Fluxomni Studio

Fluxomni Studio runs live streams on your own server. Send one stream in. Fluxomni Studio can send it out to many places at once: RTMP, SRT, or Icecast.
This repository contains self-host installation and deployment documentation only.
Install in one command
Install Fluxomni Studio:
curl -fsSL https://install.fluxomni.io | bash
By default, the installer uses the newest stable release and installs Fluxomni Studio on one server.
Use FLUXOMNI_VERSION=edge only when you want the newest main-branch build. Use a canonical public tag like v26.3.2 when you need a pinned stable release. Retained image tags require a separately reviewed recovery procedure when state has migrated.
To add a remote media server, run the same installer on that server with bash -s -- media-node.
After installation, open http://<your-server-ip>/routes and follow First Stream. It guides you through creating the first admin account, accepting an RTMP source, adding an output, verifying playback, and taking an initial backup.
Choose the next path that matches your goal:
- Run one stream on one server — Quick Start, then First Stream
- Deploy on a cloud provider — Deployment
- Secure a browser-accessible deployment — Reverse Proxy & TLS or Private Access & Tunnels
- Operate routes and media nodes — User Guide
- Automate an installation — API Automation
New in 26.3.2
Read the release notes and upgrade guide before updating custom API clients. The sizing guide separates empty routes, live inputs, and output fan-out using measured workloads.
Documentation Sections
- Quick Start — install Fluxomni Studio
- First Stream — create, publish, verify, and protect your first route
- Deployment — cloud provider guides and server provisioning
- User Guide — operate the Control Surface, including Attention, Routes, Fleet, and settings
- Configuration — configure access, networking, and runtime variables
- Monitoring, Backup & Restore, and Troubleshooting — maintain an installation
- Scenarios — choose a guided deployment pattern
- API Automation — session auth, raw GraphQL, TypeScript client, subscriptions, errors, and workflow recipes
- Changelog and Roadmap — product updates and direction
Release Channels
latest: newest stable releasevYY.Q.N: canonical public stable release tagvX.Y.Z: core image tag, accepted for direct image pinningedge: latest successful publish frommain
Support
- Found an issue? Open it in the self-host repository issue tracker
Quick Start
Get Fluxomni Studio running in minutes. Fluxomni Studio runs live streams on your own server. Send one stream in. Fluxomni Studio can send it out to many places at once: RTMP, SRT, or Icecast.
Prerequisites
- OS: Linux or macOS with Docker. Windows works through WSL2 with Ubuntu.
- Architecture: x86_64 (x64) or ARM64 (AArch64).
curlrootorsudoaccess on Debian/Ubuntu if Docker is not already installed
If Docker is already installed, the installer uses it. Installer deployments require Docker Compose 2.20 or newer; manual installs need Docker Engine with Compose v2.
One-line Install
curl -fsSL https://install.fluxomni.io | bash
By default, Fluxomni Studio installs to ~/fluxomni and follows the newest stable release channel (latest).
The installer creates one Docker Compose stack and stores data in ./data.
The web UI is included in the default install.
Install with Custom Values
This example uses the newest main-branch build and installs into /opt/fluxomni:
curl -fsSL https://install.fluxomni.io | \
FLUXOMNI_DIR=/opt/fluxomni \
FLUXOMNI_VERSION=edge \
  bash
To pin a stable release, set FLUXOMNI_VERSION=v26.3.2 or another public vYY.Q.N tag.
Use FLUXOMNI_SELFHOST_REF only when the config files must come from a different ref.
Attach Another Media Node
Before attaching a remote media node, expose 50052/tcp from the main
control-plane host only to trusted node IPs. For direct binding, set
FLUXOMNI_CONTROL_PLANE_RPC_PORT=50052 in the main install’s .env,
restart the stack, and restrict access with a firewall.
Run this on the remote media server:
curl -fsSL https://install.fluxomni.io | \
FLUXOMNI_VERSION=edge \
FLUXOMNI_CONTROL_PLANE_RPC_ENDPOINT=http://control.example.com:50052 \
FLUXOMNI_CONTROL_PLANE_INTERNAL_AUTH_TOKEN=replace-with-shared-token \
FLUXOMNI_MEDIA_NODE_PUBLIC_HOST=media2.example.com \
  bash -s -- media-node
The installer writes files to ~/fluxomni-media-node. It checks that it can reach the main Fluxomni Studio server before it starts.
Set FLUXOMNI_MEDIA_NODE_PUBLIC_HOST to the real hostname or IP for this media server.
Set FLUXOMNI_MEDIA_NODE_ENDPOINT only when the media server uses a custom gRPC endpoint.
You can also set FLUXOMNI_MEDIA_NODE_ID, FLUXOMNI_MEDIA_NODE_NAME, FLUXOMNI_MEDIA_NODE_LABELS, and FLUXOMNI_MEDIA_NODE_ZONE.
Access the Operator UI
After Fluxomni Studio starts, open http://<your-server-ip>.
Current releases use these primary operator surfaces:
/routesfor the route list/routes/:idfor an individual route workspace/fleetfor server health
Manual Install
ASSET_REF=main # or a published versioned self-host ref, for example v26.3.2
mkdir -p ~/fluxomni
cd ~/fluxomni
curl -fsSL "https://raw.githubusercontent.com/fluxomnia-systems/fluxomni-selfhost/${ASSET_REF}/docker-compose.yml" -o docker-compose.yml
curl -fsSL "https://raw.githubusercontent.com/fluxomnia-systems/fluxomni-selfhost/${ASSET_REF}/.env.example" -o .env.example
AUTH_TOKEN="$(openssl rand -hex 24)"
IMAGE_TAG="${ASSET_REF}"
if [ "${IMAGE_TAG}" = "main" ]; then
  IMAGE_TAG="latest"
elif [[ "${IMAGE_TAG#v}" =~ ^[0-9]{2}\.[1-4]\.[0-9]+$ ]]; then
  VERSION_MAP="$(mktemp)"
  curl -fsSL "https://raw.githubusercontent.com/fluxomnia-systems/fluxomni-selfhost/${ASSET_REF}/scripts/generated-version-map.sh" -o "${VERSION_MAP}"
  . "${VERSION_MAP}"
  RESOLVED_IMAGE_TAG="$(generated_public_release_alias "${IMAGE_TAG}" 2>/dev/null || true)"
  rm -f "${VERSION_MAP}"
  if [ -n "${RESOLVED_IMAGE_TAG}" ]; then
    IMAGE_TAG="${RESOLVED_IMAGE_TAG}"
  fi
fi
cat > .env <<ENVVARS
FLUXOMNI_VERSION=${IMAGE_TAG}
FLUXOMNI_PUBLIC_HOST=127.0.0.1
FLUXOMNI_MEDIA_NODE_PUBLIC_HOST=127.0.0.1
FLUXOMNI_FRONTEND_IMAGE=ghcr.io/fluxomnia-systems/fluxomni-frontend
FLUXOMNI_CONTROL_PLANE_IMAGE=ghcr.io/fluxomnia-systems/fluxomni-control-plane
FLUXOMNI_MEDIA_NODE_IMAGE=ghcr.io/fluxomnia-systems/fluxomni-media-node
FLUXOMNI_CONTROL_PLANE_INTERNAL_AUTH_TOKEN=${AUTH_TOKEN}
FLUXOMNI_FRONTEND_HTTP_PORT=80
FLUXOMNI_CONTROL_PLANE_RPC_PORT=127.0.0.1:50052
FLUXOMNI_MEDIA_NODE_RTMP_PORT=1935
FLUXOMNI_MEDIA_NODE_HLS_PORT=8000
FLUXOMNI_MEDIA_NODE_SRT_PORT=10080
FLUXOMNI_CONTROL_PLANE_DATA_DIR=./data
FLUXOMNI_MEDIA_NODE_DATA_DIR=./data
FLUXOMNI_SHARED_VIDEO_DIR=./data/videos
ENVVARS
mkdir -p data/videos data/dvr data/srs-http
touch data/state.db
docker compose up -d
Then open http://<your-server-ip>/routes.
Auto-Updates
Keep automatic updates disabled for capacity-ledger builds. Watchtower cannot coordinate the cluster drain and shutdown proofs required before container recreation. For existing installations, use Capacity Ledger Upgrades.
To stop an updater enabled by an earlier deployment:
docker compose --profile auto-update stop watchtower
Next Steps
- Complete First Stream to create an account, publish a route, add an output, and verify playback
- Configure authentication and settings
- Use private access and tunnels for Tailscale or Cloudflare Tunnel deployments
- Review cloud deployment guides
- Use troubleshooting if startup fails
For per-node playlist normalization CPU/memory/thread budgets, see Offline Preparation Resource Limits.
First Stream
Use this tutorial after installing Fluxomni Studio to create a protected operator account, accept one RTMP stream, send it to one destination, and confirm that it is live.
Before you begin
You need a running single-host installation and an encoder that can publish RTMP, such as OBS or FFmpeg. Open http://<your-server-ip>/routes in a browser.
This tutorial uses the default single-host media node. If you are deploying behind a domain or reverse proxy, configure the public host values first so generated ingest and playback URLs are usable. See Configuration and Reverse Proxy & TLS.
Create the first operator account
A new installation can initially open as an Open shell. Create a named account before using the instance for production:
- In the sidebar, open Settings, then Users.
- Enter a username, optional display name, and a strong password.
- Select Create user.
The first persisted user becomes an Admin and enables named-user sign-in. Keep the credentials in your password manager. For the full account and role model, see Settings.
Create an RTMP route
- In the sidebar, open Routes and select + New Route.
- Enter a route label, such as
Main broadcast. - Under Primary Live Source, choose RTMP and Accept publish.
- Select Create route.
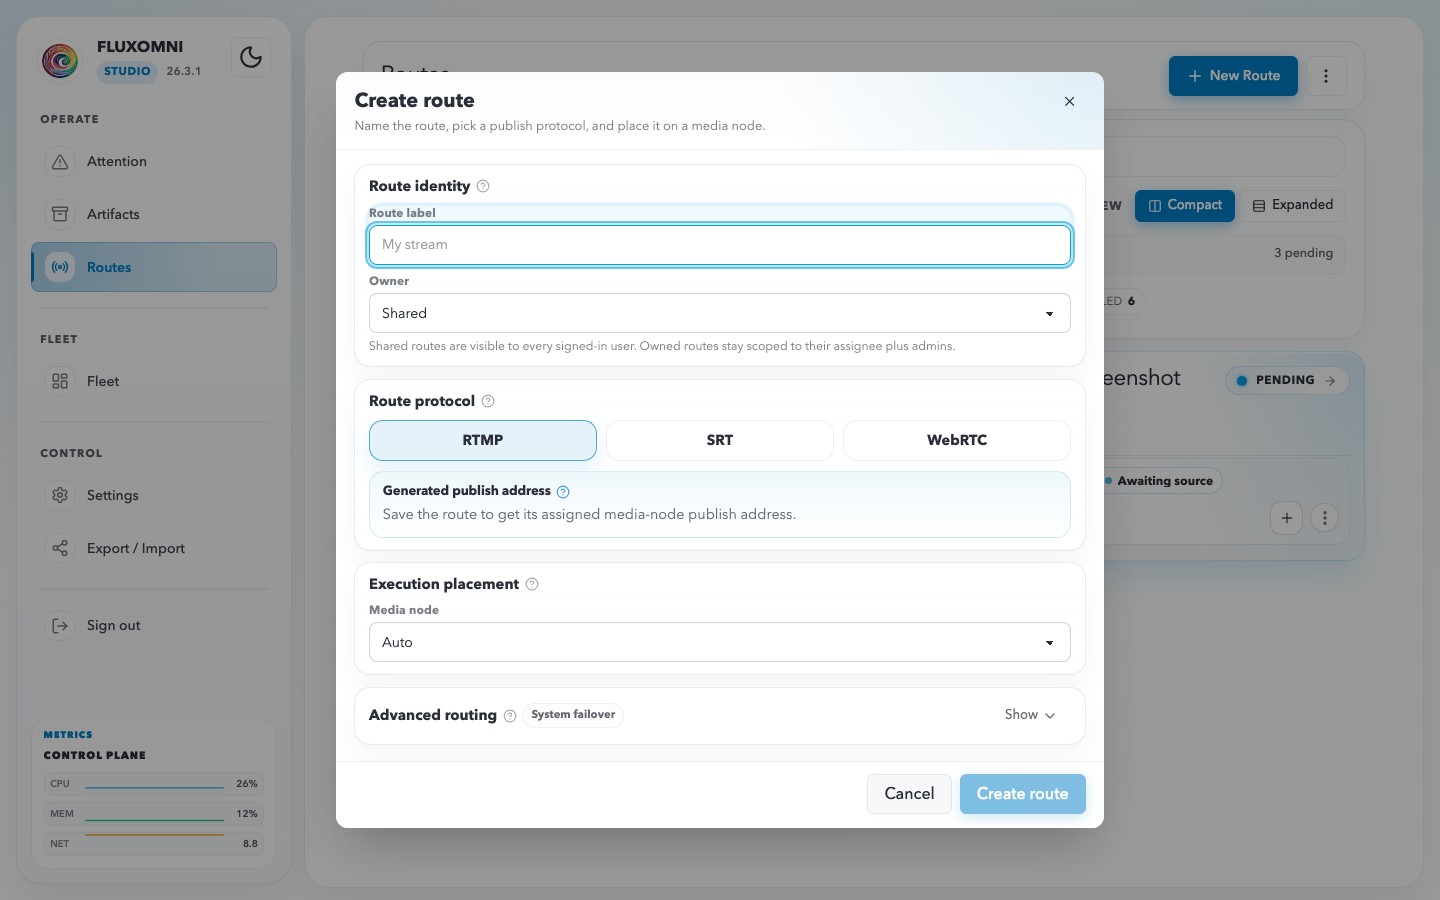
After Fluxomni Studio assigns the route to its media node, open the route workspace. In Routing, use the copy control in the input lane to copy the generated RTMP publish address.
Publish from OBS
Open the route workspace and copy the publish URL from Sources → Live Sources. For SRT or WebRTC, create the route with that protocol and Accept publish instead of RTMP. Use the copied URL, including any nonstandard port; an unavailable URL means the route or media node is not ready to accept that protocol.
RTMP
In OBS, open Settings → Stream and select Service: Custom. Split the copied URL at the final /:
- Copied URL:
rtmp://media.example.com:1935/live/pk_example - Server:
rtmp://media.example.com:1935/live - Stream Key:
pk_example
Use H.264 video and AAC audio, select Apply, then Start Streaming.
SRT
In Settings → Stream, select Service: Custom, paste the complete copied SRT URL into Server, and leave Stream Key empty. Keep the streamid and any latency or passphrase parameters intact. OBS connects in caller mode by default.
Use H.264 video and AAC audio, select Apply, then Start Streaming. See the official OBS SRT streaming guide.
WebRTC / WHIP
In Settings → Stream, select Service: WHIP and paste the complete copied HTTP WHIP URL into Server, for example:
http://media.example.com:8003/rtc/v1/whip/?app=live&stream=pk_example
Leave Bearer Token empty: Fluxomni includes the publishing credential in the URL’s stream parameter. Use H.264 video and Opus audio, select Apply, then Start Streaming.
Choose WHIP, not Custom: pasting this HTTP URL into Custom leaves OBS using RTMP and causes a handshake failure. If WHIP is missing, use an OBS build that supports it. See the official OBS WHIP streaming guide.
WHIP requires a media node with public gateway support. Both signaling TCP (default 8003) and RTC media UDP (default 8000) must be reachable from OBS, and the node must advertise a reachable ICE candidate. Use your deployment’s actual ports; reaching the web UI alone does not establish media connectivity.
Confirm publishing
The source should become live and the route monitor should show your media. If OBS reports Failed to connect to server, check the selected service, copied address, and reachable protocol ports. Keep publish URLs private: they authorize publishing to the route. For other encoders, use the same copied endpoint with the matching publishing protocol. See Troubleshooting.
Add one output
- In the route workspace, open Routing and select + Add output.
- Paste the destination URL supplied by your streaming platform.
- Optionally add a label that identifies the destination.
- Save the output.
A real platform destination can begin receiving the stream as soon as the encoder publishes. Confirm the selected destination and its stream key before you start the encoder.
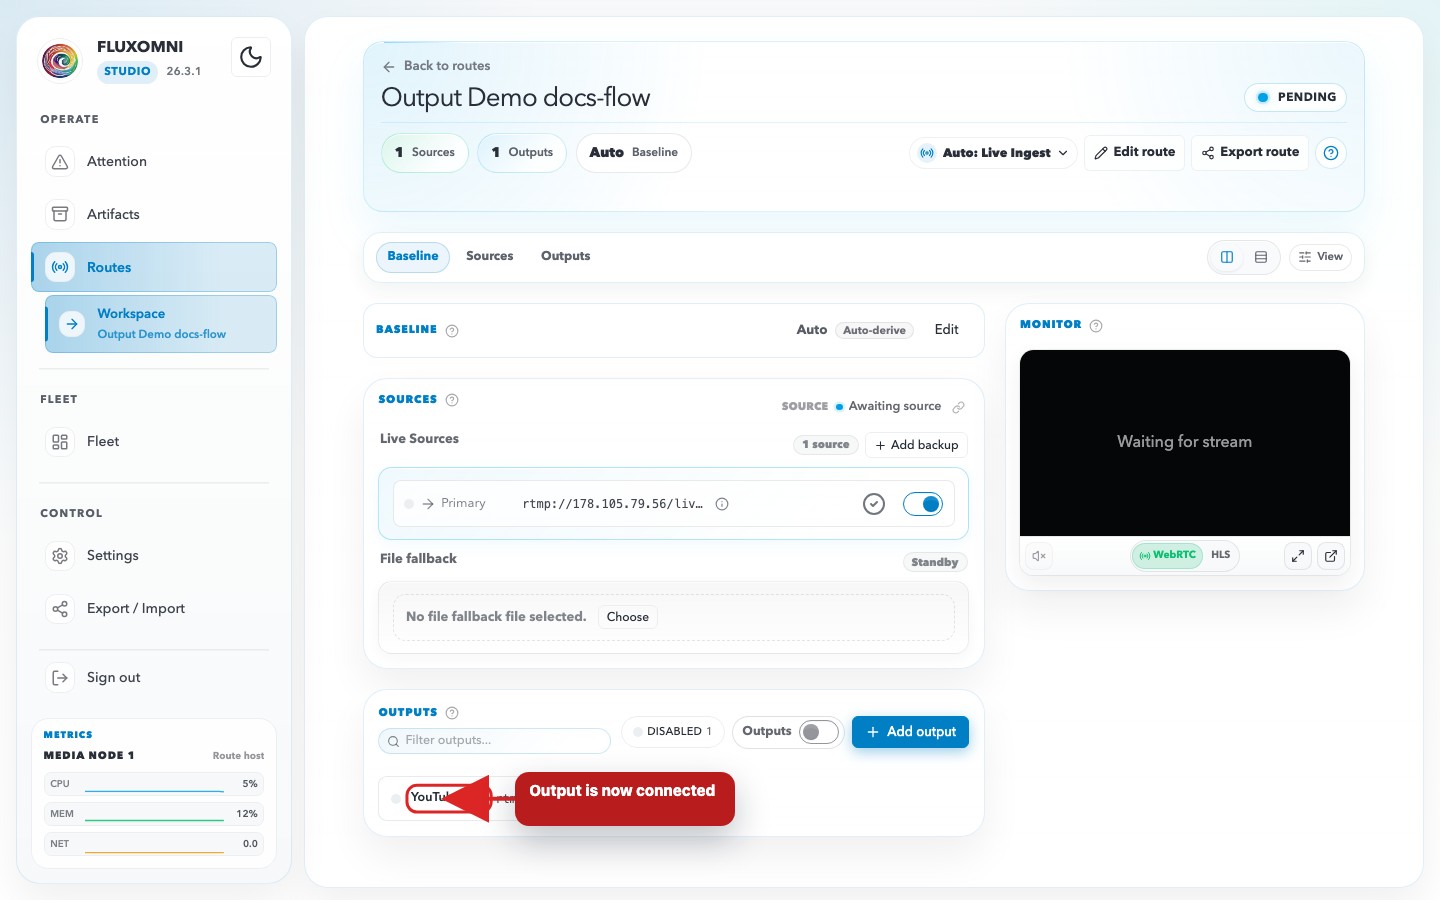
Fluxomni Studio supports RTMP/RTMPS, SRT, Icecast, and file output destinations. Use an RTMP or RTMPS destination for a typical streaming platform.
Verify the stream
Confirm all of the following before relying on the route:
- The route header shows LIVE.
- The Live playback panel shows LIVE and the expected outgoing stream when a playback URL is available.
- The destination has received the expected stream.
- Attention has no active Critical alert for the route or its media node.
The Routes guide explains the workspace, output states, preview, playlists, and route-level alerts in more detail.
Protect your configuration
Create a backup after this first successful stream. From the install directory, stop the stack, archive data/ and .env, then start the stack again as described in Backup & Restore.
Next steps
- Routes — add backups, playlists, and more outputs
- Reverse Proxy & TLS — serve the operator UI securely on a domain
- Monitoring — monitor route and media-node health
- Backup & Restore — establish a regular backup routine
Deployment
Fluxomni Studio deploys to Docker hosts on Linux, macOS, or Windows (WSL2 Ubuntu).
The installer downloads the stack, starts it, and can install Docker on Debian/Ubuntu. Firewall configuration is opt-in: enable it with WITH_UFW=1 or WITH_FIREWALLD=1 when running the installer.
Quick Install
curl -fsSL https://install.fluxomni.io | bash -s
On Debian/Ubuntu hosts, this automatically installs Docker if it is missing.
The default install path is ~/fluxomni.
General Requirements
- Supported platforms: Linux x64/ARM64, macOS x64/Apple Silicon, Windows (WSL2 Ubuntu)
- Recommended server OS: Ubuntu 24.04 LTS
- Architecture: x86_64 (x64) or ARM64 (AArch64)
- Docker: Engine with Compose v2 — the installer bootstraps Docker automatically on Debian/Ubuntu
- Ports: see the Configuration page for the full port list
For the smallest restreaming workloads, a 1-vCPU / 1 GB instance is usually enough. If you plan to run many concurrent routes or use transcoding, size up accordingly.
Cloud Provider Guides
Step-by-step instructions for creating a server and auto-installing Fluxomni Studio:
- DigitalOcean — Droplets
- Hetzner Cloud — Cloud Servers
- Oracle Cloud — OCI Compute (includes Free Tier notes)
- VScale / Selectel — Moscow / St. Petersburg regions
Each guide ends with Fluxomni Studio running at http://<server-ip>/routes.
Installer Variables
The installer accepts environment variables to control its behavior. Pass them before the pipe, for example:
curl -fsSL https://install.fluxomni.io | WITH_UFW=1 FLUXOMNI_VERSION=edge bash -s
Server provisioning
WITH_INITIAL_UPGRADE=1— runapt-get upgradebefore installing (useful for fresh servers)WITH_UFW=1— install and configure ufw with the required Fluxomni Studio portsWITH_FIREWALLD=1— install and configure firewalld instead of ufw (required for Oracle Cloud)ALLOWED_IPS— comma-separated list of IPs to allow through the firewall (default:*for all)
Install target
FLUXOMNI_DIR— install path (default:~/fluxomni, or~/fluxomni-media-nodefor media-node installs)FLUXOMNI_VERSION— image tag:latest(default),edge, canonical publicvYY.Q.N, or core-imagevX.Y.ZFLUXOMNI_FRONTEND_IMAGE— override frontend image repositoryFLUXOMNI_CONTROL_PLANE_IMAGE— override control-plane image repositoryFLUXOMNI_MEDIA_NODE_IMAGE— override media-node image repositoryFLUXOMNI_IMAGE— legacy base repository override (derives split image names when explicit variables are unset)FLUXOMNI_SELFHOST_REF— force a specific self-host config bundle refFLUXOMNI_REPO_RAW— override the raw asset base entirely
Media-node mode
Install a standalone media-node by passing media-node as a positional argument:
FLUXOMNI_CONTROL_PLANE_RPC_ENDPOINT=http://control.example.com:50052 \
FLUXOMNI_CONTROL_PLANE_INTERNAL_AUTH_TOKEN=replace-with-shared-token \
FLUXOMNI_MEDIA_NODE_PUBLIC_HOST=media2.example.com \
  curl -fsSL https://install.fluxomni.io | bash -s -- media-node
Required variables: FLUXOMNI_CONTROL_PLANE_RPC_ENDPOINT, FLUXOMNI_CONTROL_PLANE_INTERNAL_AUTH_TOKEN, and FLUXOMNI_MEDIA_NODE_PUBLIC_HOST.
Optional media-node overrides: FLUXOMNI_MEDIA_NODE_ENDPOINT, FLUXOMNI_MEDIA_NODE_ID, FLUXOMNI_MEDIA_NODE_NAME, FLUXOMNI_MEDIA_NODE_LABELS, FLUXOMNI_MEDIA_NODE_ZONE.
Release Channels
latest: newest stable releasevYY.Q.N: canonical public stable release tag, e.g.v26.2.4vX.Y.Z: core image tag, accepted for direct image pinning, e.g.v0.13.0edge: latest successful publish frommain
When FLUXOMNI_VERSION is pinned, the installer first tries the same self-host ref, then its public/core alias when applicable, and falls back to main if no versioned self-host assets are published yet.
After Deployment
Once the stack is running:
- Configuration — environment variables, release channels, attaching media nodes
- Troubleshooting — logs, common issues, rollback
- User Guide — operating the control surface
How to Deploy Fluxomni Studio to DigitalOcean
This guide provides a common and recommended way to deploy Fluxomni Studio as a standalone droplet on DigitalOcean.
0. Prerequisites
You should have a registered account on DigitalOcean with a payment method attached to it.
1. Create Droplet
Open the droplet creation page.
1.1. Choose an Image
Select Ubuntu 24.04 LTS.
Supported platforms:
- Linux x64 / ARM64
- macOS x64 / Apple Silicon
- Windows (WSL2 Ubuntu)
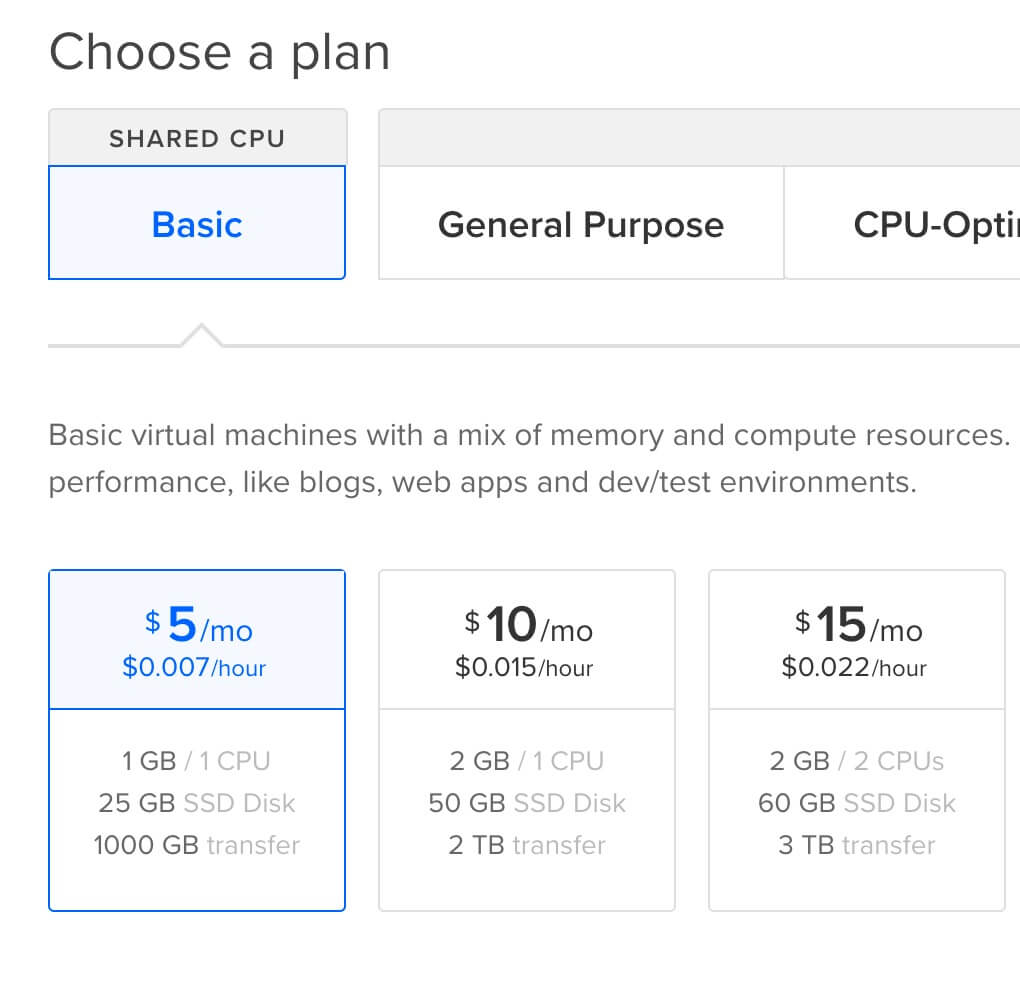
1.2. Choose a Plan
For simple restreaming, the cheapest plan should be sufficient. If you plan to run a large number of streams or require transcoding, consider a more powerful plan.
1.3. Add Volume (Optional)
NOTE: Skip this step if you do not plan to record streams to files.
If you intend to record live streams, you may need more disk space than the default provided. You can attach an external block storage volume to the droplet.

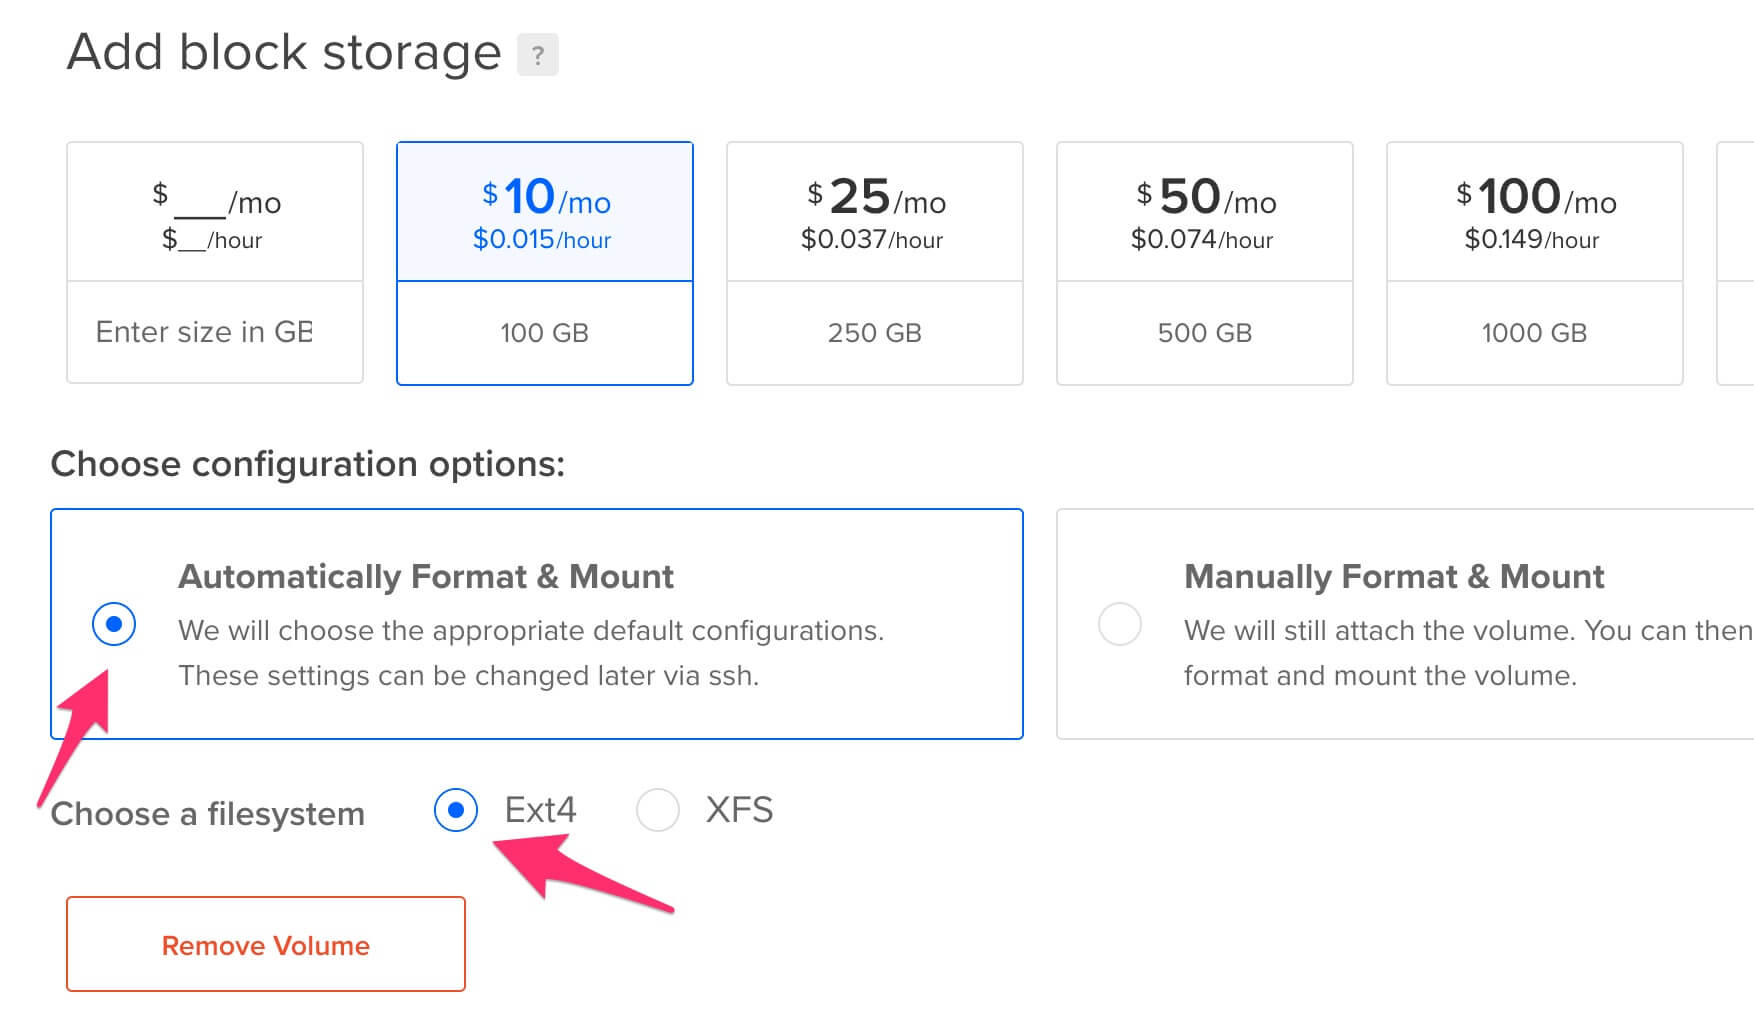
The installer will automatically detect and use the attached volume for Fluxomni Studio.
1.4. Choose a Datacenter Region
Select a region that is geographically close to both your stream source and your destination endpoints to minimize latency.
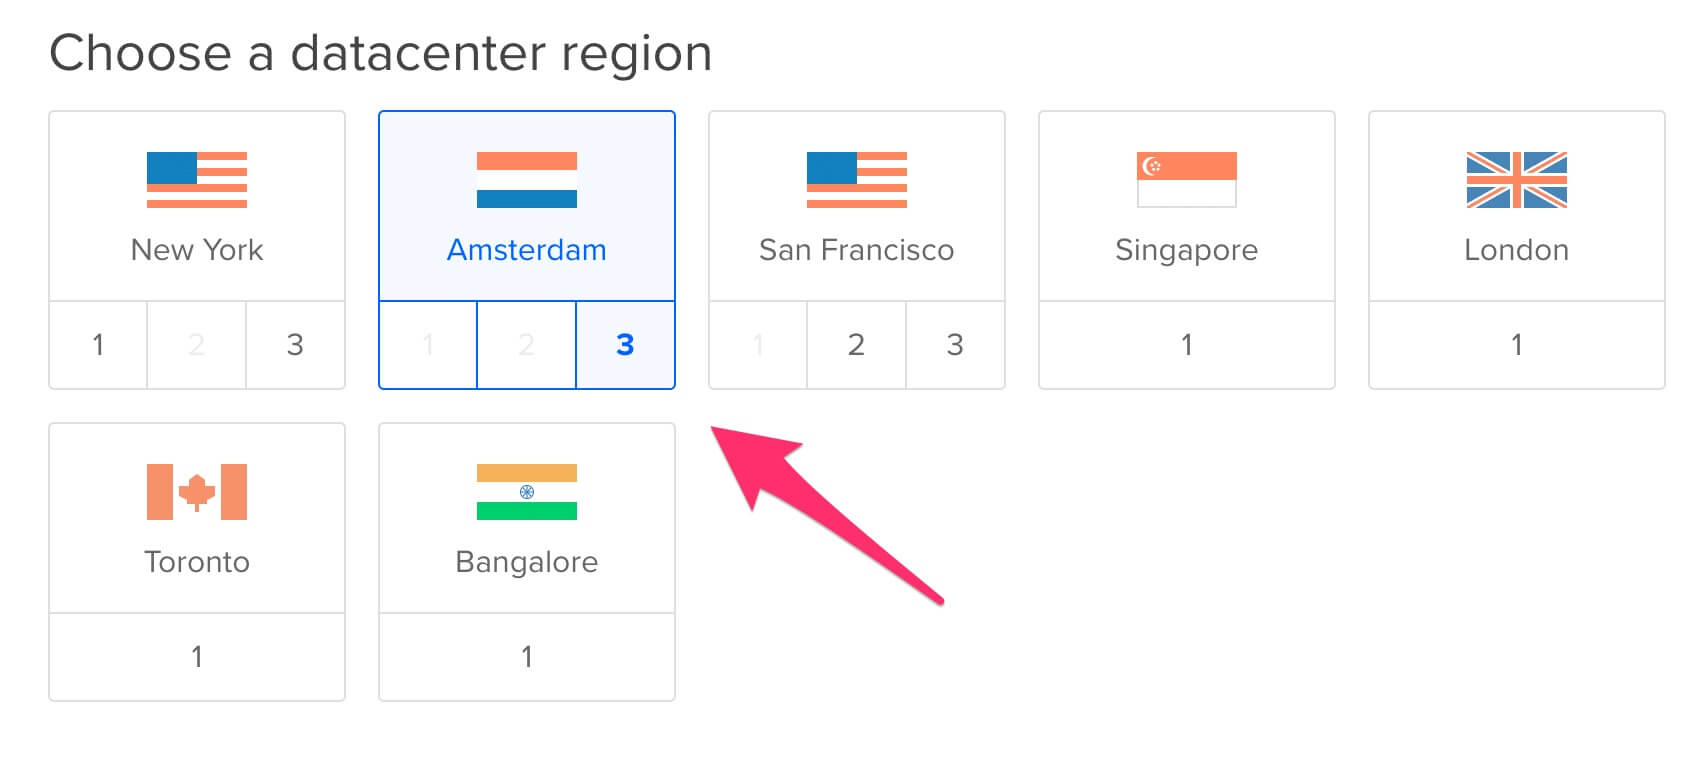
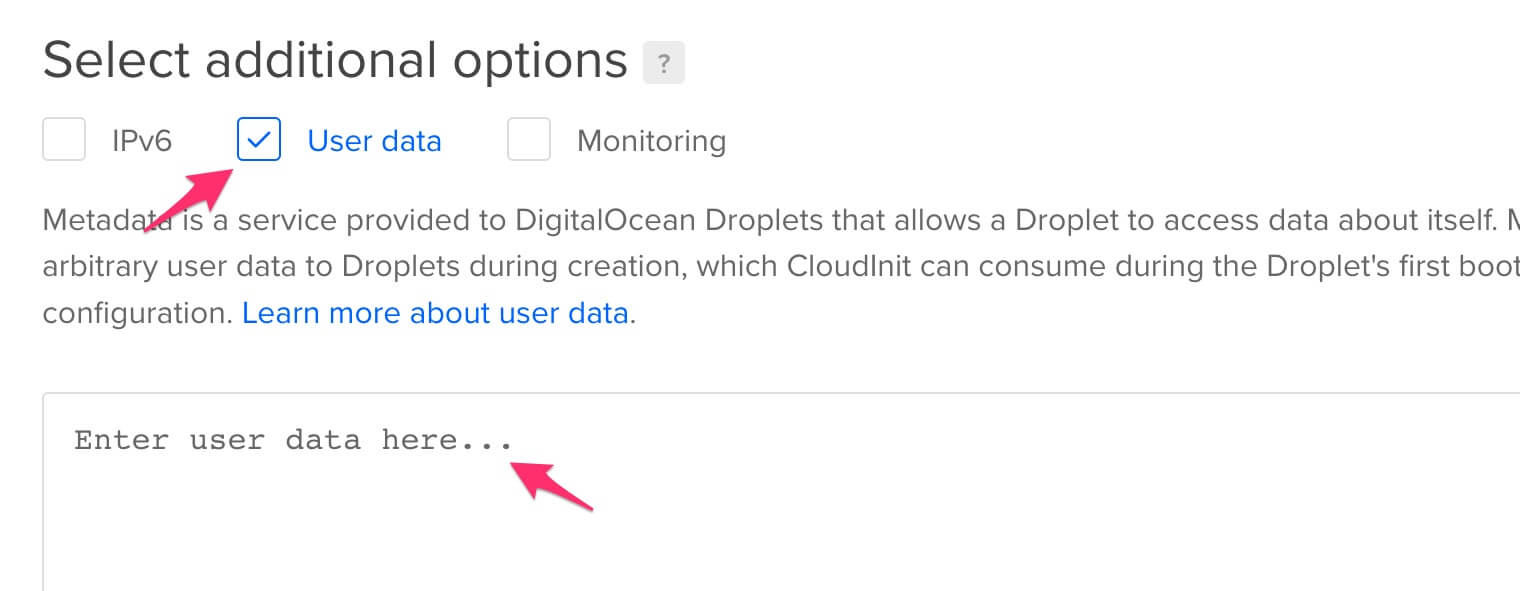
1.5. Add User Data
To automatically install Fluxomni Studio on the new droplet, paste the following script into the User data field. This runs once when the droplet is first created and also configures a firewall with the required ports.
#!/bin/bash
curl -fsSL https://install.fluxomni.io | WITH_UFW=1 bash -s
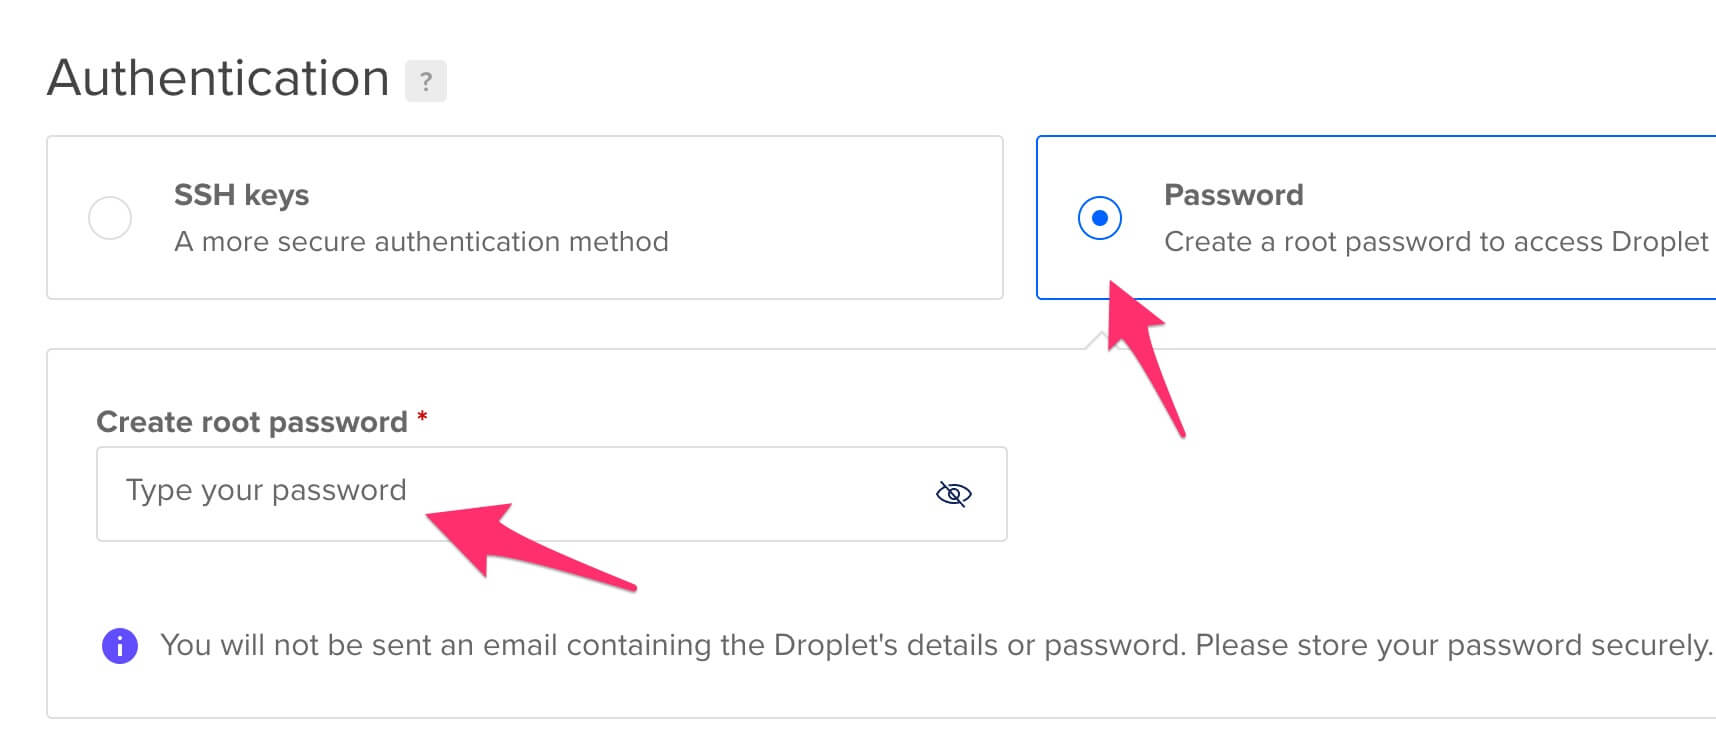
1.6. Select Authentication Method
DigitalOcean requires an authentication method to access the droplet. You can use an SSH key (recommended) or set a root password. This is for managing the server itself; it is not required for using the Fluxomni Studio application.
1.7. Finalize and Create
Choose a hostname for your droplet to easily identify it later. You can leave the other settings at their defaults.
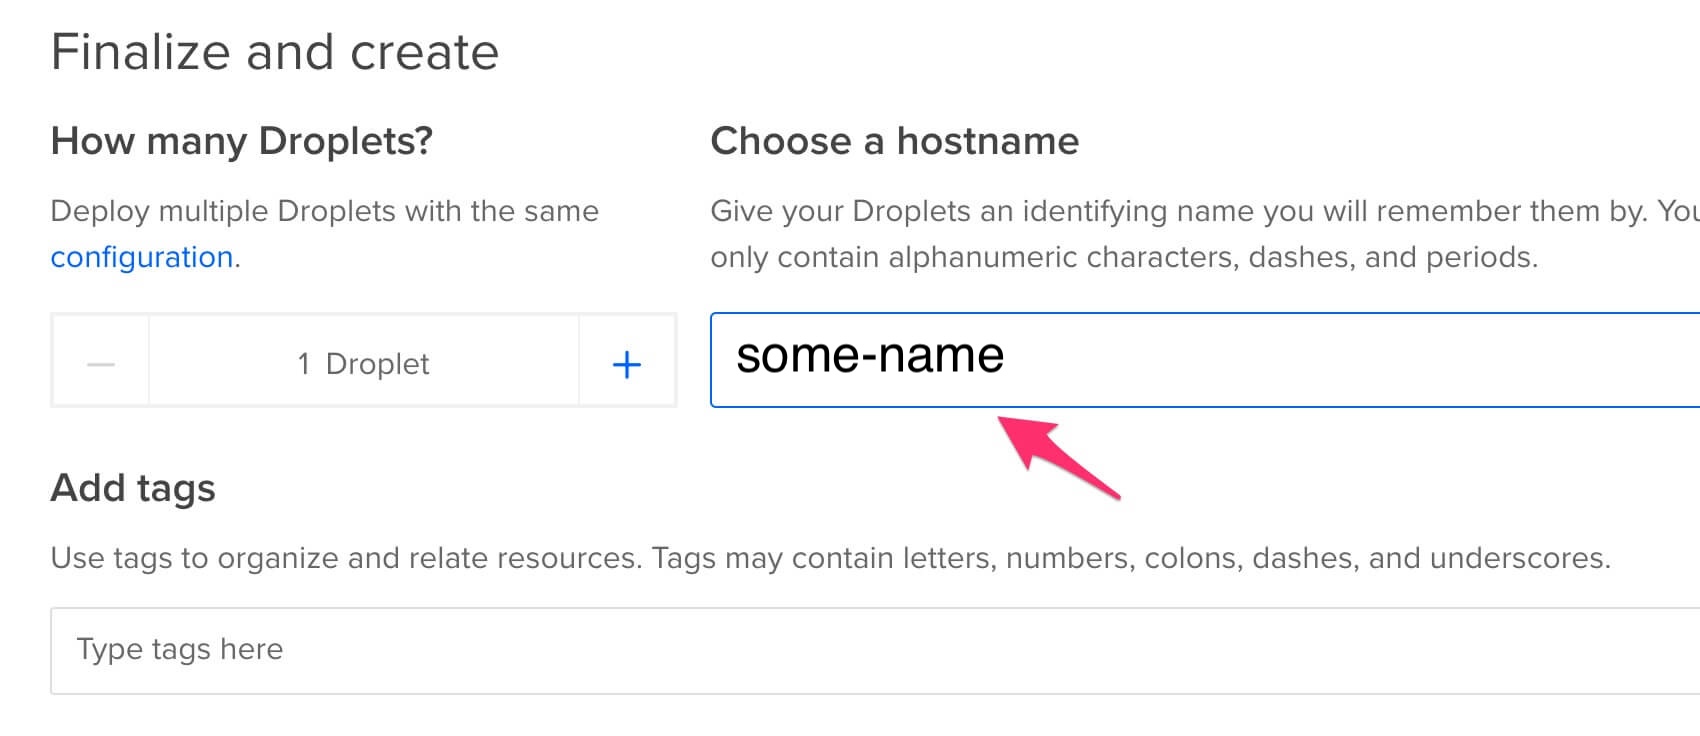
Click Create Droplet to begin provisioning.
2. Access Fluxomni Studio
After you launch the droplet, allow 5-15 minutes for the provisioning and installation to complete.
You can find the IP address of your droplet in the DigitalOcean control panel.

Open your web browser and navigate to the IP address of the droplet.
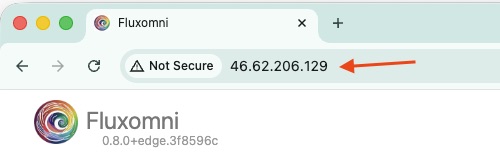
Current releases serve the operator UI from the frontend container.
Use /routes for route management and /fleet to inspect attached media nodes.
NOTE: By default, Fluxomni Studio is served over
http://. For production use, it is highly recommended to set up a domain name and configure a reverse proxy (e.g., Nginx or Caddy) to enablehttps://for secure access.
Next, complete First Stream to create a protected operator account and verify one live route.
How to Deploy Fluxomni Studio to Hetzner Cloud
This guide provides a common and recommended way to deploy Fluxomni Studio as a standalone server on Hetzner Cloud.
0. Prerequisites
You should have a registered account on Hetzner Cloud with a payment method attached and a Project created.
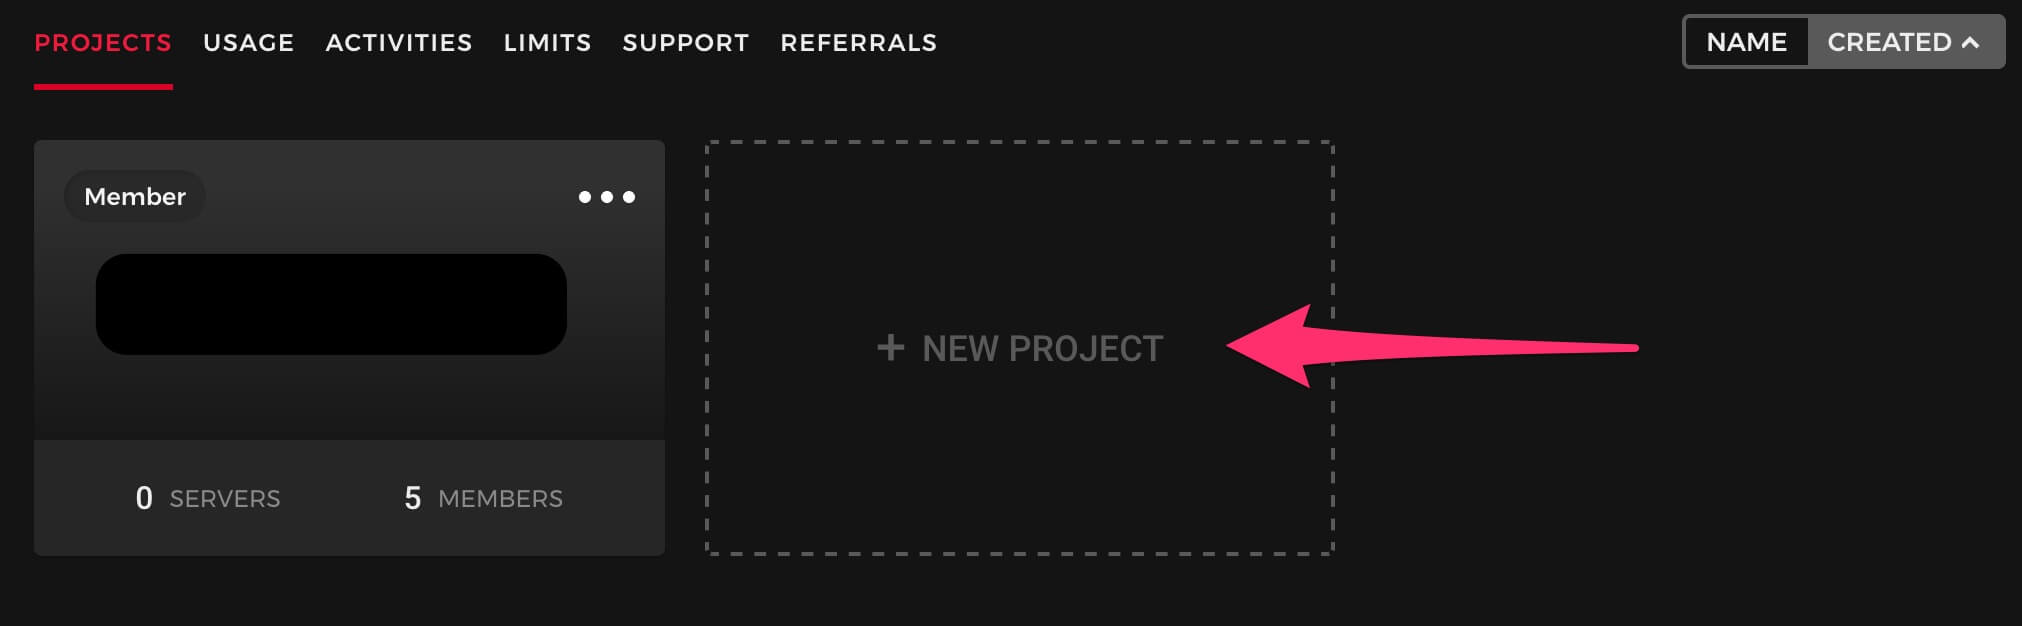
1. Create Server
From your project dashboard, click to create a new server.
1.1. Choose a Location
Select a location that is geographically close to both your stream source and your destination endpoints to minimize latency.

1.2. Choose an Image
Select Ubuntu 24.04.
Supported platforms:
- Linux x64 / ARM64
- macOS x64 / Apple Silicon
- Windows (WSL2 Ubuntu)
1.3. Choose a Type
For simple restreaming, the cheapest plan (e.g., CX11) should be sufficient. If you plan to run a large number of streams or require transcoding, consider a more powerful server type.
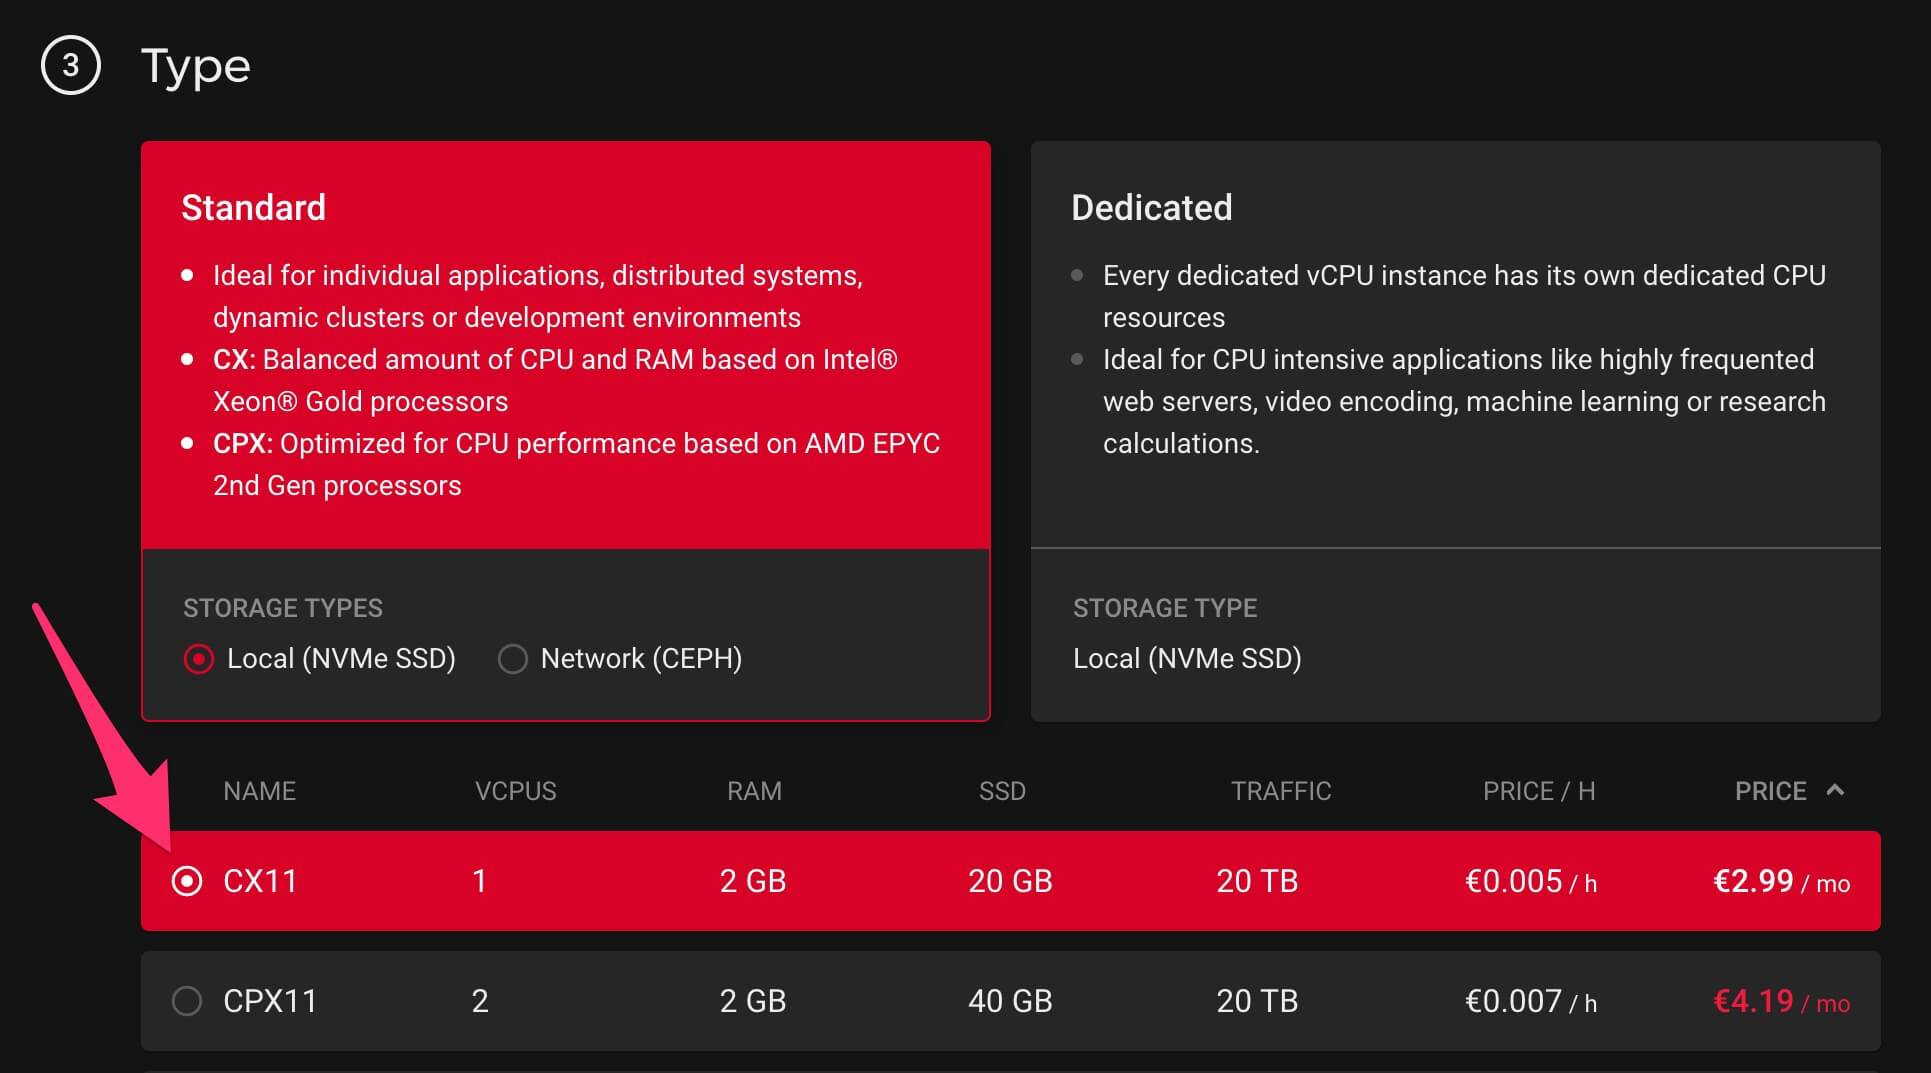
1.4. Add Volume (Optional)
NOTE: Skip this step if you do not plan to record streams to files.
If you intend to record live streams, you may need more disk space than the default provided. You can attach an external volume to the server.
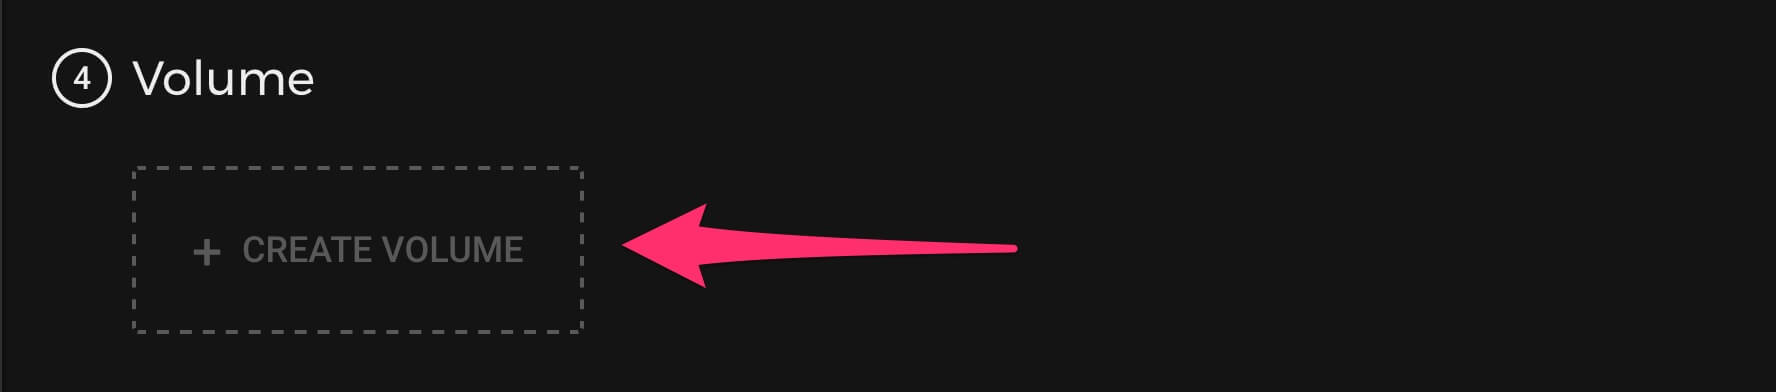
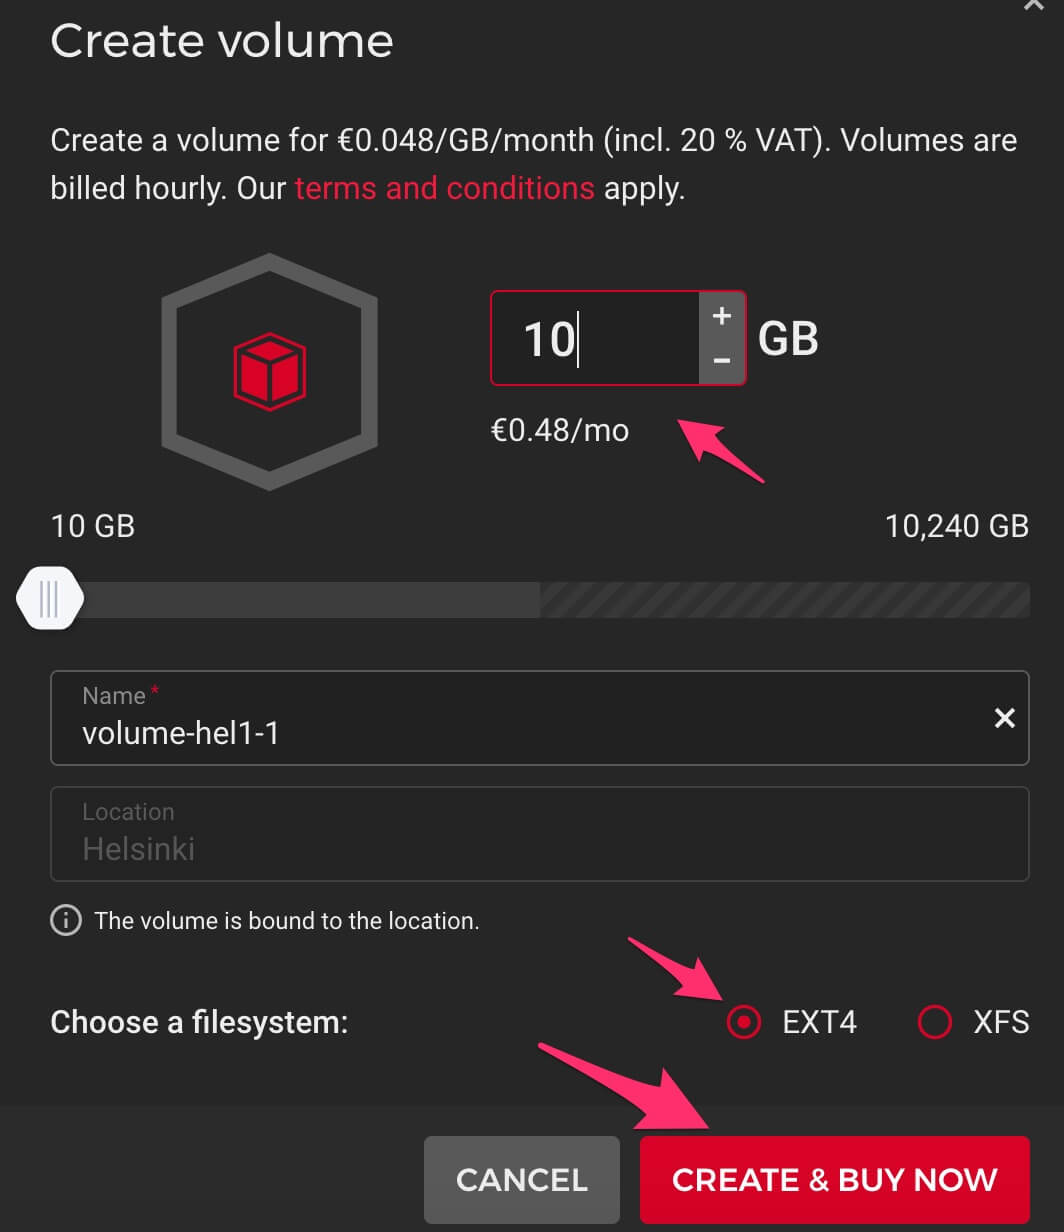
The installer will automatically detect and use the attached volume for Fluxomni Studio.
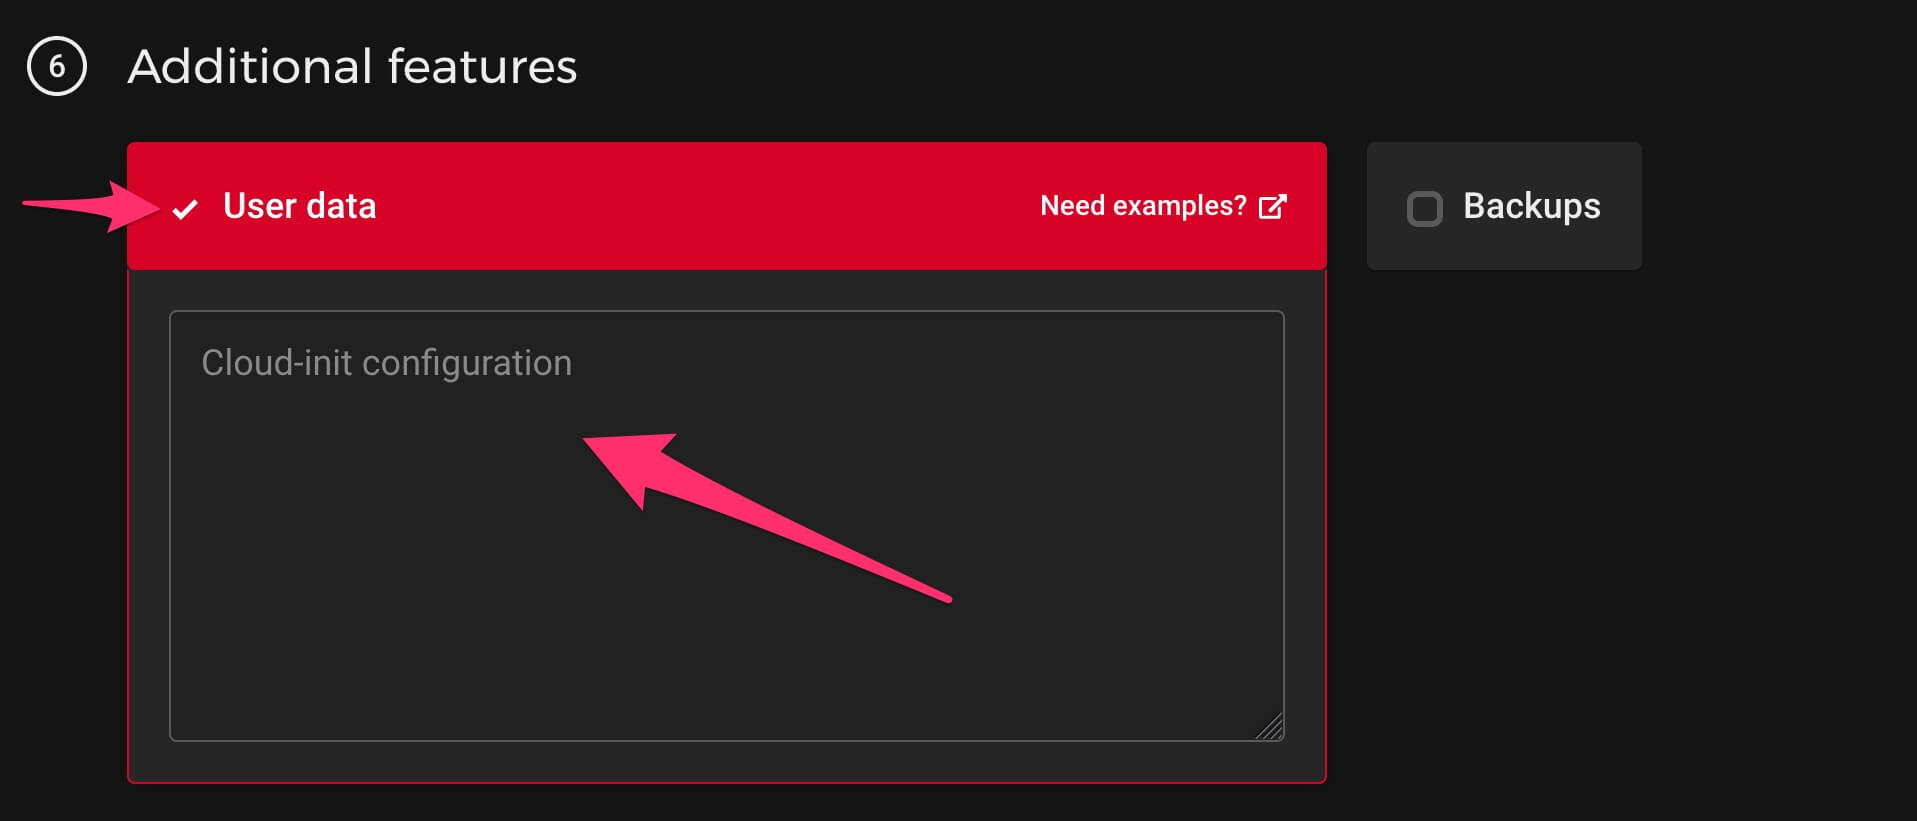
1.5. Add User Data
To automatically install Fluxomni Studio on the new server, paste the following script into the User data field. This runs once when the server is first created and also configures a firewall with the required ports.
#!/bin/bash
curl -fsSL https://install.fluxomni.io | WITH_UFW=1 bash -s
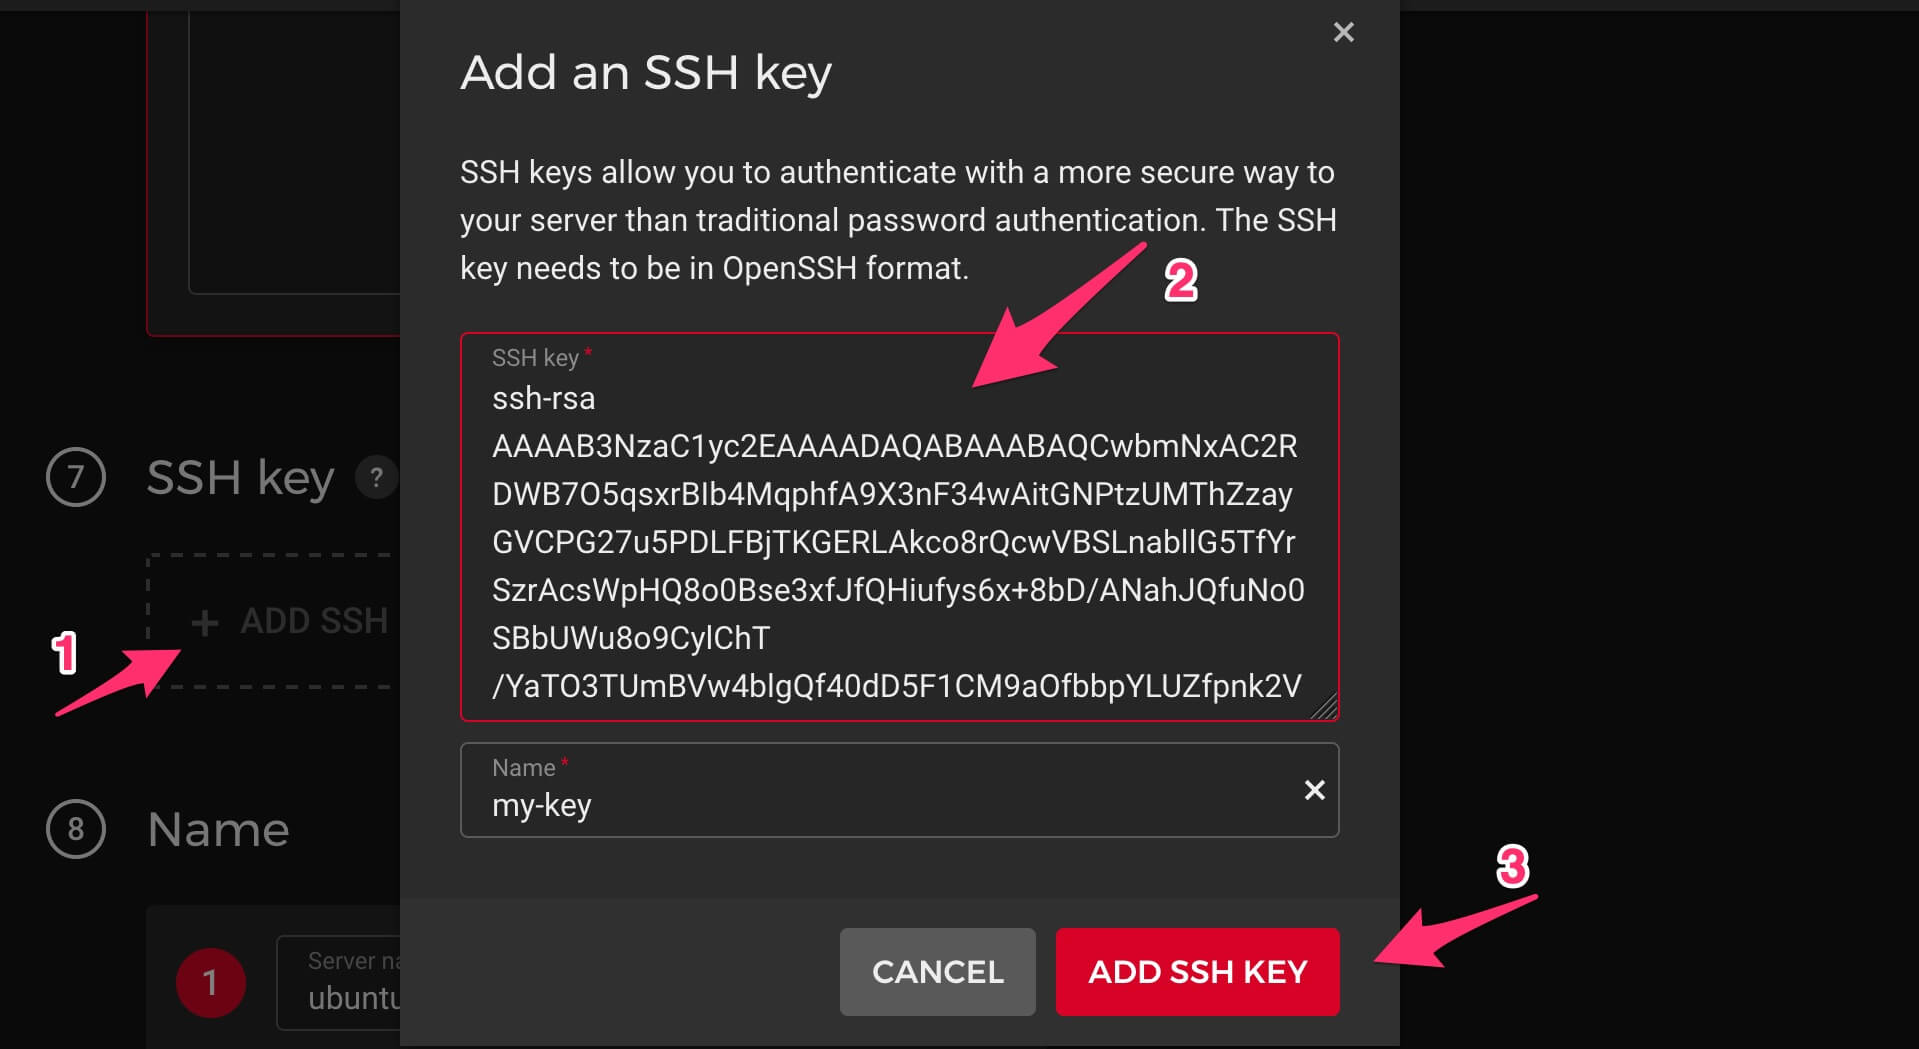
1.6. Add an SSH Key
Hetzner Cloud requires an SSH key to access the server. This is for managing the server itself; it is not required for using the Fluxomni Studio application.
1.7. Finalize and Create
Choose a name for your server to easily identify it later. You can leave the other settings at their defaults.

Click Create & Buy Now to begin provisioning.
2. Access Fluxomni Studio
After you launch the server, allow 5-15 minutes for the provisioning and installation to complete.
You can find the IP address of your server in the Hetzner Cloud console.

Open your web browser and navigate to the IP address of the server.
Current releases serve the operator UI from the frontend container.
Use /routes for route management and /fleet to inspect attached media nodes.
NOTE: By default, Fluxomni Studio is served over
http://. For production use, it is highly recommended to set up a domain name and configure a reverse proxy (e.g., Nginx or Caddy) to enablehttps://for secure access.
Next, complete First Stream to create a protected operator account and verify one live route.
How to Deploy Fluxomni Studio to Oracle Cloud Infrastructure
This guide provides a common and recommended way to deploy Fluxomni Studio as a standalone instance on Oracle Cloud Infrastructure (OCI).
OCI can be a cost-effective option due to its Free Tier instances. However, be aware that their resources and bandwidth are limited and may not be suitable for a large number of high-bitrate streams.
NOTE: The official bandwidth for a Free Tier VM instance is often higher than the real-world performance. Expect around 50 Mbps, which is enough for up to 8 streams at 5000 kbps each.
0. Prerequisites
You should have a registered account on Oracle Cloud Infrastructure. The registration process can be lengthy and requires careful data entry.
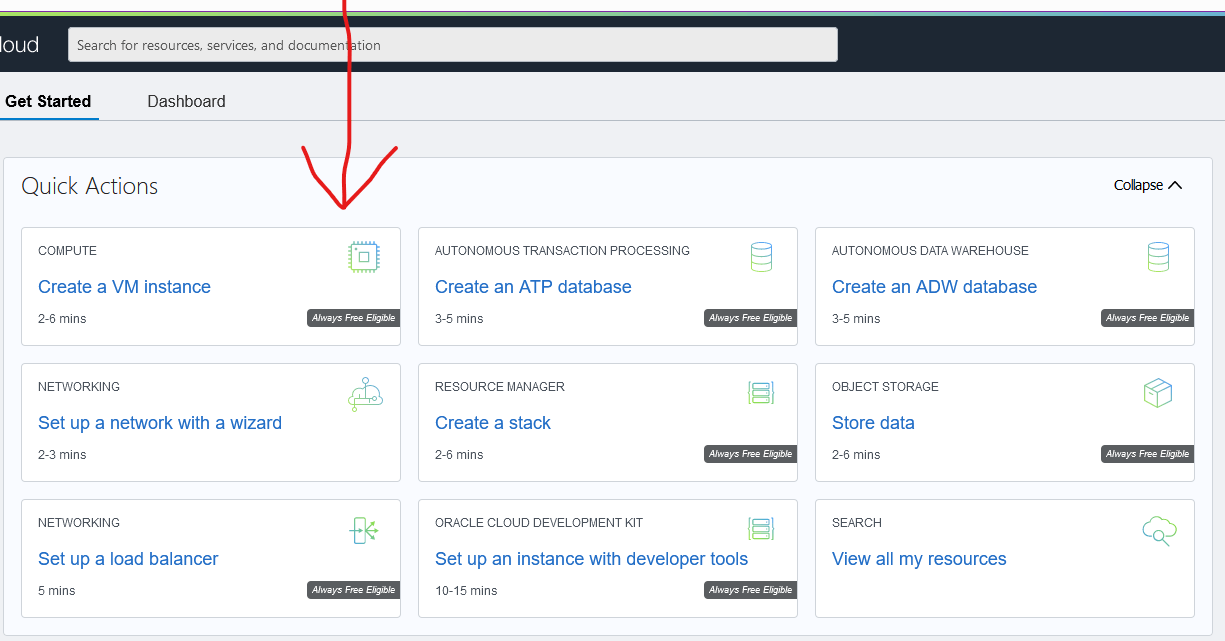
1. Create VM Instance
From the OCI console, select Create a VM instance.
1.1. Name and Compartment
Choose a name for your instance. Then, click Edit in the “Placement and hardware” section to customize the configuration.
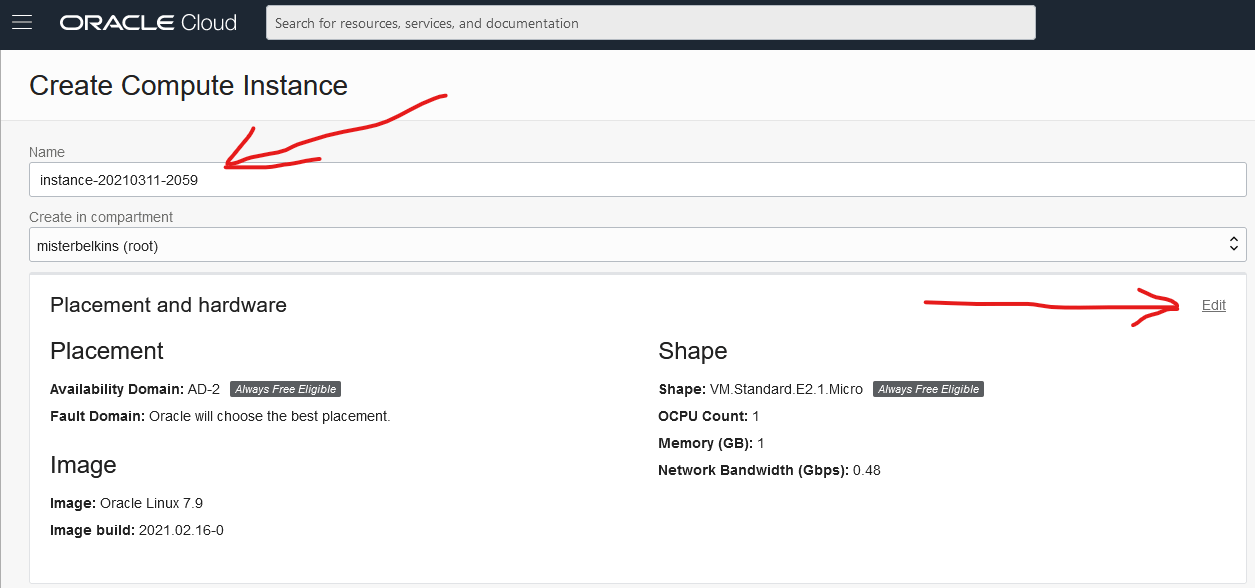
1.2. Choose an Image
Click Change image and select Canonical Ubuntu 24.04.
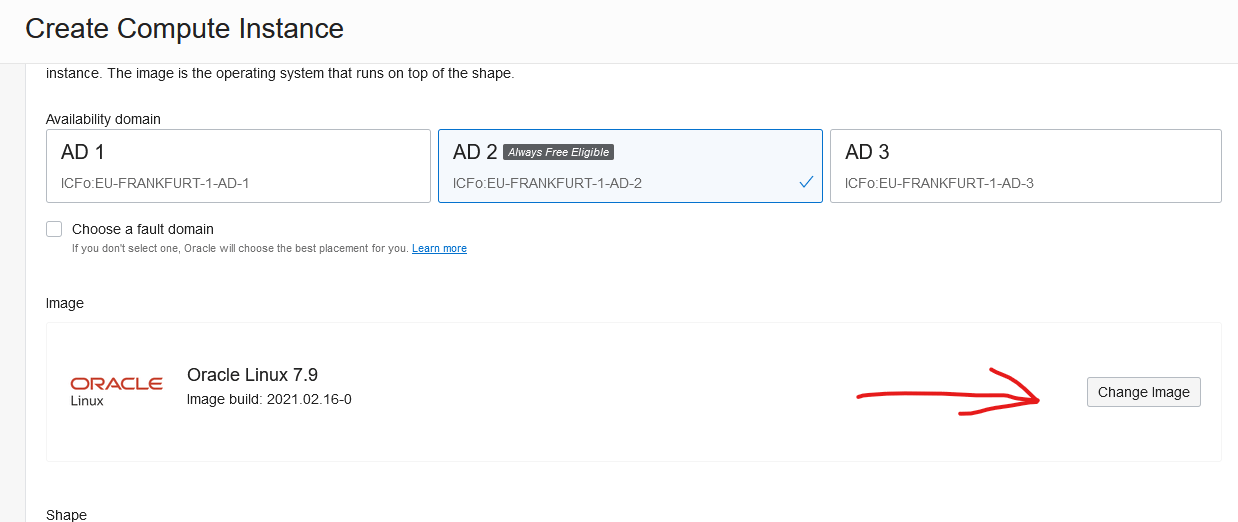
Supported platforms:
- Linux x64 / ARM64
- macOS x64 / Apple Silicon
- Windows (WSL2 Ubuntu)
1.3. Choose a Shape
For simple restreaming, a Free Tier eligible shape (e.g., VM.Standard.A1.Flex) should be sufficient. For more demanding workloads, choose a more powerful shape.
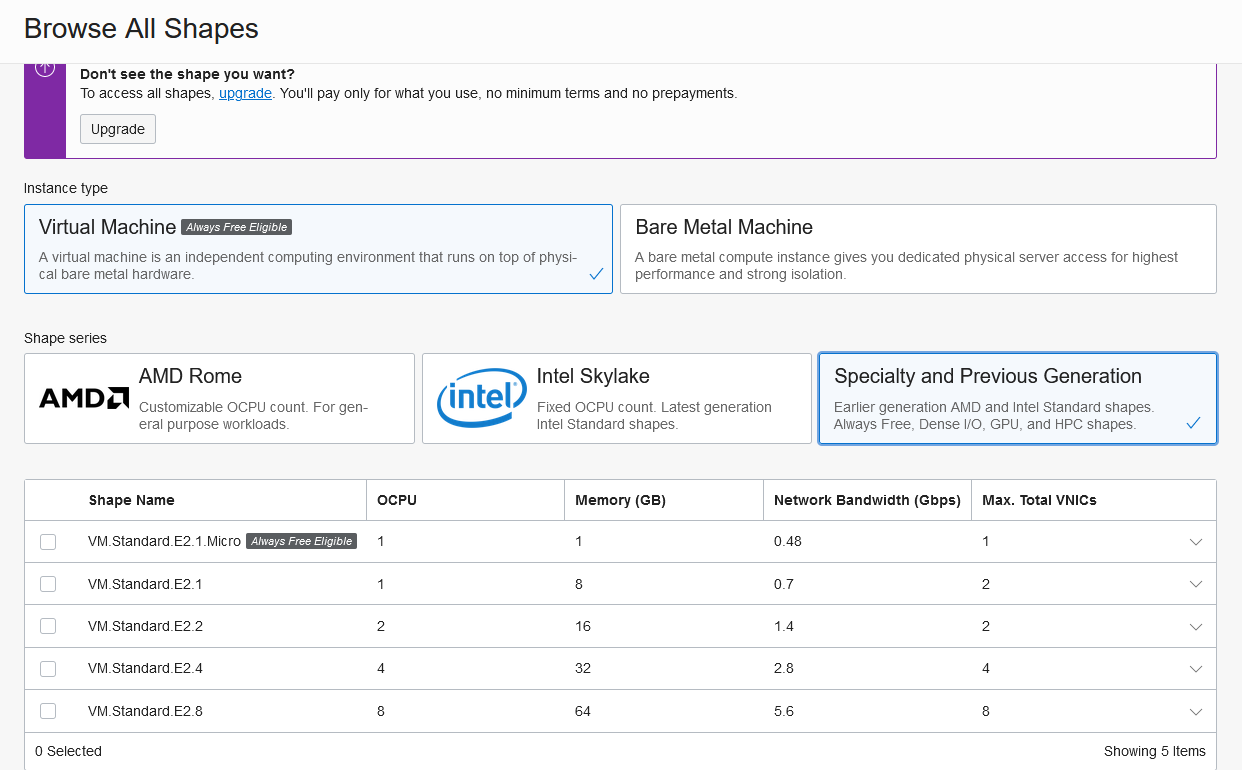
1.4. Add SSH Keys
You can add an SSH key to access the instance for server administration. This is not required for using the Fluxomni Studio application itself. If you do not wish to add a key, you can select “No SSH keys”.
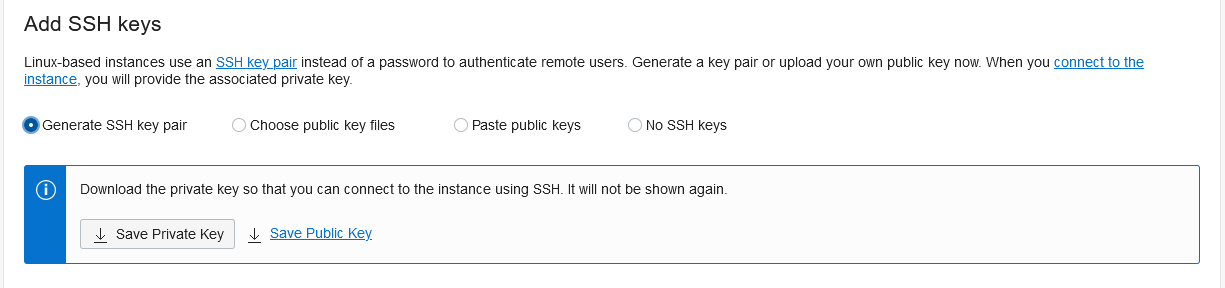
1.5. Use Cloud-Init Script
Expand the Show advanced options section. Go to the Management tab and paste the following script into the Cloud-init script field. This runs once when the instance is first created, configures the OS-level firewall (firewalld), and installs Fluxomni Studio.
#!/bin/bash
curl -fsSL https://install.fluxomni.io | WITH_FIREWALLD=1 bash -s
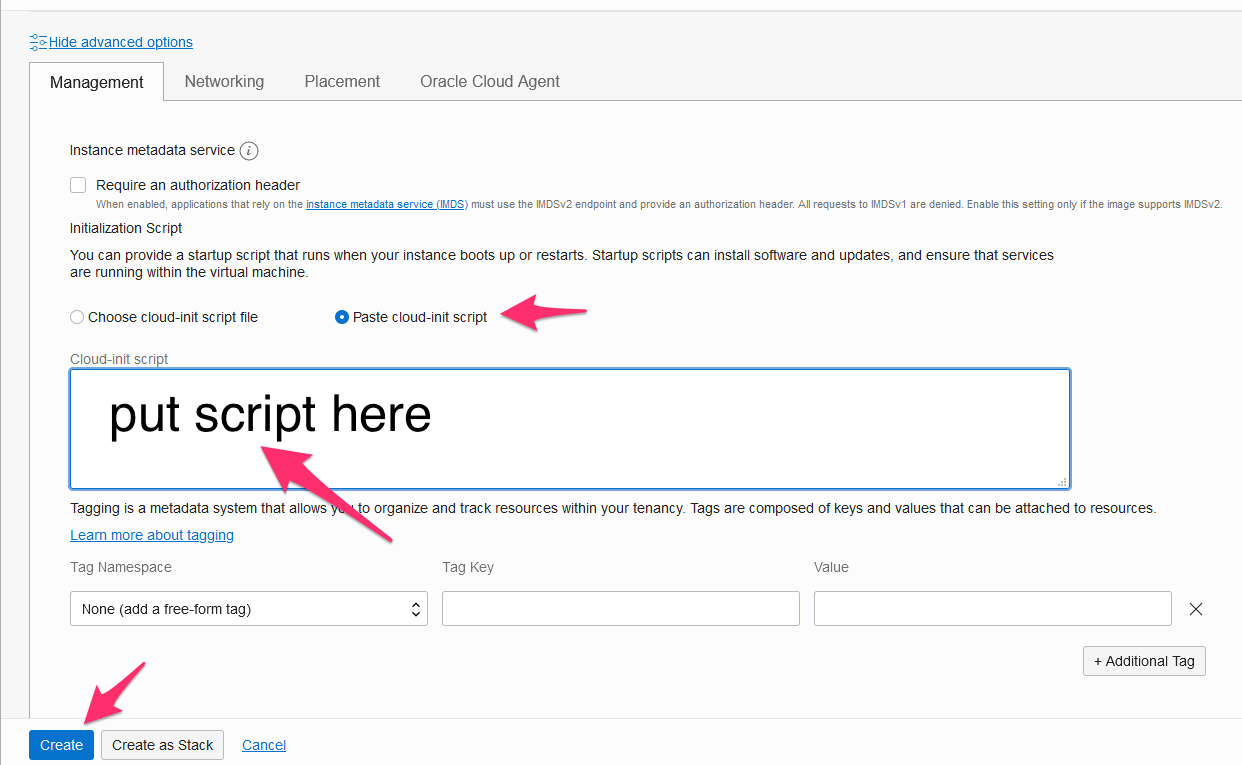
Click Create to begin provisioning the VM instance.
2. Configure Networking
By default, OCI instances have a restrictive firewall. You must create ingress rules to allow traffic to Fluxomni Studio.
2.1. Navigate to Virtual Cloud Network
Go to your instance’s details page, and click the link to its Virtual Cloud Network.
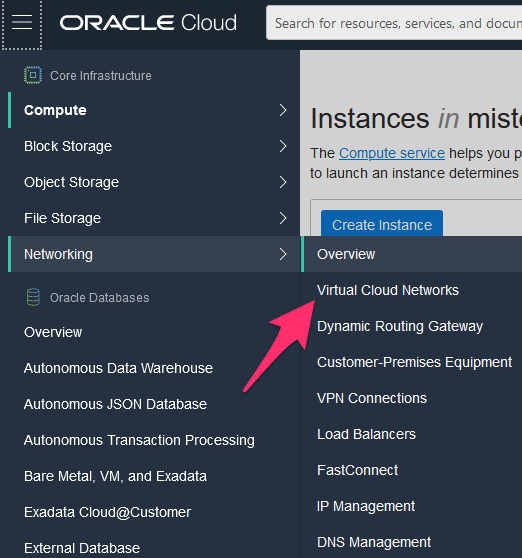
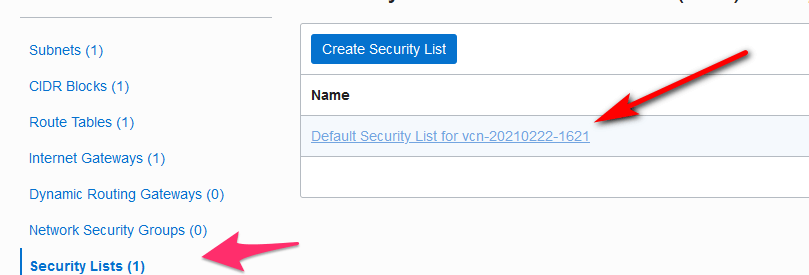
2.2. Edit the Security List
Navigate to Security Lists and click on the default security list for your network.
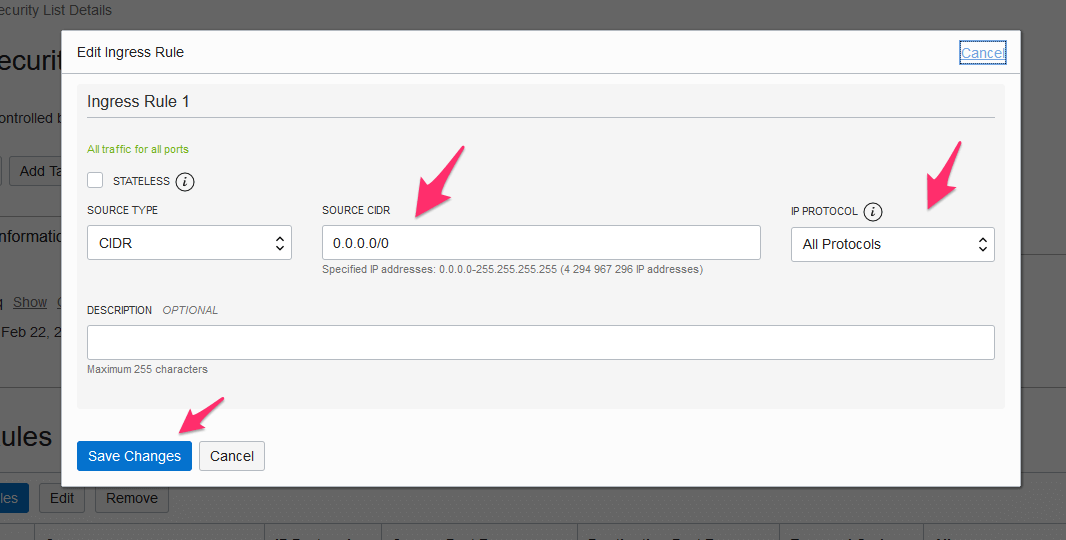
2.3. Add Ingress Rules
Remove the existing stateful ingress rule for port 22 (or edit it if you need SSH access). Then, add a new ingress rule with the following settings:
- Source Type: CIDR
- Source CIDR:
0.0.0.0/0 - IP Protocol: All Protocols
This allows all incoming traffic to your instance. For a production environment, you should create more restrictive rules that only allow traffic on the necessary ports (e.g., 80 for HTTP, 1935 for RTMP, 8000/tcp for SRS HTTP, 8000/udp for WebRTC media, 8003/tcp for WHIP signaling, and 10080/udp for SRT).
3. Access Fluxomni Studio
After the instance is created and the networking is configured, allow 5-15 minutes for the provisioning and installation to complete.
Find the Public IP address on the instance details page.
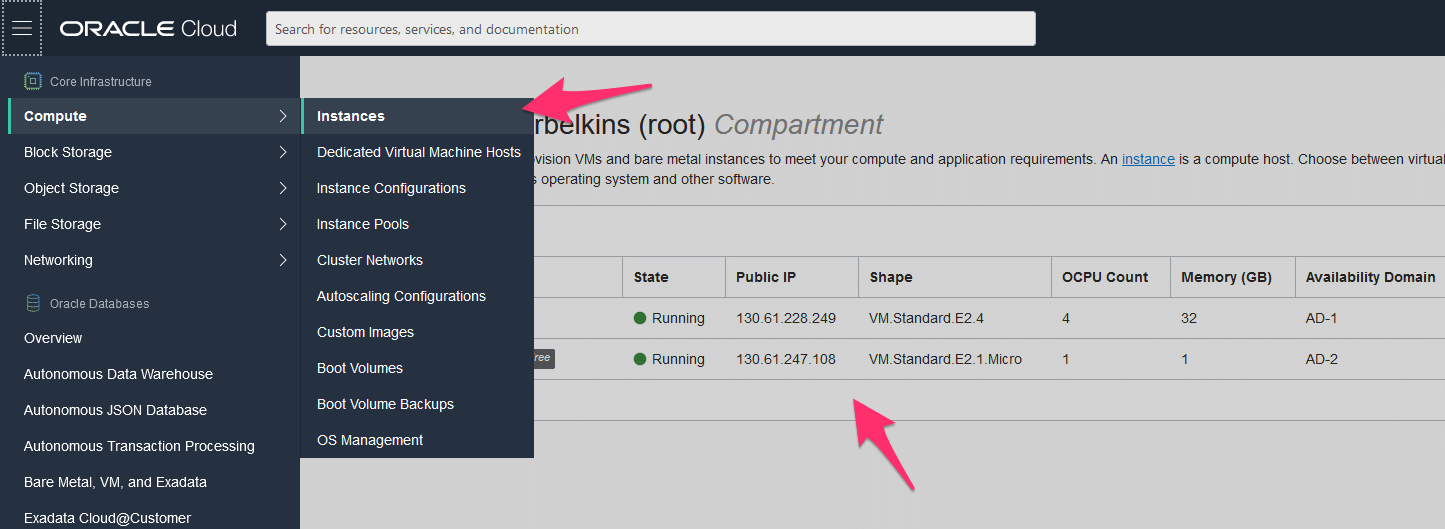
Open your web browser and navigate to the IP address.
Current releases serve the operator UI from the frontend container.
Use /routes for route management and /fleet to inspect attached media nodes.
NOTE: By default, Fluxomni Studio is served over
http://. For production use, it is highly recommended to set up a domain name and configure a reverse proxy (e.g., Nginx or Caddy) to enablehttps://for secure access.
Next, complete First Stream to create a protected operator account and verify one live route.
How to Deploy Fluxomni Studio to VScale/Selectel Cloud
This guide provides the recommended method for deploying Fluxomni Studio to VScale/Selectel Cloud.
This provider is a good option for users who need servers in Moscow or St. Petersburg.
NOTE: This installation method requires accessing the server via SSH.
0. Prerequisites
You must have a registered account with VScale/Selectel Cloud and a positive account balance.
1. Create a Virtual Server
After logging in, open the “Servers” page, select “Create another instance”, and choose the Ubuntu 24.04 image.
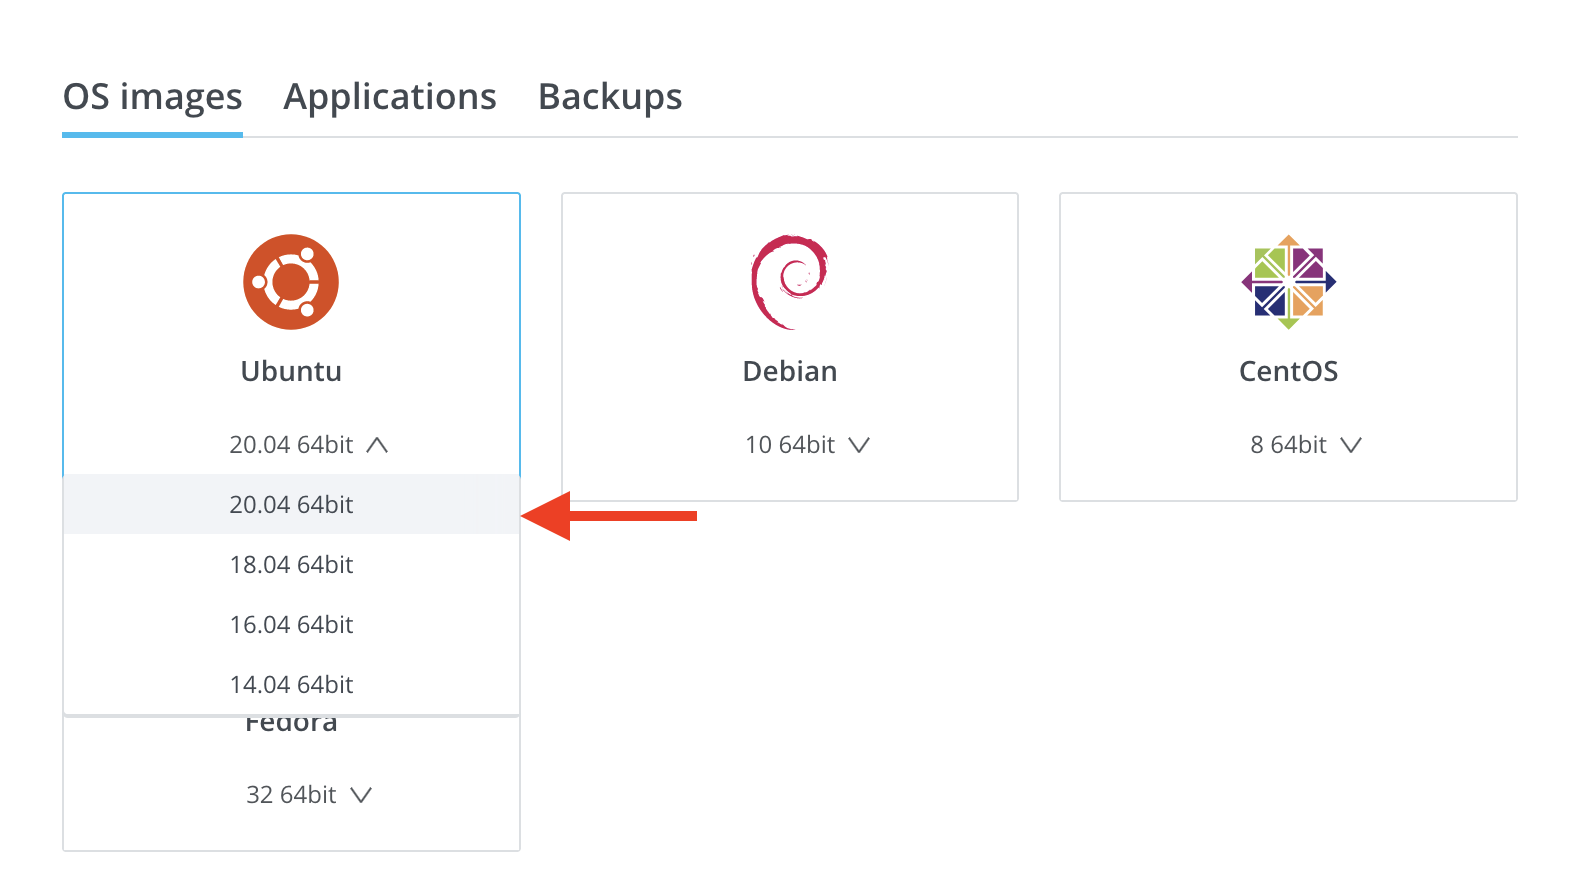
Supported platforms:
- Linux x64 / ARM64
- macOS x64 / Apple Silicon
- Windows (WSL2 Ubuntu)
1.1. Choose a Configuration
For simple restreaming, the smallest configuration is usually sufficient. If you plan to run a large number of streams, consider a more powerful server.
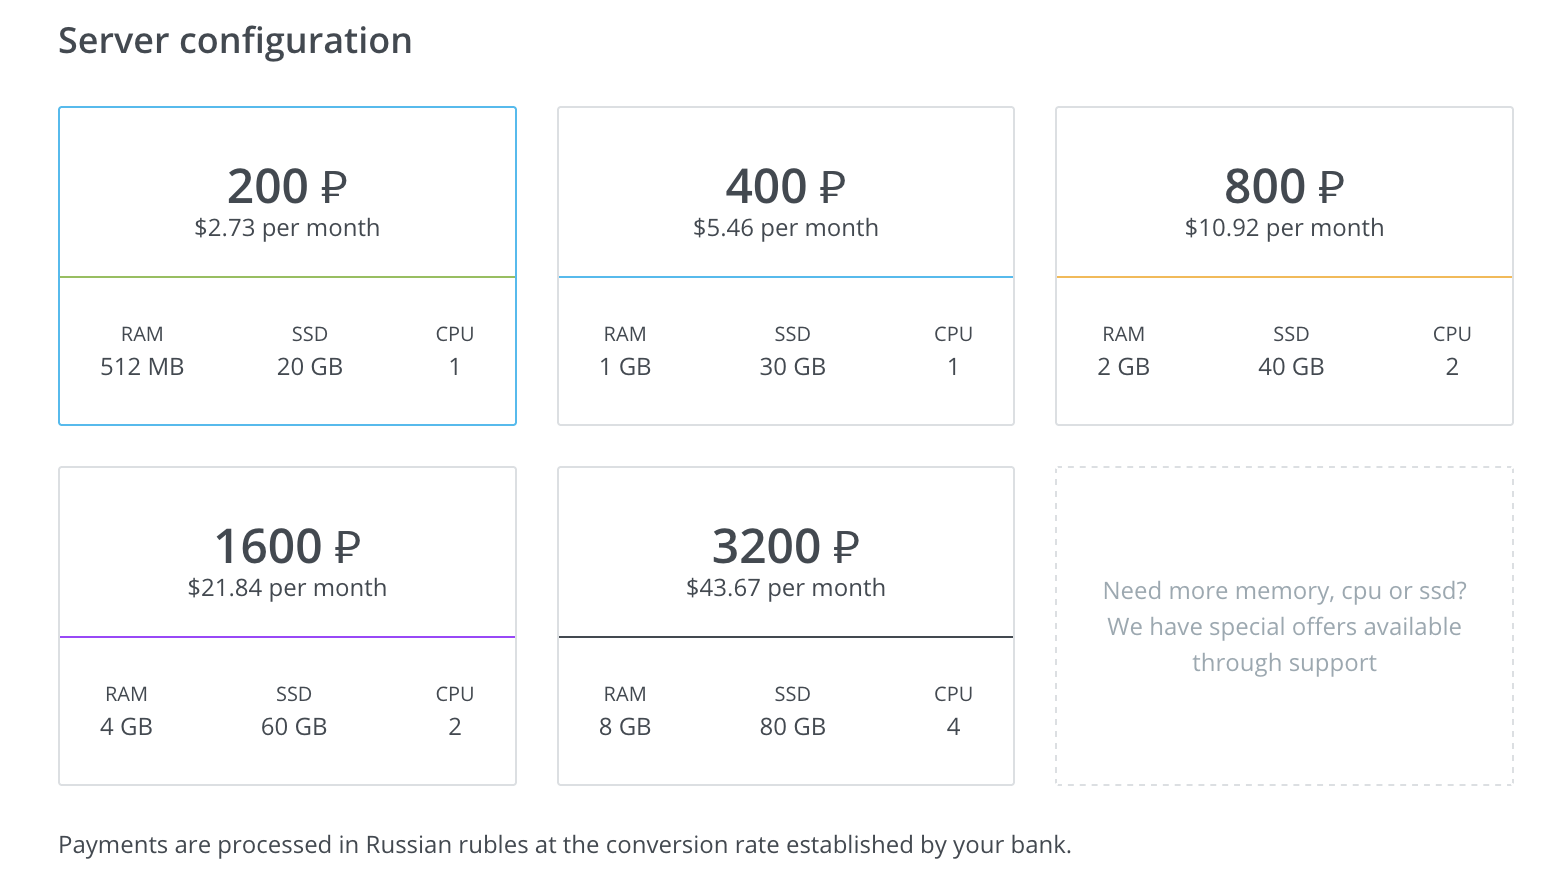
1.2. Choose a Location
Choose a location that is geographically close to both your stream source and destination endpoints to minimize latency.
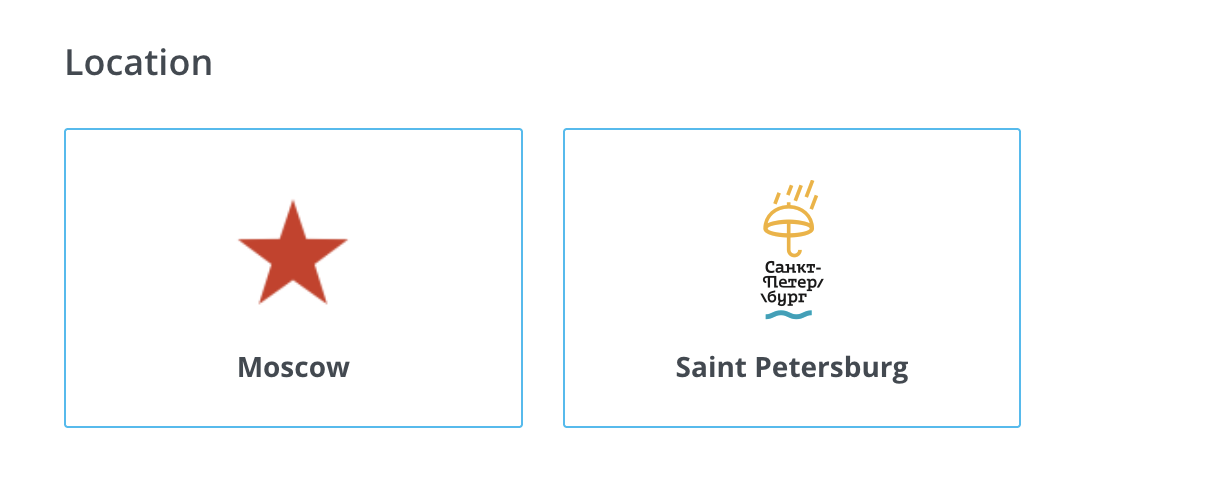
1.3. Set the Server Name
Give your server a descriptive name so you can easily identify it later.
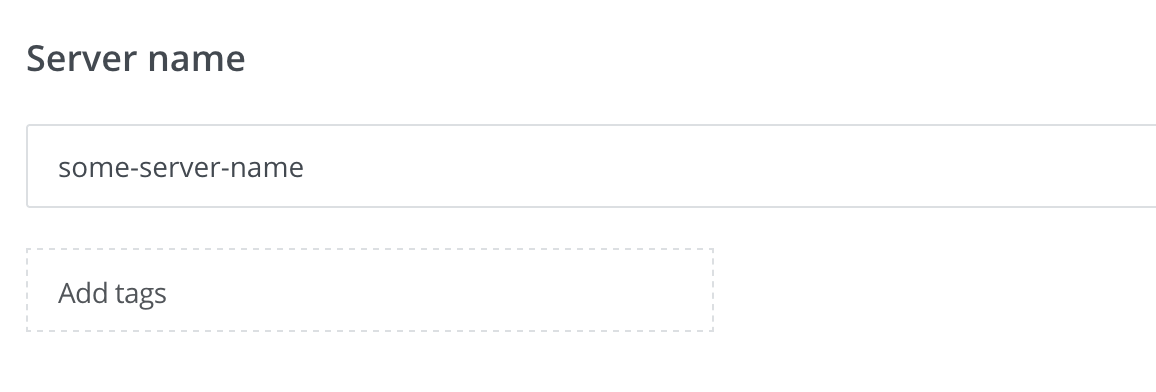
1.4. Configure SSH Access (Optional)
You can create the server without an SSH key, in which case a password will be provided for the root user.
If you want to use an SSH key, you can add your public key during server creation.
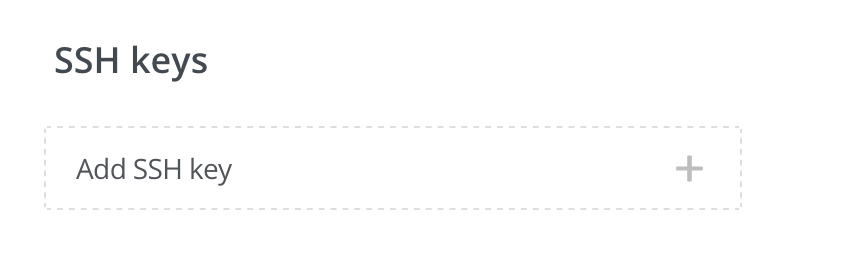
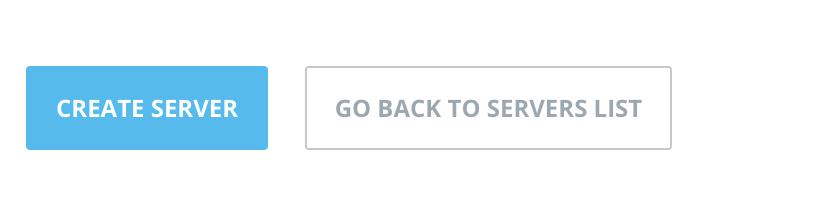
1.5. Create the Server
After configuring the options, click “CREATE SERVER”.
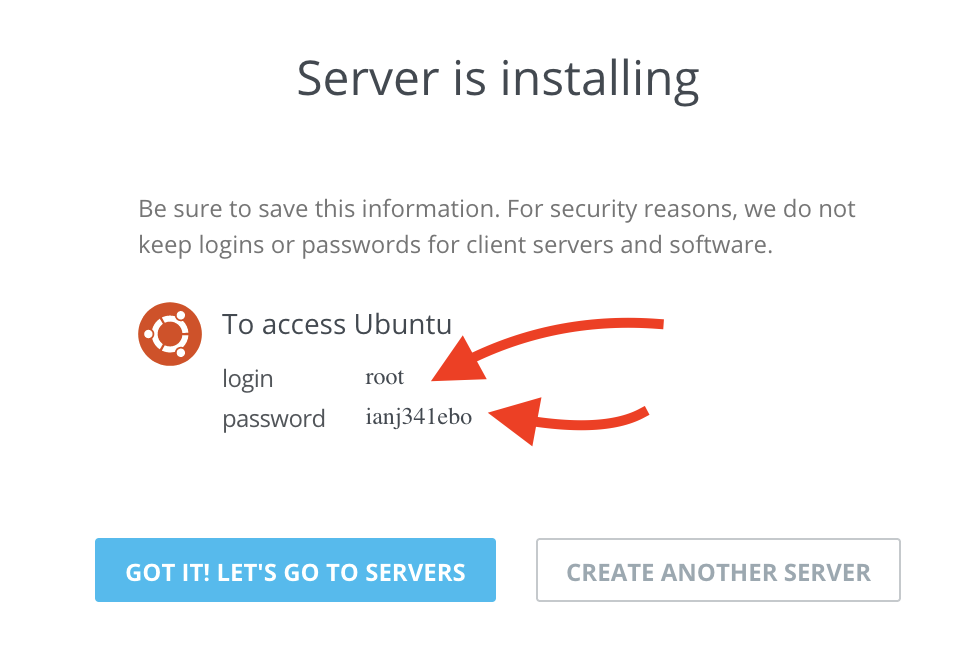
If you did not provide an SSH key, you will be given a username and password. You will need these to log in to the server.
1.6. Install Fluxomni Studio
To install Fluxomni Studio, you need to connect to the server using an SSH client and run the installation script.
Find the IP address of your server. In this example, it is 80.249.146.84.
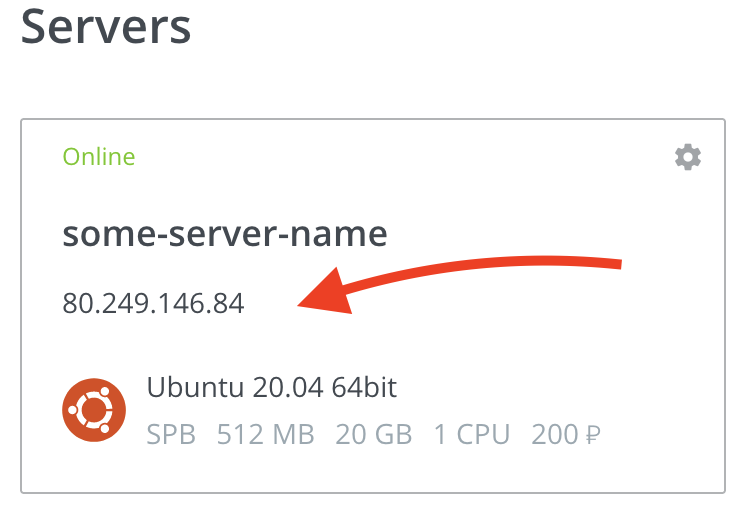
Connect to your server via SSH and run the following command. Replace your_server_ip with the actual IP address of your server.
ssh root@your_server_ip "curl -fsSL https://install.fluxomni.io | WITH_INITIAL_UPGRADE=1 WITH_UFW=1 bash -s"
If you are using password authentication, you will be prompted to enter the password from the previous step.
2. Access Fluxomni Studio
After the installation script is finished (it may take 5-15 minutes), you can access Fluxomni Studio by navigating to the server’s IP address in your web browser.
Current releases serve the operator UI from the frontend container.
Use /routes for route management and /fleet to inspect attached media nodes.
NOTE: By default, Fluxomni Studio is served over
http://. For production use, it is highly recommended to set up a domain name and configure a reverse proxy (e.g., Nginx or Caddy) to enablehttps://for secure access.
Next, complete First Stream to create a protected operator account and verify one live route.
User Guide
Fluxomni Studio is a web-based RTMP streaming platform that lets you broadcast a single source to multiple destinations simultaneously. The operator interface — called the Control Surface — runs in your browser and gives you real-time control over route health, outputs, playlists, media-node inventory, and local-user administration.
This guide covers the day-to-day operation of the Control Surface after your Fluxomni Studio instance is installed and running. For installation and deployment, see the Quick Start section.
Key Concepts
Route — a named streaming pipeline that connects one ingest input to one or more output destinations. Each route has its own workspace where you manage execution, routing, playlists, and live playback.
Input — the ingest endpoint where your source signal arrives. Fluxomni Studio generates a unique URL for each route depending on the chosen protocol (RTMP, SRT, or WebRTC). Point your encoder (OBS, FFmpeg, hardware encoder) at this URL.
Output — a destination where Fluxomni Studio relays the ingested signal. Outputs are typically RTMP URLs for platforms like YouTube, Twitch, Facebook Live, or custom CDN endpoints.
Media Node — a server that handles the actual media processing (transcoding, relaying, file playback). A single-host install runs one media node automatically. Larger deployments can attach multiple media nodes across different servers.
Fleet — the collective view of all attached media nodes, their health, capacity, and cached files.
Playlist — a queue of pre-recorded video files that a route can play out through its outputs, useful for scheduled programming or fallback content.
Artifact — a reusable source file or generated media asset tracked in the shared library. Artifacts can be uploaded once, tagged, monitored for storage usage, and reused from playlists or file-backup sources.
Control Surface Layout
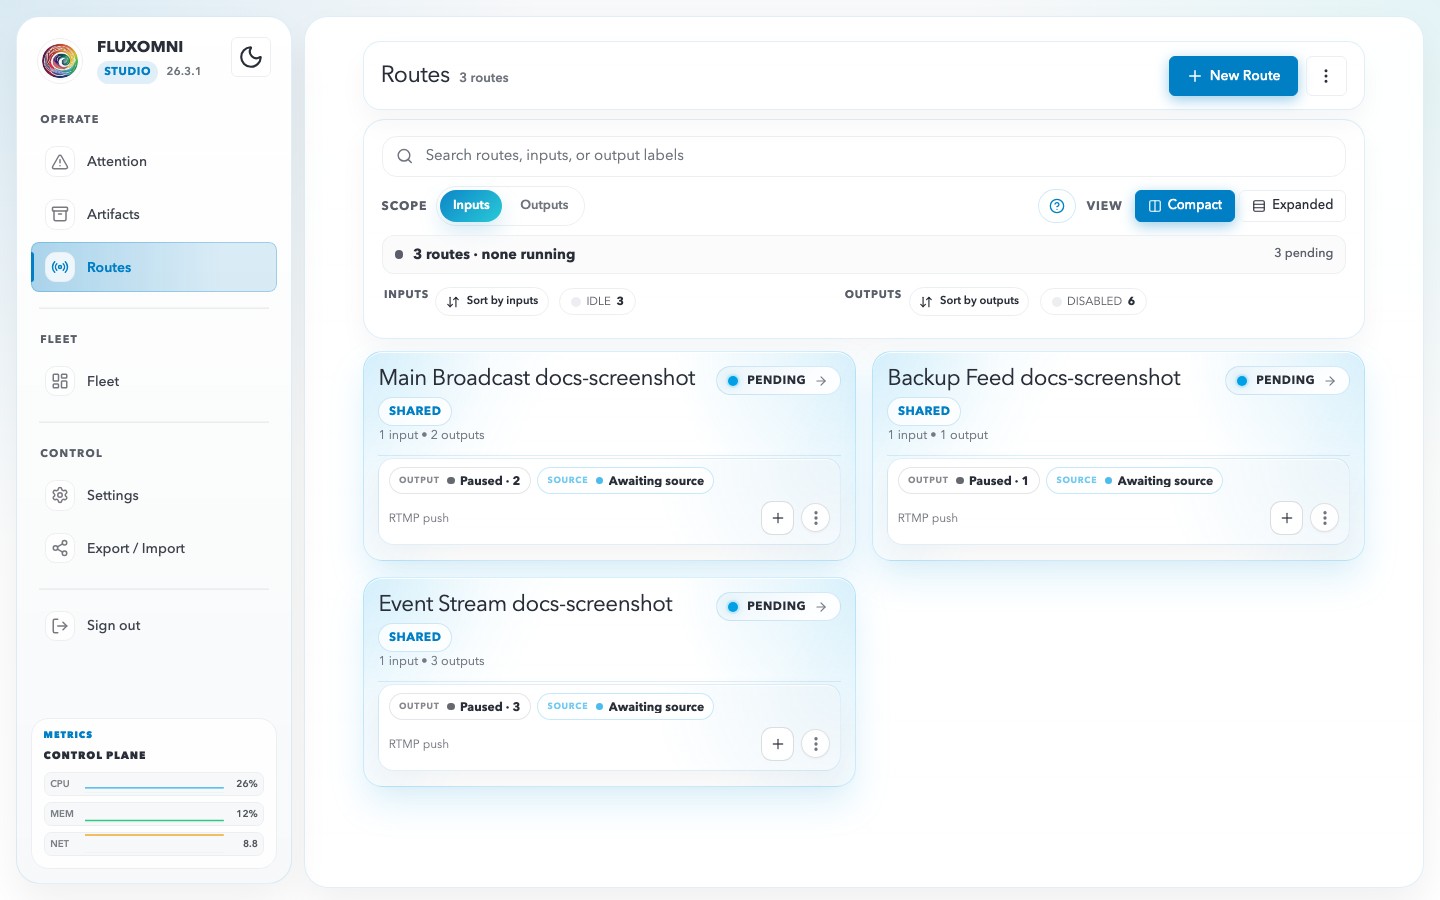
When you open the Control Surface, you see a persistent sidebar on the left with the Fluxomni Studio logo, version badge, theme toggle, navigation menu, sign-out action, and live system metrics. The main content area on the right changes based on the current page.
Operate
- Attention — a unified alert feed for route alerts, fleet alerts, and acknowledged known issues. Each route alert links directly to the affected workspace.
- Routes — the main operational view. Combines search, scope toggles, health strips, route cards, and quick output actions.
- Artifacts — the shared source-file library for uploads, Drive imports, tags, storage admission, and playlist reuse.
Fleet
- Fleet — inventory of all media nodes. Shows node health, assignments, heartbeat freshness, reachability, capabilities, and cached file distribution.
Control
- Settings — a role-scoped settings workspace for general defaults, artifact ingest settings, media-profile references, session security, and user administration.
- Export / Import — bulk export or import of route configurations.
System Metrics
The bottom of the sidebar shows real-time CPU, memory, and network utilization for the control plane.
Next Steps
- Attention — triage route, fleet, and storage alerts
- Routes — learn how to create and operate routes
- Artifacts — upload and reuse source files across routes
- Fleet — understand media node management
- Settings — configure your Fluxomni Studio instance
- Export / Import — move or restore route definitions
Attention
Use the Attention page to triage active route, fleet, and storage issues from one place before they interrupt an operator workflow.
Open Attention from the Operate section of the sidebar, or visit /attention.
Review active alerts
The page groups actionable alerts by surface:
- Route alerts identify an affected route and offer Open route to inspect its current routing and execution context.
- Fleet alerts identify media-node conditions that can block route execution or operator workflows.
- Storage alerts identify artifact-capacity conditions that can block uploads and imports; use Open artifacts to inspect the library.
Each route or storage alert is marked Critical or Attention. Start with Critical alerts, then use the linked route, fleet, or artifact surface to investigate the condition.
When no active or known alert exists, the page shows All clear.
Mark an alert as known
Use Known when an issue is understood and is being handled elsewhere. The alert moves to Known issues and no longer contributes to the sidebar urgency badge.
Marking an alert as known does not repair the underlying condition. Use Restore in Known issues to return it to active triage when it needs attention again.
Next steps
- Routes — inspect route inputs, outputs, runtime state, and playback
- Fleet — inspect media-node health and artifact distribution
- Artifacts — resolve storage admission and import issues
- Monitoring — configure broader health and telemetry monitoring
Artifacts
Artifacts are reusable source files and generated media assets that Fluxomni Studio tracks in a shared library. Use this page to import files once, tag them, monitor storage capacity, and reuse them from route playlists or fallback sources.
Artifact Library
Open Artifacts in the sidebar to manage the global source library.
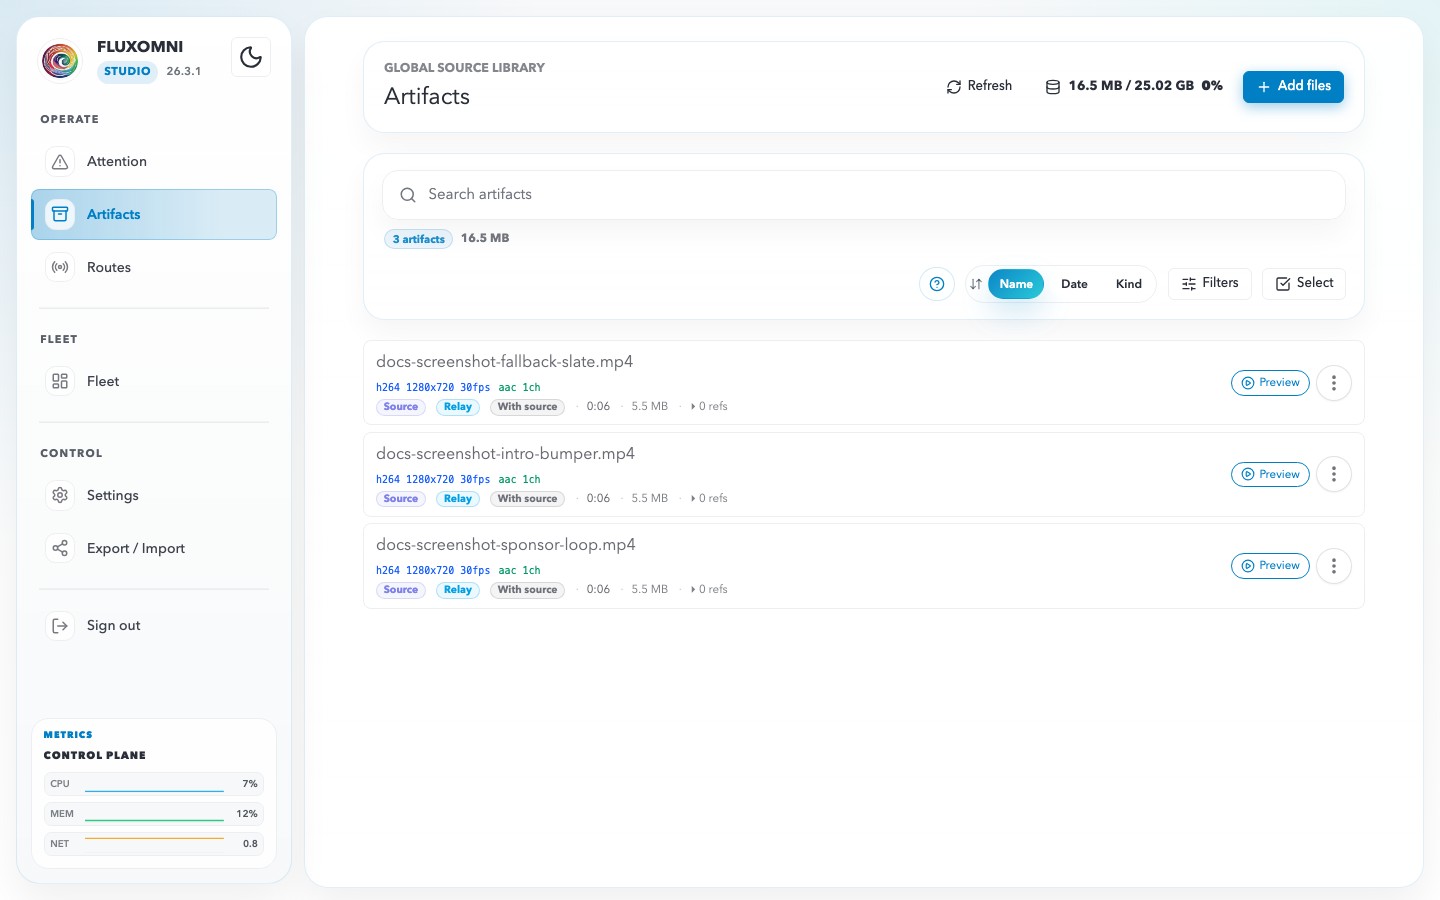
- Search finds files by name or file id.
- Tags group files by client, show, campaign, language, or day-part.
- Filters narrow the library by usage, artifact kind, location, lifecycle policy, or baseline compatibility.
- Sort switches between name, date, and artifact kind.
- Selection mode enables bulk tag and delete actions.
Rows show codec status, references from routes, tags, artifact kind, durable location, and lifecycle policy. Referenced files are protected from regular delete; admins can force-delete only when they intend to break those references.
Add Files
Use Add files to bring media into the library.
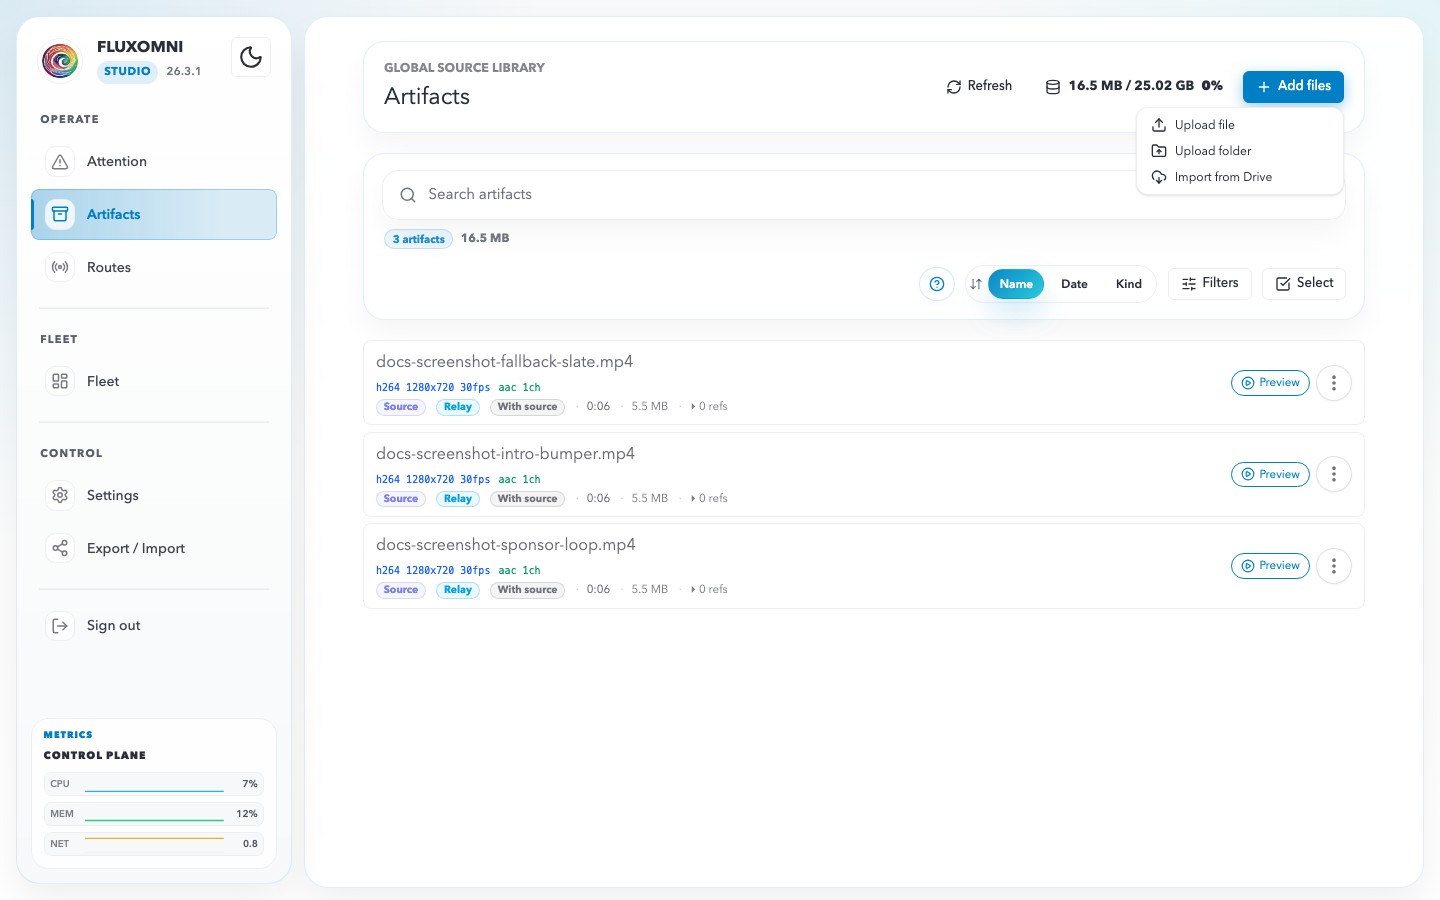
The menu supports:
- Upload file — choose one or more local video files.
- Upload folder — choose a folder; non-video sidecars are skipped.
- Import from Drive — enter a Google Drive file ID or URL. Folder imports are available from playlist flows.
Uploads and imports share the same transfer drawer. The drawer shows queued files, upload progress, skipped non-video files, and storage rejections.
Storage Backends
The storage chip in the header summarizes the control-plane relay backend used for direct uploads.
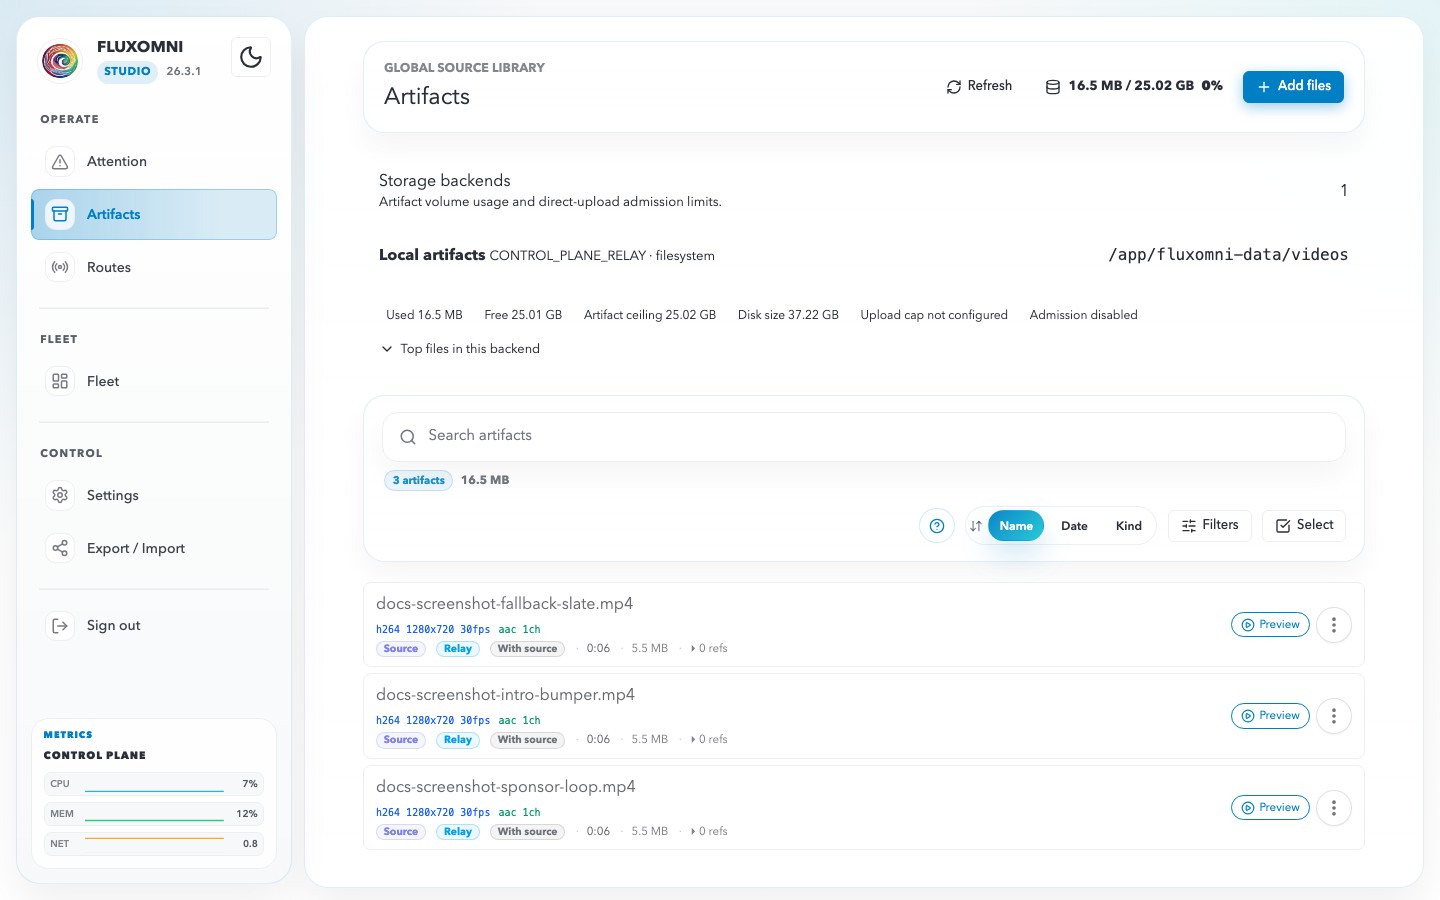
Expand the panel to inspect:
- Used and free artifact capacity.
- Raw disk size and configured headroom.
- Admission limit for new uploads.
- Outstanding reservations from in-flight transfers.
- Top artifact consumers.
- Recent storage rejection context.
Fluxomni Studio rejects uploads before they exceed the backend admission limit. The rejected upload also appears in Attention as a storage alert so operators can free space or move content before retrying.
Playlist Reuse
Route playlists use the same library picker. Open a route, switch to Playlist, then choose From library to add existing artifacts without uploading or importing the same file again.
The picker can filter by tags and route baseline compatibility. In multi-select mode it commits only visible, usable rows, so stale selections from prior filters are skipped instead of adding hidden files by accident.
Operational Tips
- Use short, stable tags such as
client-acme,intro,sponsor, or2026-season. - Check the storage panel before folder uploads or Drive imports.
- Keep file backup distinct from playlist programming: file backup is the safety loop; playlist is scheduled playout.
- Use Fleet when you need to confirm whether a media node has cached artifacts required by an assigned route.
Routes
Routes are the core of Fluxomni Studio. Each route is an independent streaming pipeline with its own ingest input, one or more outputs, an optional playlist, and a live playback monitor.
Flow Overview
This short overview shows the normal live path: create an RTMP route, copy its publish URL into an encoder, wait for the route to become live, verify HLS preview in the workspace, and add a YouTube-style output.
Routes List
Navigate to Routes in the sidebar (or visit /routes) to see all configured routes.
- The page header summarizes route count, live-input health, output health, and quick operator actions.
- The Controls view combines search, scope selection, view mode, and health chips for inputs, signal integrity, and outputs.
- The Routes view strips the collection controls back and focuses on the route cards themselves.
Collection controls
The Controls view gives you the fastest way to triage the whole system:
- Search — find routes by route label, input label, or output label.
- Scope — switch the search focus between Inputs and Outputs.
- View mode — choose Compact or Expanded cards.
- Health strip — shows whether the current slice is live, idle, clean, or needs attention.
- Inputs / Signal / Outputs groups — summarize route health, mismatch or fetch issues, and distribution state without opening each route.
Route cards
Each card shows the route label, ownership scope, current source, input and output state, and quick actions:
- Open workspace → jumps into the full route workspace.
- + Add output opens the output modal directly from the card.
- Copy duplicates the route configuration.
- Edit opens the route modal.
Creating a Route
Click + New Route on the routes list page (or the empty-state create prompt) to open the route setup dialog.
The dialog is organized into three steps.
1. Route Identity
- Route Label — a human-readable name for the route, such as
Main broadcast. - Owner — for admins, choose whether the route stays Shared or is assigned to a named user. Shared routes are visible to every signed-in user; owned routes stay scoped to their assignee plus admins.
The route key and publish key are generated automatically when the route is saved.
2. Primary Live Source
Choose the ingest protocol for the route:
- RTMP — the best default for OBS, FFmpeg, and most hardware encoders.
- SRT — useful for contribution over less stable networks.
- WebRTC — low-latency browser publishing.
Then choose the source mode:
- Accept publish — Fluxomni Studio generates an ingest address and waits for a publisher to push into it.
- Pull from remote — Fluxomni Studio fetches a remote source URL itself.
The Generated publish address area becomes actionable after the route is saved and assigned to a media node.
3. Advanced Routing
Leave Advanced routing collapsed for the normal setup path, or expand it when the route needs custom runtime behavior:
- Execution placement — keep auto-placement or pin the route to a specific media node.
- Failover policy — stay on system defaults or customize stickiness and cooldown behavior.
- Live backups — add additional ingest paths in the same live protocol family.
- File backup — configure a Google Drive file as a last-resort fallback when no live source is available.
Step-by-step: create a route
-
Start from the Routes page and use + New Route.
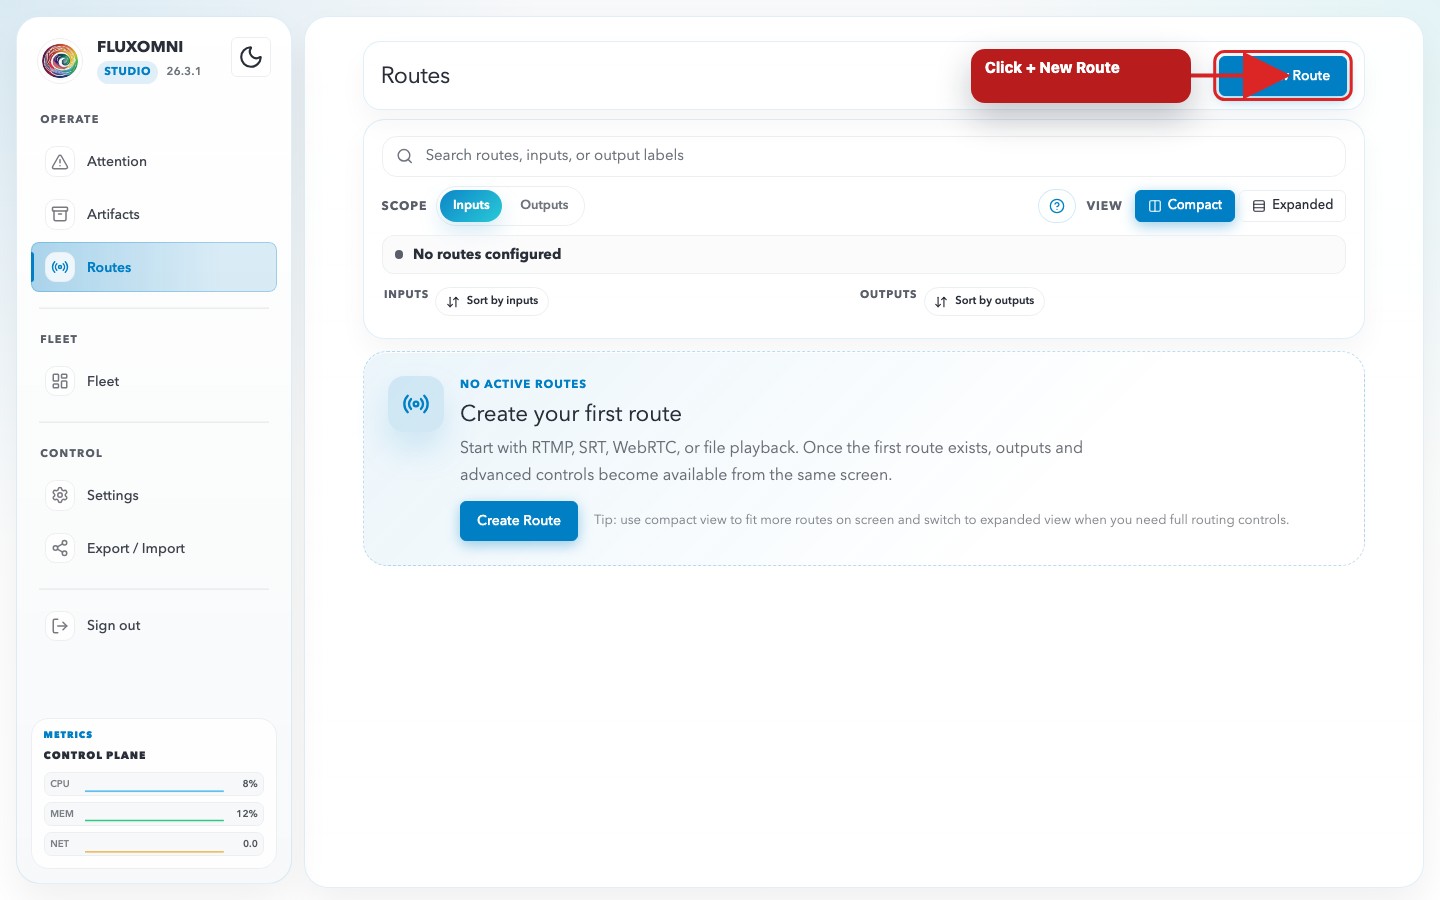
-
Name the route and confirm the source/profile defaults.
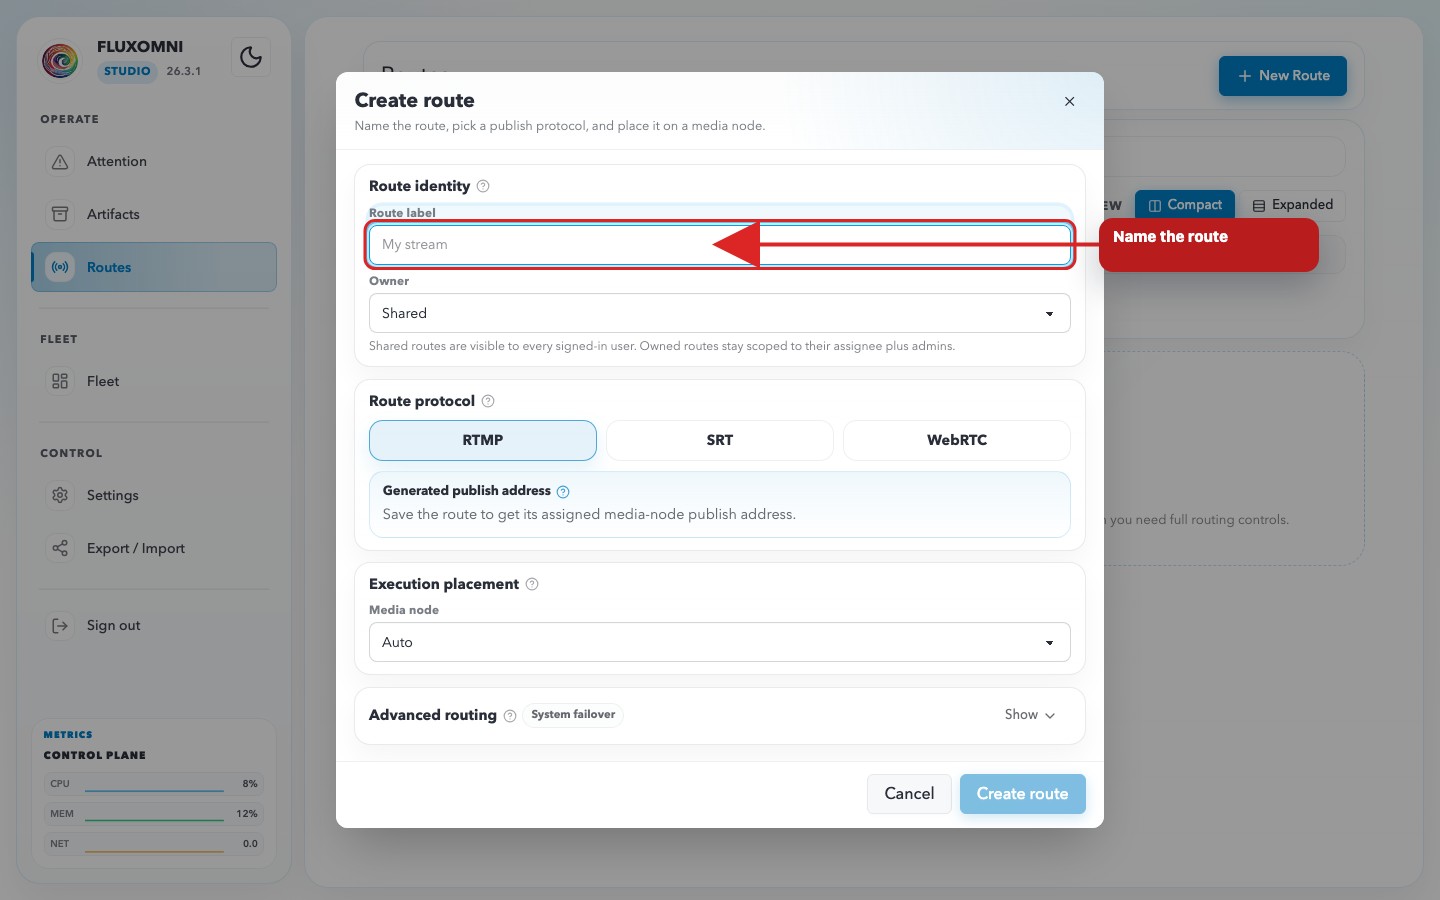
-
Submit the form with Create route.
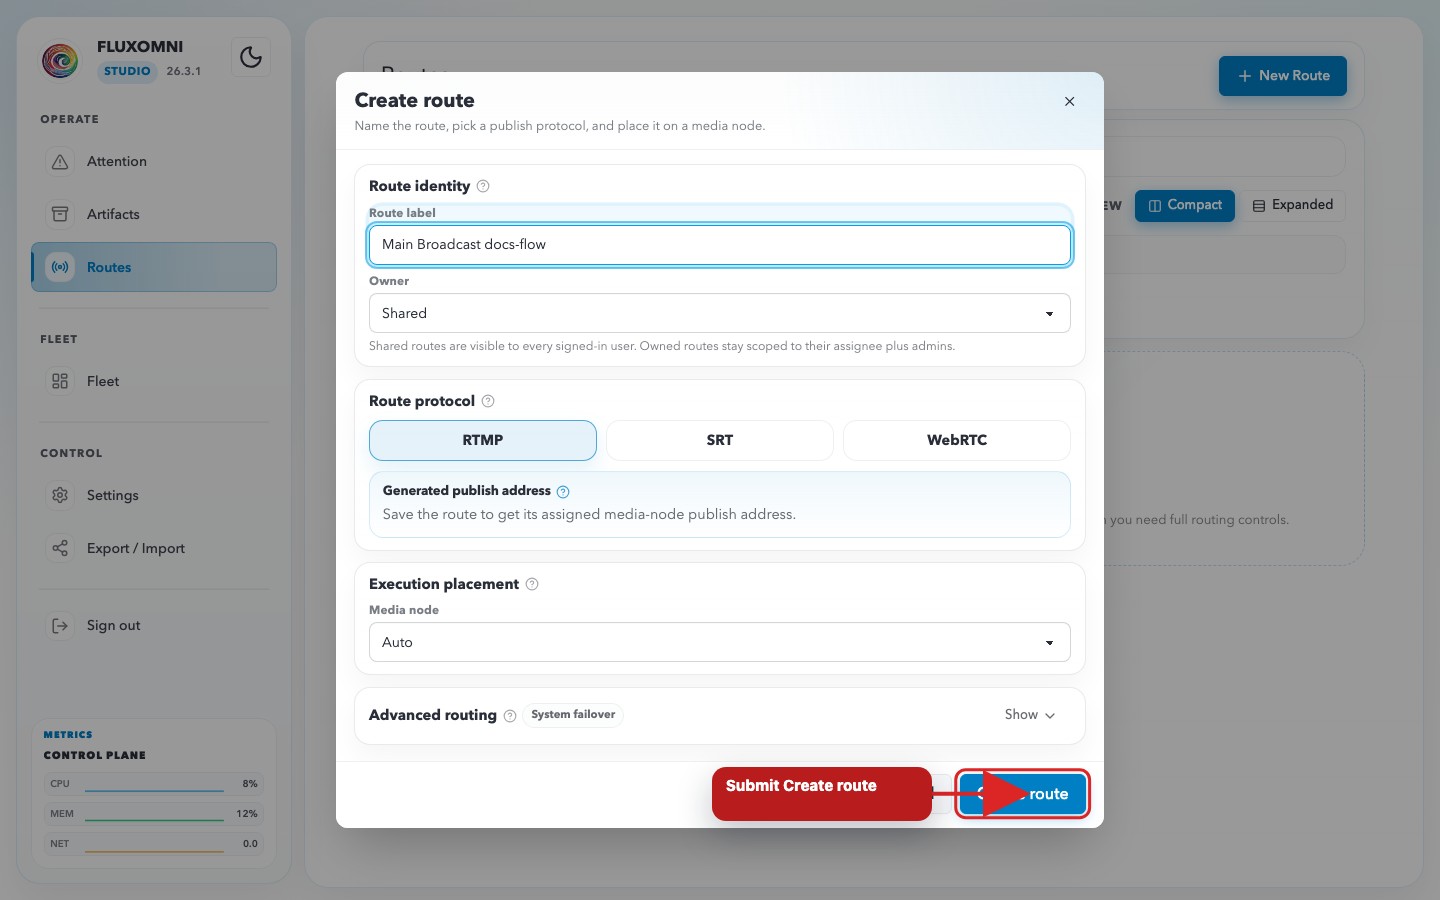
-
Confirm the created route appears in Expanded view.
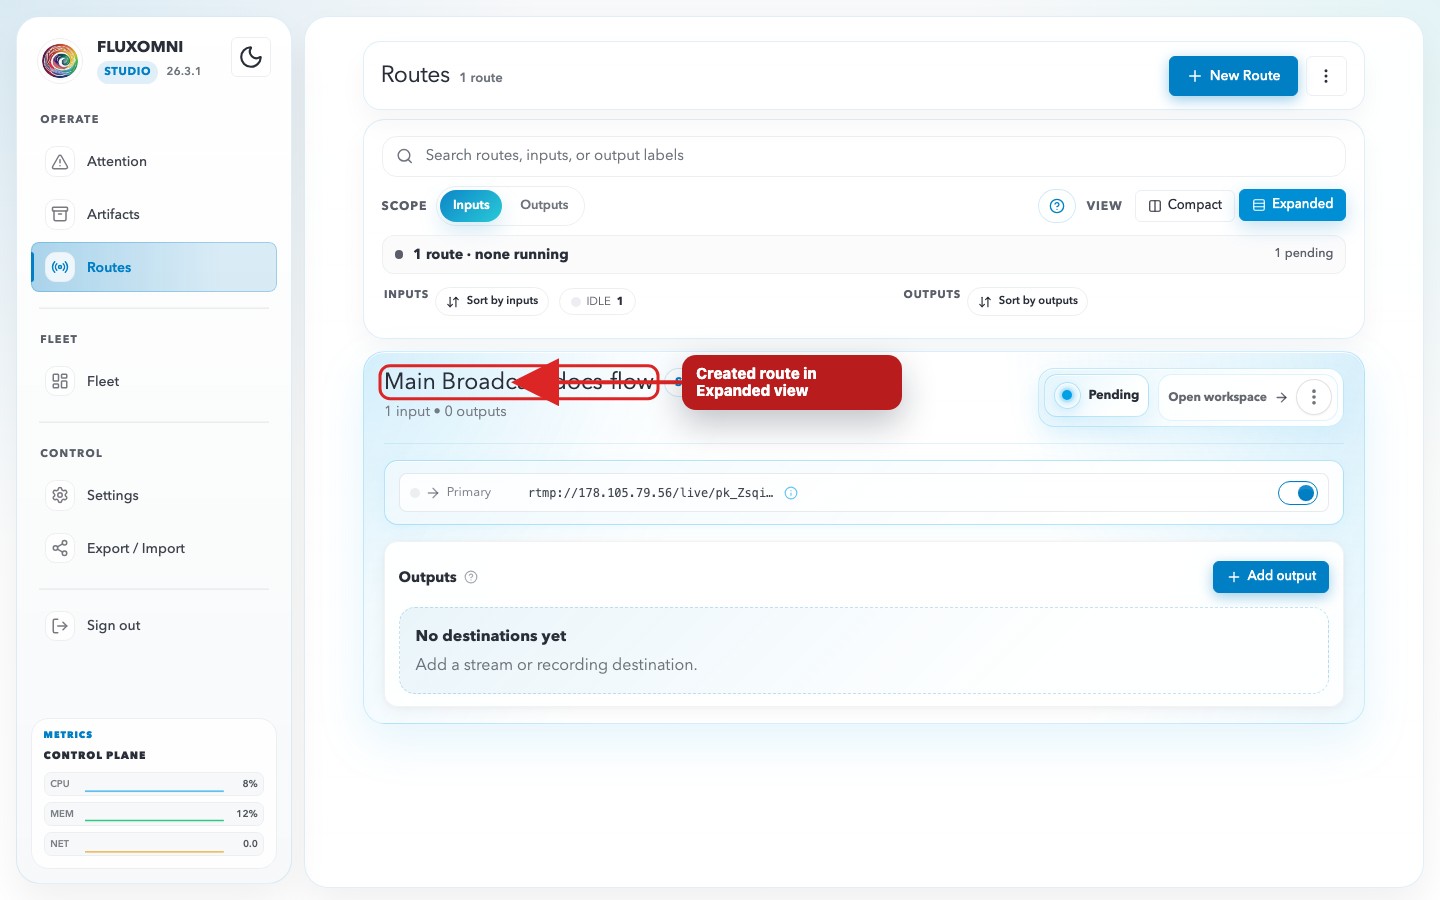
Route Workspace
Click Open workspace → on any route card to enter the route workspace.
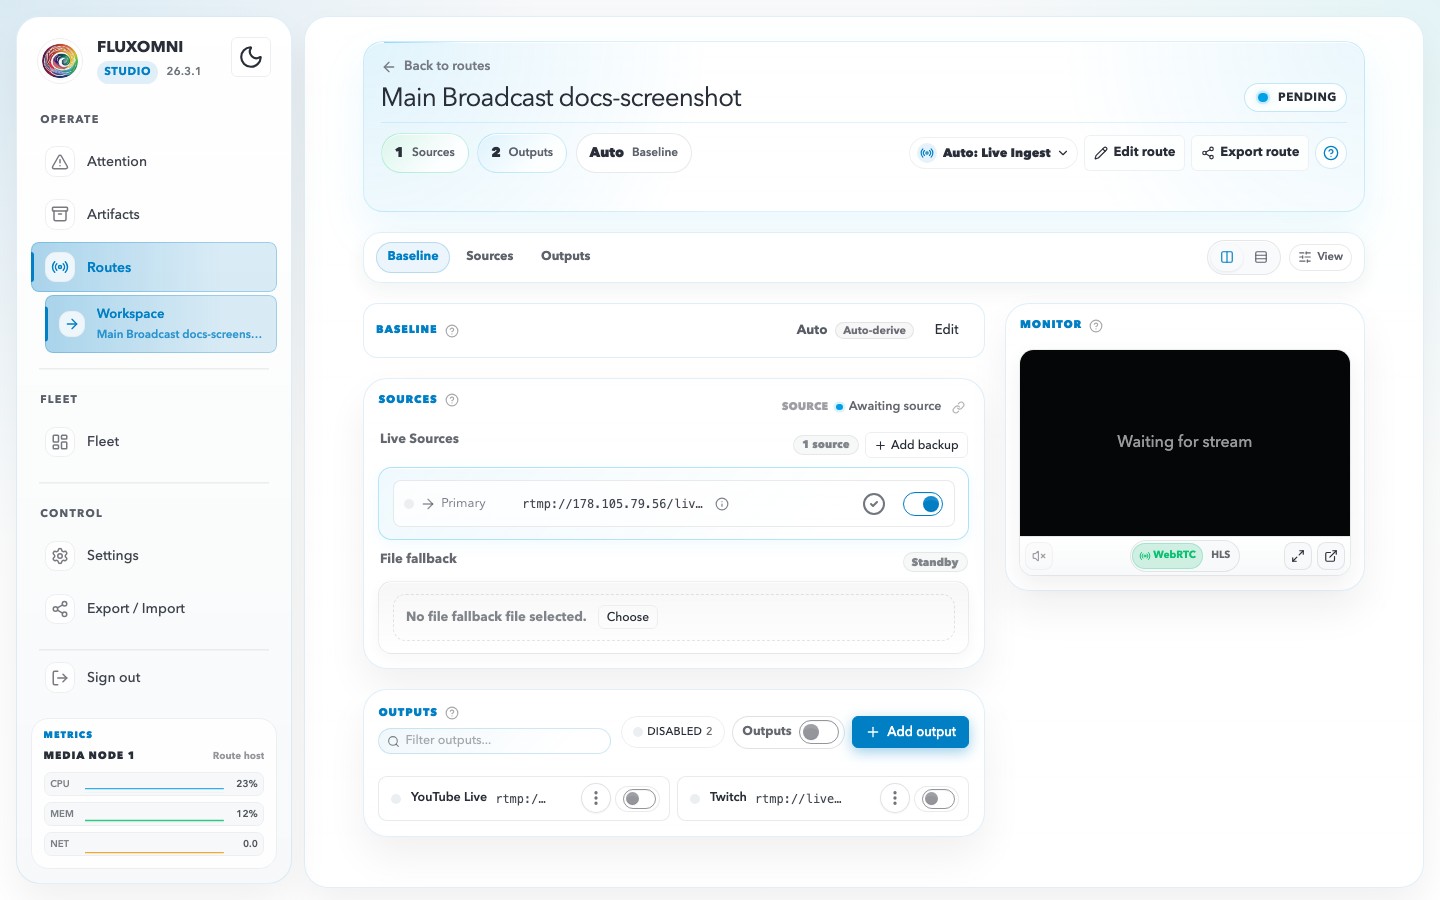
The workspace header shows the route name, status badge, quick actions, route key, input count, output count, and current issue count.
The workspace has four tabs:
Execution
The Execution tab answers where the route is running and what the control plane currently knows about it.
- Assigned node — the selected media node, its advertised endpoints, and a shortcut to node diagnostics.
- Manifest delivery — whether the desired runtime plan has been applied.
- Observed runtime — the latest runtime-side execution signal, including pending or degraded states.
Routing
The Routing tab is the operational signal-path view.
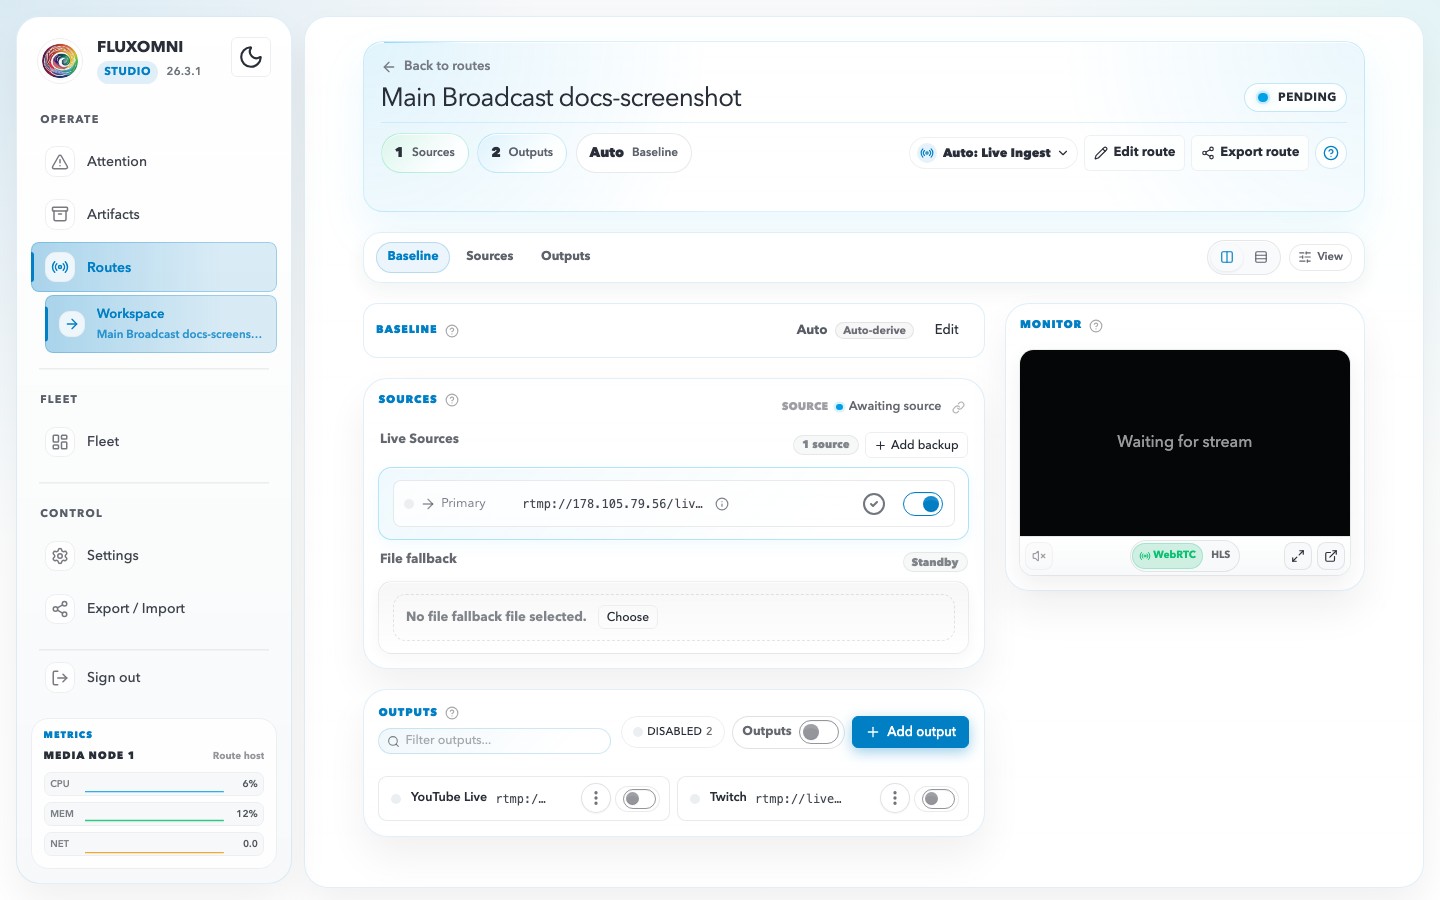
- Active source chip — shows whether the route is awaiting source, live, playing from playlist, or running from fallback.
- Inputs lane — displays the primary ingress and any live backups, with enable/disable controls and copyable ingest addresses.
- Outputs lane — lists every destination with per-output state, filtering, bulk enable/disable, and the + Add output action.
- Queue / Playlist — the file-playout controls remain visible below the routing surface.
- Live playback — the browser preview stays docked on the right when a playback URL exists.
Step-by-step: add an output
-
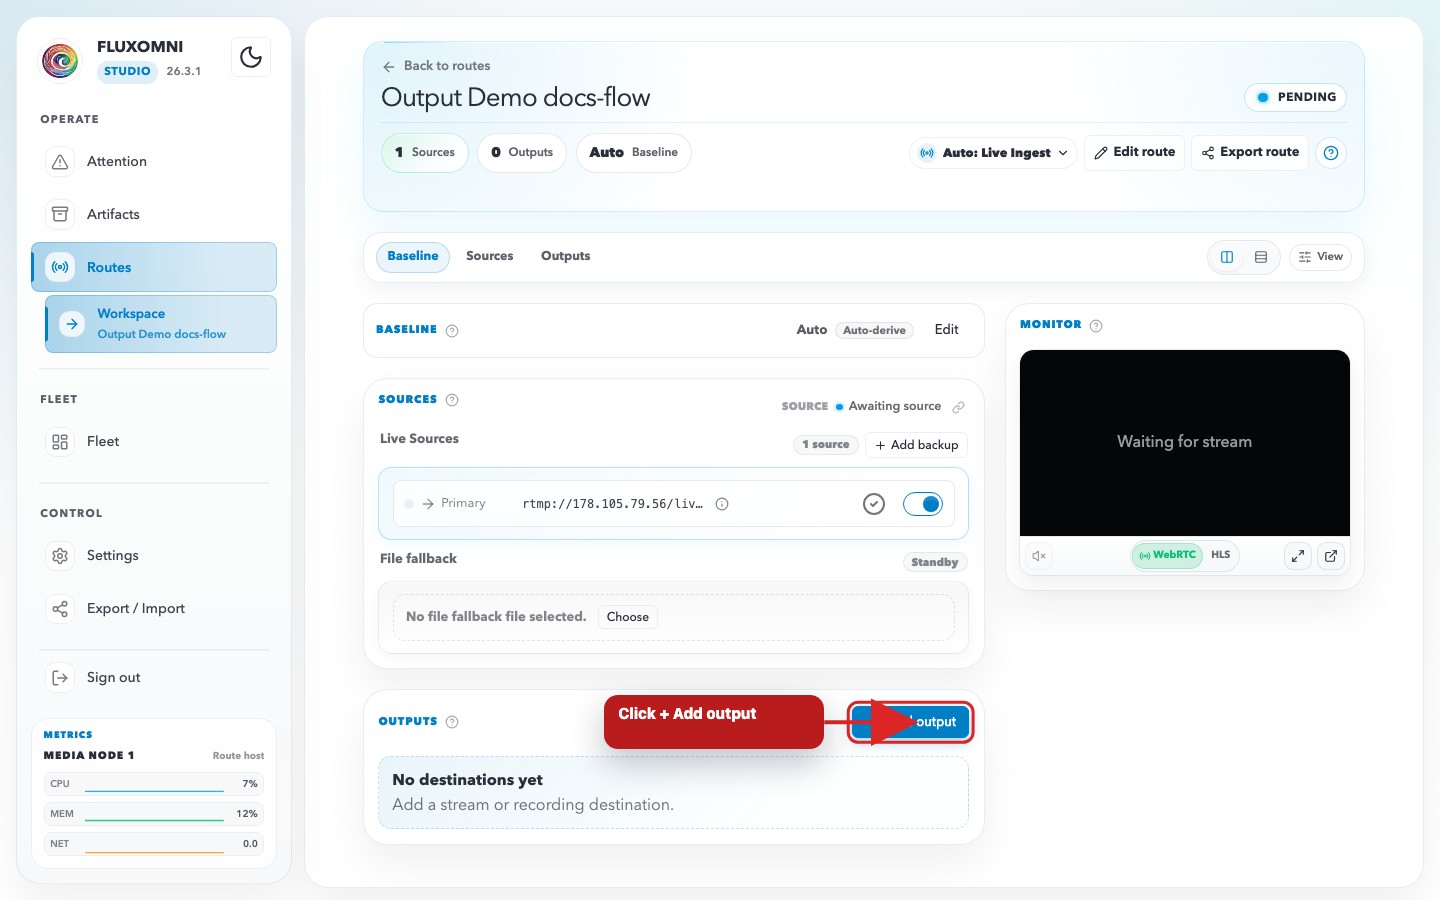
Open the route workspace and switch to Routing.
-
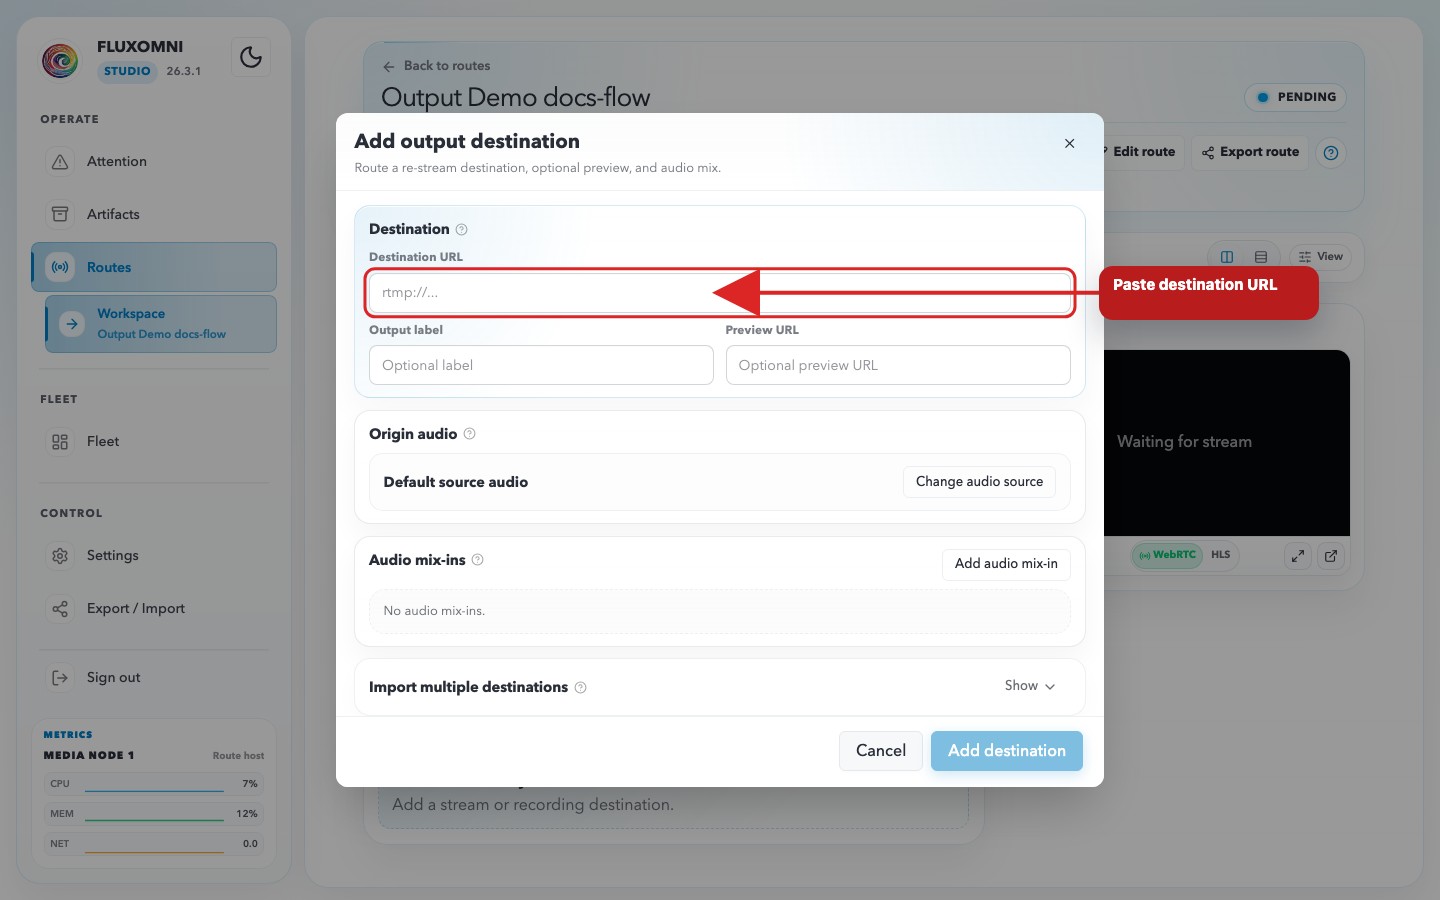
Click + Add output to open the destination modal.
-
Enter the destination URL and an optional label, then save.
The output dialog also supports:
- Preview URL — an optional URL associated with that destination.
- Audio mix-ins — extra MP3 or TeamSpeak audio sources mixed into the output.
- Import multiple destinations — a bulk path for pasting a list or JSON payload of outputs.
Editing advanced routing
Click Edit route in the workspace header to reopen the route modal with the current route values.
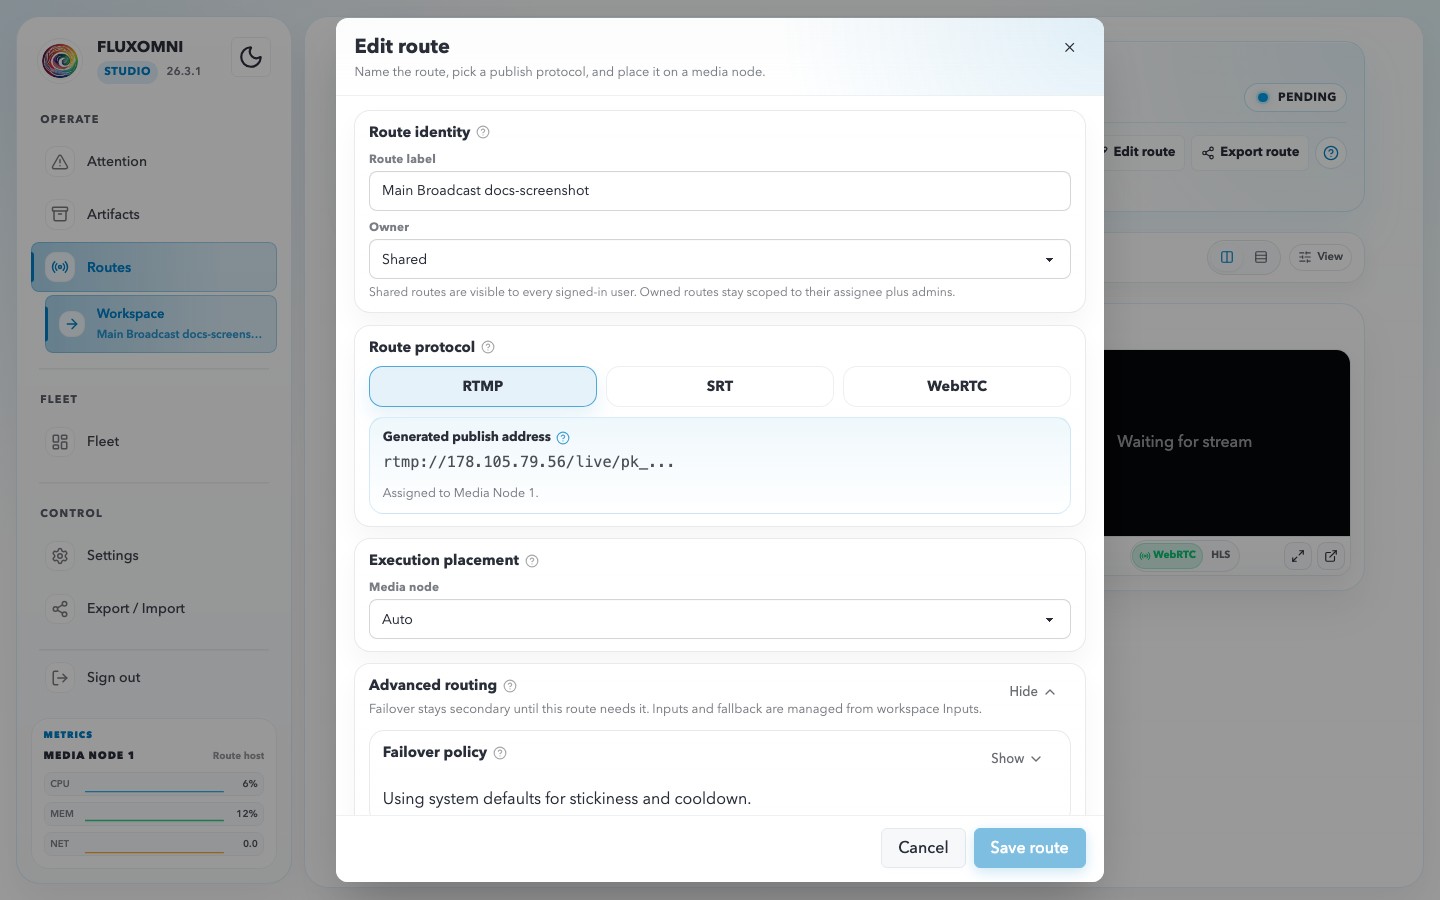
This is where admins and operators revisit placement, failover, live backups, and file fallback after the route is already running.
Playlist
The Playlist tab manages file-based playout for the route:
- Now playing — current file, codec summary, progress, and transport controls.
- Queue status — readiness, local-file count, mismatch warnings, and stream errors.
- Google Drive import — load files from a Drive folder or file URL/ID, then start downloads to the assigned media node. Configure the required API key first in Settings → Artifacts → Google Drive.
- File list — codec metadata plus signal-integrity badges such as REF, DIFF, or ERROR.
Live Playback
The Live playback tab embeds the HLS monitor for the route’s output. When a playback URL is available and the route is live, you can inspect the outgoing stream directly in the Control Surface.
Output Protocols
When adding an output destination, Fluxomni Studio supports several destination URL families:
- RTMP / RTMPS — the common choice for YouTube, Twitch, Facebook Live, and custom RTMP servers.
- SRT — useful for contribution or delivery over less predictable networks.
- Icecast — for Icecast-compatible audio publishing.
- File —
file:///destinations for writing FLV, WAV, or MP3 output to disk.
Mix-ins (Audio Mixing)
Outputs support mix-ins — extra audio sources mixed into the output before it reaches the destination. Use them for background music, commentary, or TeamSpeak/VoIP audio.
Each mix-in can define:
- Source URL — an HTTP(S) MP3 URL or TeamSpeak source.
- Volume — gain control for the added source.
- Delay — an optional offset before the mix-in starts.
- Sidechain — ducking that lowers the mix-in when the main route audio is active.
Alerts
Route-level and fleet-level issues surface on the Attention page.
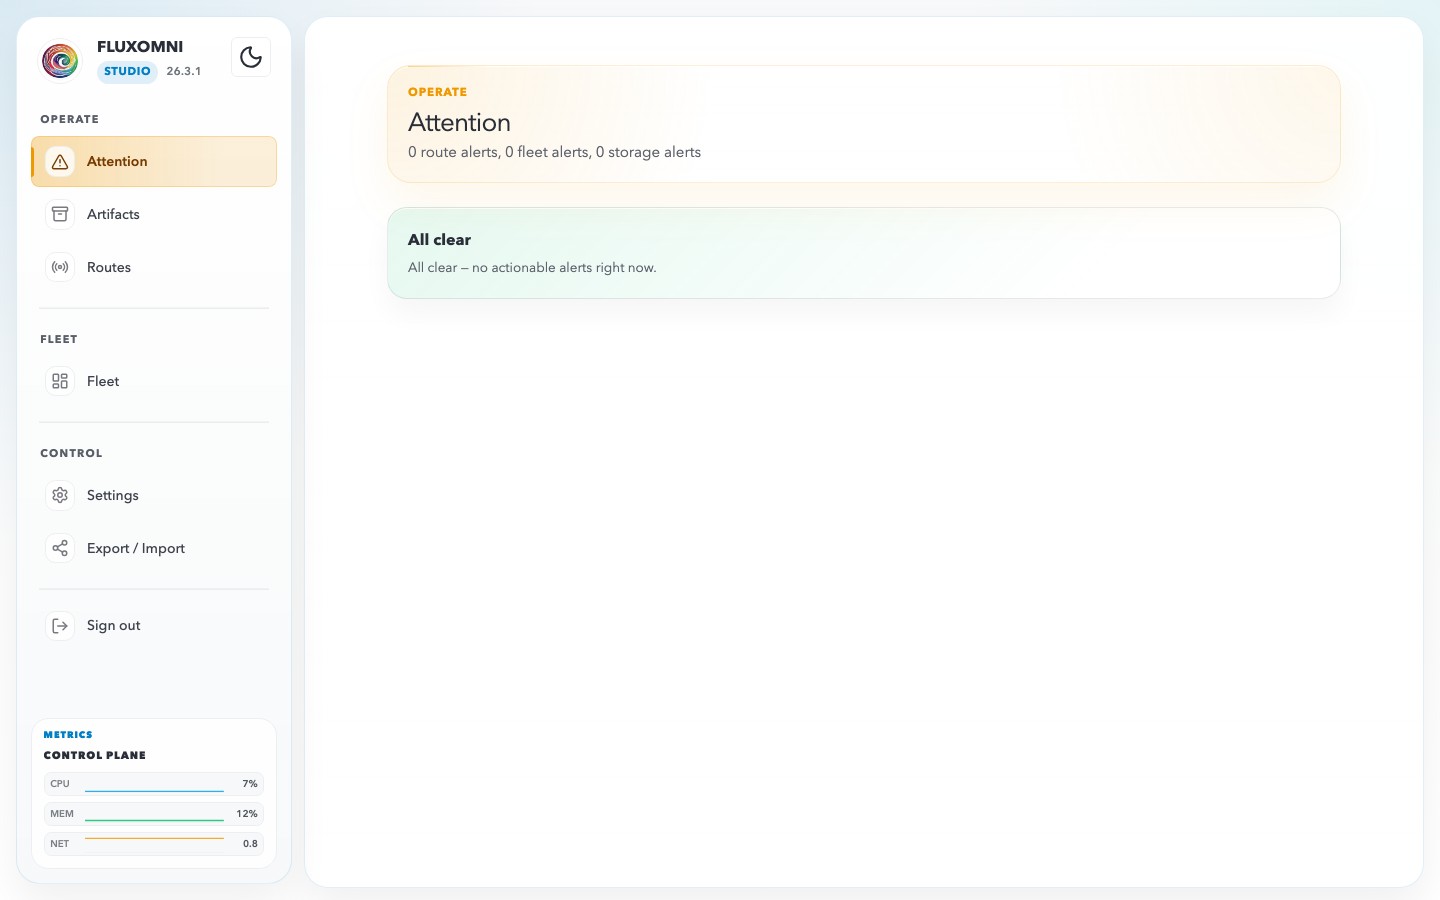
When active issues exist, Fluxomni Studio groups them into Route alerts and Fleet alerts. Operators can mark items as Known to move them into the muted known-issues area without keeping the sidebar urgency badge lit forever. When nothing is active, the page collapses to the all-clear state shown above.
Alert severity levels include:
- Critical — route or fleet conditions that need immediate action.
- Attention — warnings, mismatches, or degraded conditions that still need review.
Use Open route on route alerts to jump directly into the affected workspace.
Fleet
The Fleet page (/fleet) provides an inventory view of all media nodes attached to your Fluxomni Studio instance. Use it to monitor node health, inspect capacity, and confirm which artifacts are cached where.
Fleet Overview
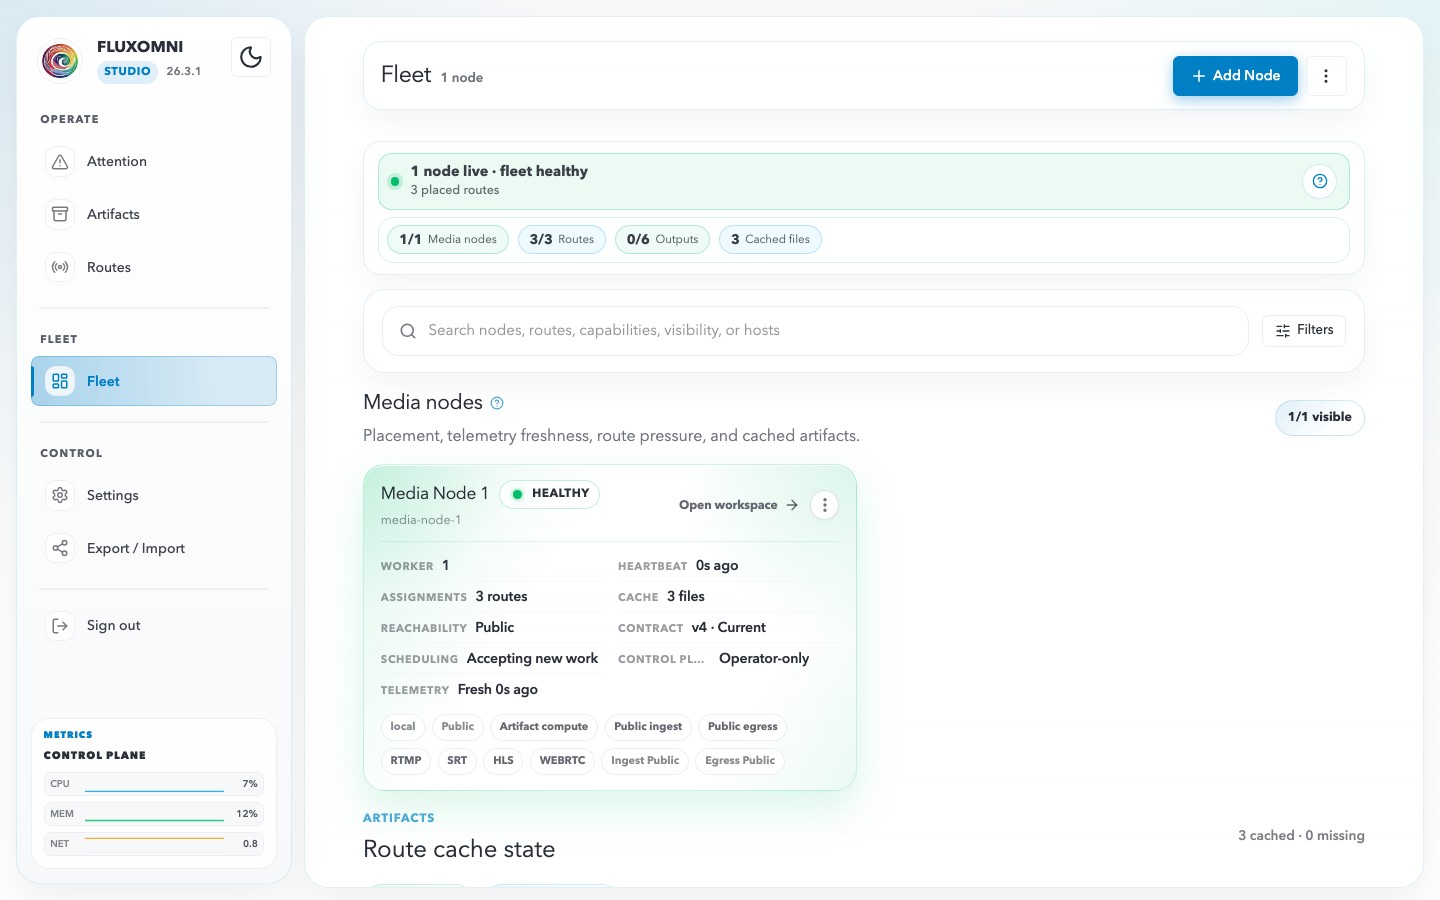
The top of the Fleet page shows a summary bar with:
- Media nodes — total attached nodes and how many are healthy (e.g. 1/1).
- Assigned routes — how many routes are placed on nodes.
- Cached files — total artifact files currently cached across the fleet.
Click + Add Node to register a new media node (see the Quick Start guide for the installation command).
Fleet Tabs
Controls
The default view with a search bar and filters. You can search by node name, route, capabilities, visibility, or host. The main panel shows each media node as a card with live telemetry.
Nodes
A focused list of all registered nodes.
Artifacts
The cache distribution view for artifacts required by assigned routes. Use the separate Artifacts page to upload, import, tag, delete, or inspect library storage.
Media Node Card
Each media node card displays:
| Field | Description |
|---|---|
| Node name | Human-readable name (e.g. “Media Node 1”) |
| Node ID | Machine identifier (e.g. “media-node-1”) |
| Node Health | Current health status: Healthy, Degraded, or Offline |
| Worker | Number of active worker processes |
| Assignments | Number of routes placed on this node |
| Heartbeat | Time since last heartbeat (e.g. “2s ago”) |
| Reachability | Network visibility: Public or Private |
| Control Plane | Access mode: Operator-only or Full |
| Cache | Number of cached artifacts on the node |
| Scheduling | Whether the node is accepting new work |
| Telemetry | Freshness of telemetry data |
Capabilities
Each node advertises its supported protocols and features as tags:
- Protocols: RTMP, SRT, HLS, WEBRTC
- Visibility: Public, local
- Functions: Artifact compute, Public ingest, Public egress, Ingest Public, Egress Public
Routes
Below the capabilities, you can see which routes are currently placed on this node.
File Distribution (Artifacts)
The Fleet Artifacts section is operational visibility for node caches, not the shared library editor. It helps answer whether each assigned route’s required artifacts have reached the node that will play them.
- Cached artifacts — total files cached across all nodes.
- Nodes with gaps — nodes that are missing files required by their assigned routes.
- Blocked routes — routes that cannot start because required files are not cached on the assigned node.
The distribution table shows per-node, per-route breakdowns of required, cached, and missing files with an overall status (Applied, Pending, etc.).
If a row shows a baseline compatibility status such as Compatible, Incompatible, or Unknown, the exact preset definitions live in Settings → Media profiles. Fleet shows whether required files are present on nodes; profile definitions explain why a file may or may not match the route’s expected media shape.
For library operations, use:
- Artifacts — upload files, import from Drive, tag assets, inspect storage, and reuse files in playlists or file-backup sources.
- Settings → Artifacts — configure Google Drive imports and shared file-operation limits.
- Settings → Media profiles — review the baseline presets used by route, playlist, and artifact compatibility checks.
Opening a Node
Click Open node → on any media node card to view detailed node information, including full telemetry, route assignments, and cached file inventory. Use Attention to triage node conditions that need action before returning to node diagnostics.
Settings
The Settings workspace (/settings) is where Fluxomni Studio exposes server defaults, artifact ingest settings, media-profile references, self-service account information, and local user administration. Access it from Settings in the sidebar.
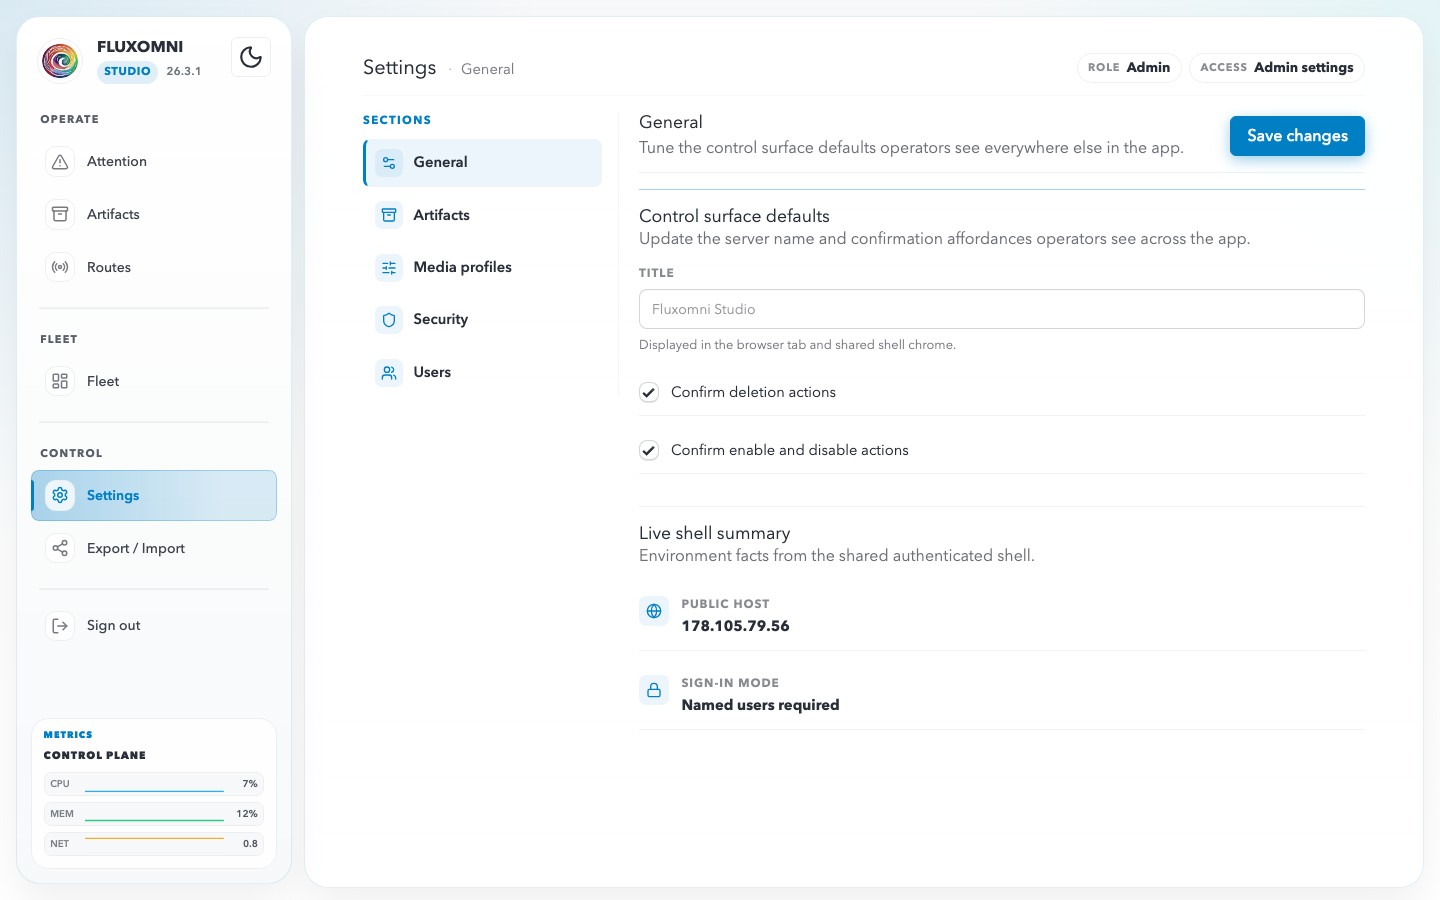
The page uses a split layout:
- a persistent section rail on the left
- a hero card at the top showing your current Role and Access level
- a large content panel for the selected section on the right
Admins can reach General, Artifacts, Media profiles, Security, and Users. Operators stay limited to the self-service General and Security sections.
General
The General section contains control-surface defaults plus a read-only shell summary. Admins can edit the shared defaults here; Operators see the same section as a self-service reference surface.
Control surface defaults
These settings affect the shared operator experience:
- Title — the server name shown in the browser tab and shared shell chrome.
- Confirm deletion actions — requires confirmation before destructive actions such as deleting routes, outputs, or files.
- Confirm enable and disable actions — adds confirmation before toggling inputs or outputs on or off.
Live shell summary
The lower summary cards mirror the current shell-level values visible to the operator:
- Public host
- Delete confirmation
- Enable confirmation
- Sign-in mode
Artifacts
The Artifacts settings section is admin-only and controls ingest defaults for the shared media library. Use the separate Artifacts page for day-to-day uploads, imports, tags, storage review, and playlist reuse.
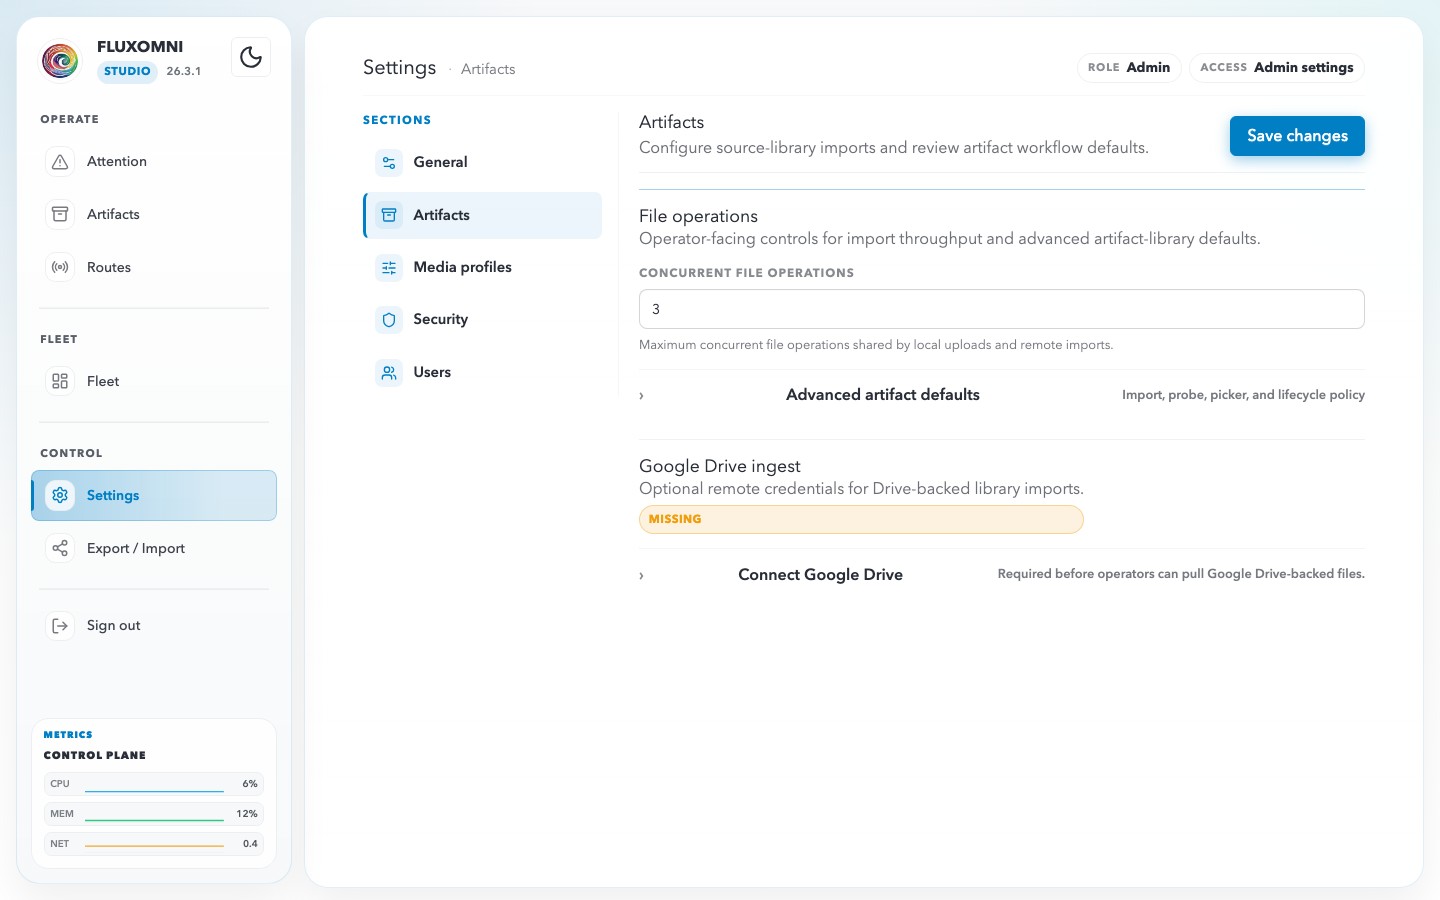
Google Drive
Google Drive settings control Drive imports into the artifact library and route playlist flows:
- Google API Key — required before operators can import shared Drive files or folders.
- Files Limit — maximum concurrent file operations for local uploads and remote imports.
Get an API key
Fluxomni Studio uses a Google Drive API key, not an OAuth user token. The key lets the control plane list and download files that are already shared with link access.
To create one:
- Open the official Google Workspace credential guide: Create access credentials.
- In Google Cloud Console, create or select a project.
- Open APIs & Services → Library, search for Google Drive API, and enable it for the project.
- Open APIs & Services → Credentials and choose Create credentials → API key.
- Copy the generated key into Settings → Artifacts → Google Drive → Google API Key in Fluxomni Studio.
- Recommended: restrict the key to the Google Drive API in Google Cloud Console. If your deployment has a stable public egress IP, also restrict usage to that IP.
Drive files and folders must be shared so the key can read them. Use link sharing such as Anyone with the link can view for the folders/files you import. Private files that require a signed-in Google account are not available through this API-key flow.
Artifact workflow defaults
The remaining cards are read-only reminders for the current artifact workflow:
- library uploads and Drive imports land in the shared artifact catalog
- route playlists and file-backup sources reuse the same library picker
- storage admission and rejections are visible from the Artifacts page and Attention feed
- media nodes cache artifacts as runtime state; the control plane remains the durable catalog authority
Media Profiles
The Media profiles settings section is admin-only and lists the baseline presets Fluxomni Studio uses when checking route playlist compatibility.
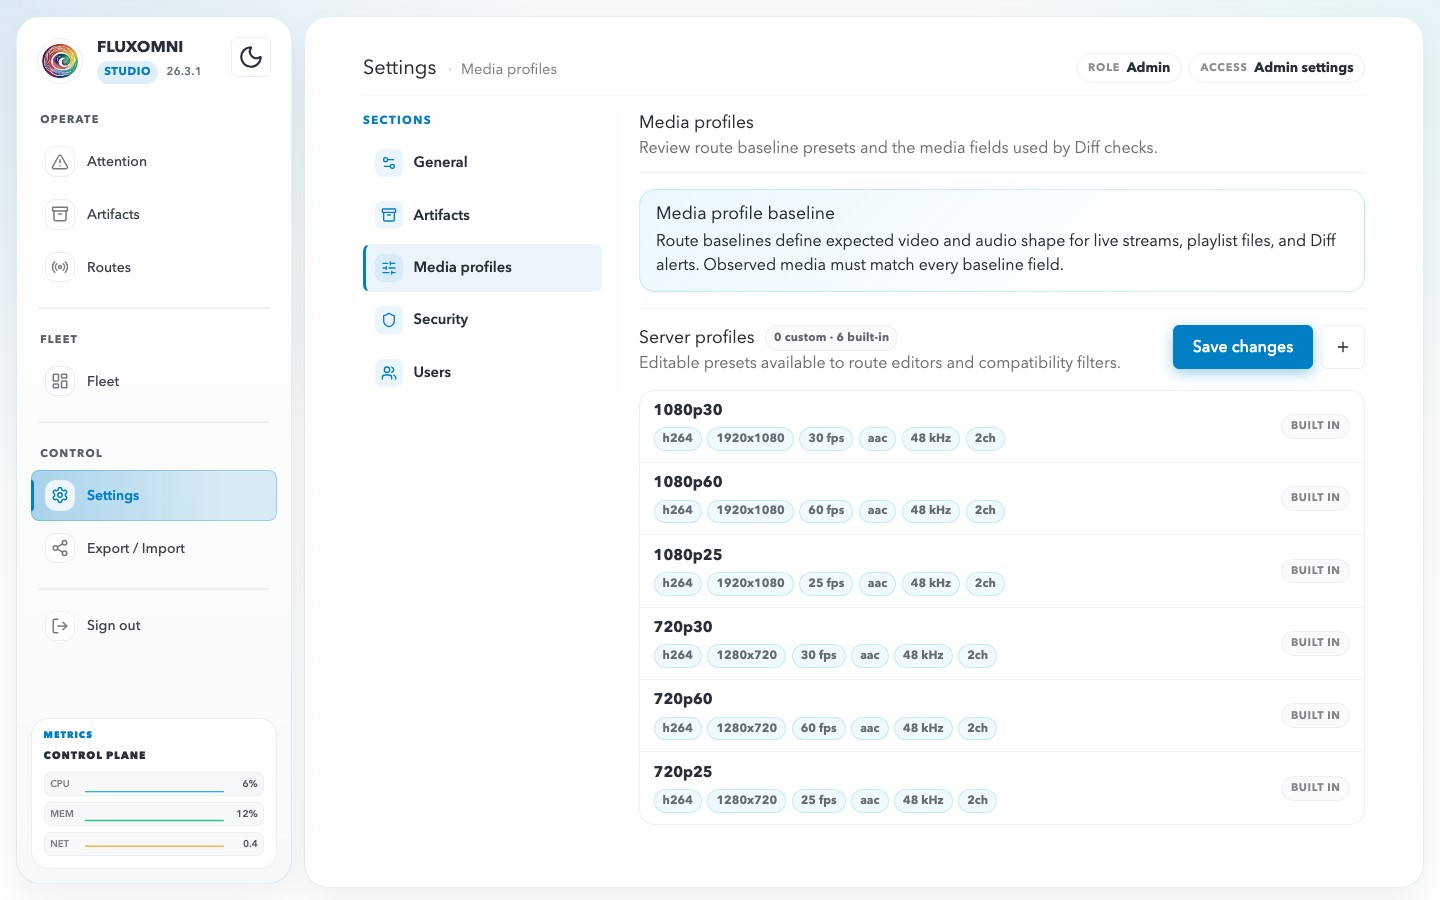
Profiles are reference presets, not encoder controls. They describe the video and audio shape a route expects before playlist files are allowed to start or stay healthy. The current presets cover common H.264/AAC stereo 48 kHz broadcast shapes:
1080p301080p601080p25720p30720p60720p25
Each row shows the comparable fields Fluxomni Studio checks:
- video codec
- width and height
- frame rate
- audio codec
- audio sample rate
- audio channel count
Use this section when a route, playlist item, or artifact row shows a Compatible, Incompatible, or Unknown baseline status. Route workspaces and artifact pickers surface the quick status; Settings → Media profiles explains the exact profile contract those checks are comparing against.
Security
The Security section is focused on the current browser session and its authentication posture.
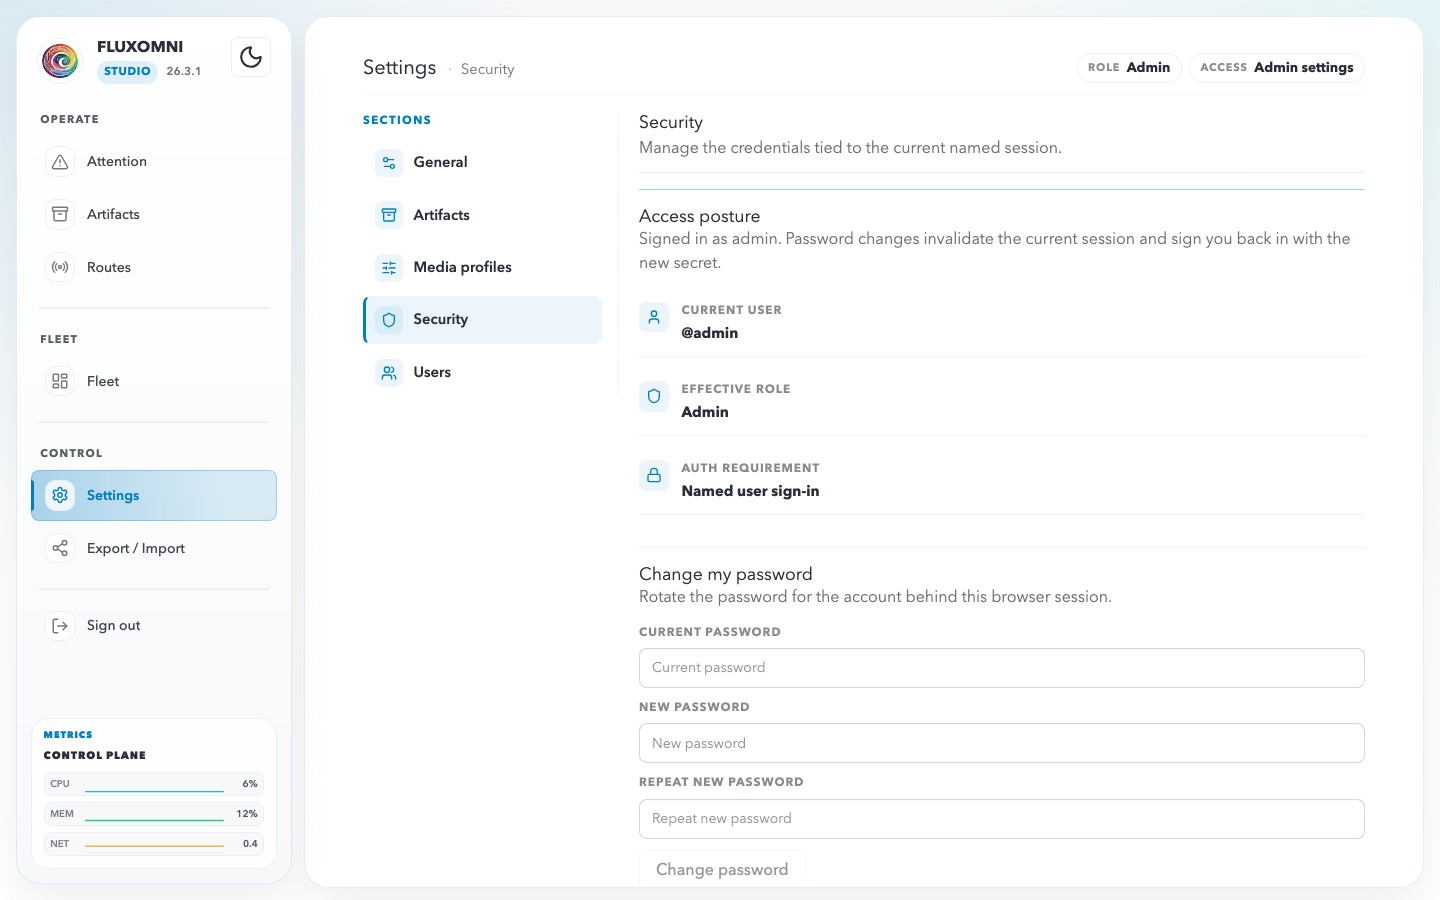
Access posture
The top card shows the current auth boundary for this session:
- Current user — the signed-in username, or the open admin shell when auth is disabled.
- Effective role — the resolved role for the current session.
- Auth requirement — whether the server is running in Named user sign-in mode or Open shell mode.
Change my password
When you are signed in as a named local user, use the password form to rotate that account’s password. Fluxomni Studio invalidates the current session and signs the browser back in with the new password once the change succeeds.
Sign-in screen
When named-user auth is required, unauthenticated browsers land on the sign-in screen shown below.
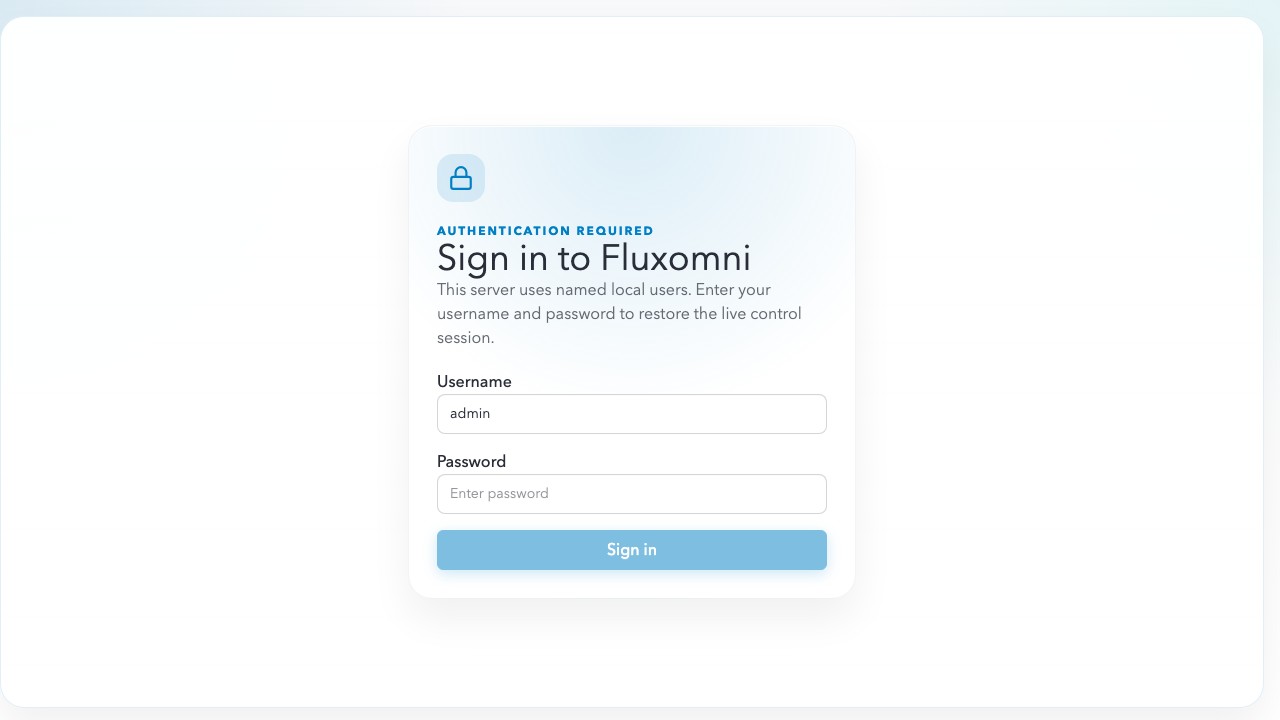
Creating the first persisted admin user is what flips a fresh open-shell install into named-user sign-in mode.
Users
The Users section is admin-only and manages local accounts plus route ownership.
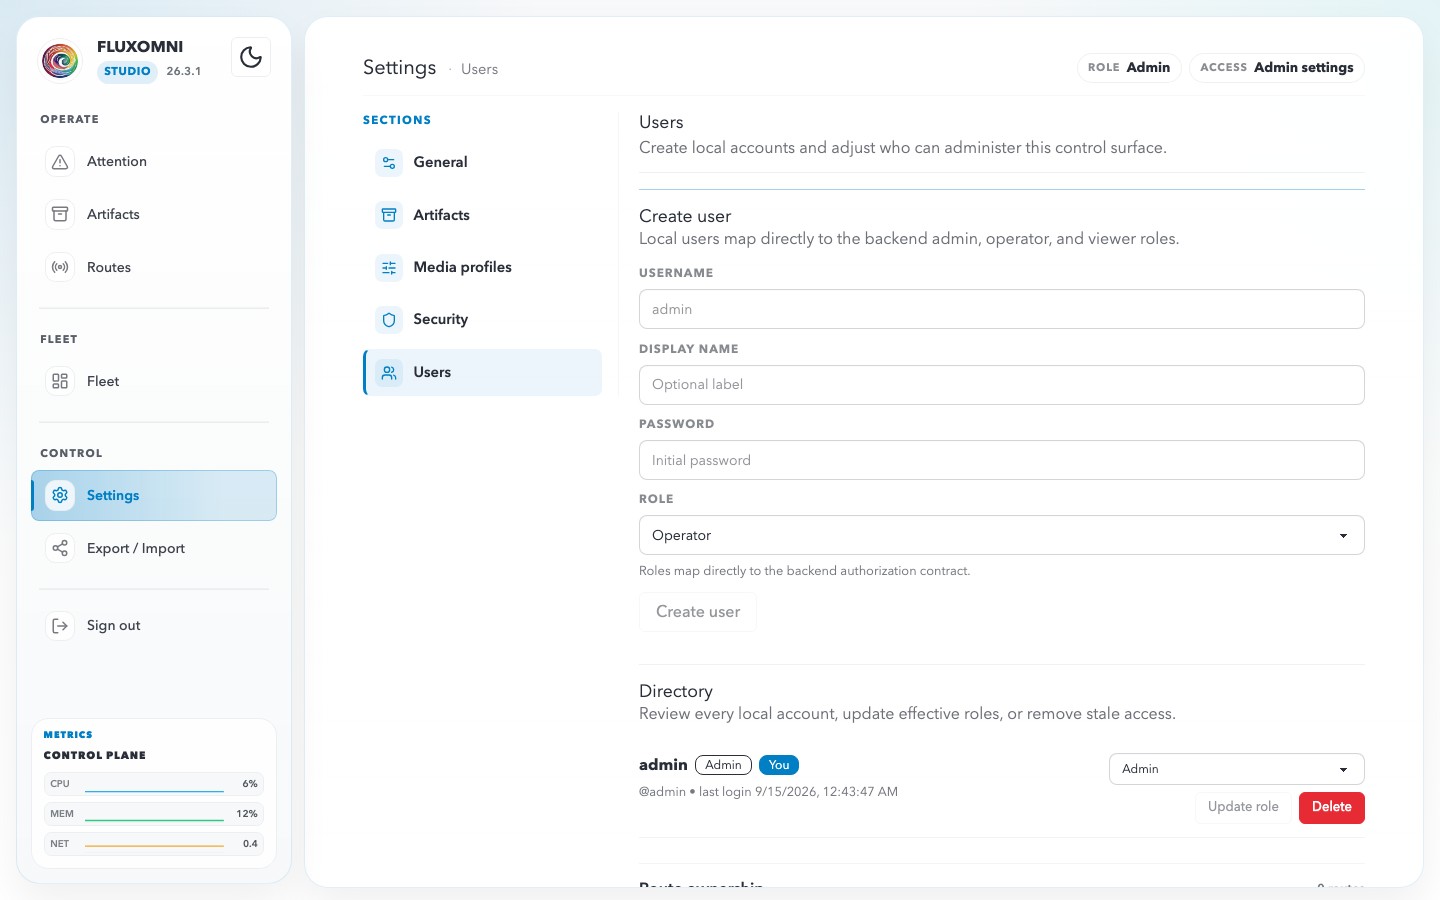
Create user
Use the creation card to add a local account:
- Username — login name for the operator
- Display Name — optional friendly label
- Password — initial password
- Role — Admin, Operator, or Viewer
On a brand-new open-shell install, the very first persisted user is always promoted to Admin and immediately becomes the account that enables named-user auth.
Directory
The Directory card lists all local accounts with their:
- display name or username
- role badge
- last login timestamp
- controls to Update role or Delete the user
Changing your own role or deleting your own account forces the shell to reload under the new auth boundary.
Route ownership
Fluxomni Studio routes can be either Shared or owned by a single named user.
- Shared routes remain visible to every signed-in user.
- Owned routes stay scoped to their assignee plus admins.
- Admins can assign or clear ownership from the route modal and from the route-ownership panels in Users.
- If a user is deleted, any routes they owned fall back to shared scope.
The Users page organizes this with per-user Route ownership panels plus a Shared routes section for reassigning unowned routes.
User roles
Fluxomni Studio has three built-in roles:
| Role | Access |
|---|---|
| Admin | Full access to routes, fleet, settings, user management, export/import, and ownership assignment. |
| Operator | Can create and manage routes, playlists, and outputs for routes they can see. Operators only get self-service Settings sections. |
| Viewer | Read-only access to visible routes and system surfaces. |
Export / Import
Use the Export / Import action in the sidebar to open the route-definition transfer modal. See Export & Import for export scope, preview, replace-mode, owner mapping, and safe-apply guidance.
Export / Import
Use Export / Import to move route definitions between Fluxomni Studio instances, restore reviewed route configuration, or save a route-definition snapshot before major changes.
Export / Import is a sidebar action under Control, not a separate page. Select it to open the modal.
Export route definitions
Choose the export scope in the modal, then download or copy the generated JSON. Store exported files securely: route definitions can contain destination addresses and operational configuration.
Use an export before making broad route changes or when preparing a migration. The export contains route-definition data; it does not create accounts or restore passwords on import.
Preview an import
- Open Export / Import and select the import tab.
- Paste exported JSON or upload a
.jsonfile. - Select the import options, then preview the proposed changes.
- Review every route, settings change, warning, and error before applying.
The preview simulates changes before Fluxomni Studio writes state. Outputs are matched by destination URL, so changing a destination can appear as one output removed and another created.
Apply changes safely
By default, import preserves definitions that are not present in the submitted specification. Select Replace existing definitions only when the imported JSON is intended to remove definitions missing from the spec.
A preview with dangerous changes requires typing APPLY before the modal enables Apply. If imported owner IDs do not exist on the destination instance, you can preview a username-based owner mapping for existing local users.
After applying, download or copy the import report and confirm the affected routes in Routes.
Next steps
- Routes — verify inputs, outputs, and execution after an import
- Settings — review local users and route ownership
- Backup & Restore — back up application state and
.env, not only route definitions
Configuration
Fluxomni Studio is configured through environment variables in .env.
Core Variables
FLUXOMNI_FRONTEND_IMAGE: frontend image repository.FLUXOMNI_CONTROL_PLANE_IMAGE: control-plane image repository.FLUXOMNI_MEDIA_NODE_IMAGE: media-node image repository.FLUXOMNI_VERSION: image tag to deploy.FLUXOMNI_PUBLIC_HOST: public hostname/IP used for the control surface and generated control-plane URLs.FLUXOMNI_PUBLIC_URL: full public base URL including scheme (e.g.https://stream.example.com). Required for HTTPS deployments behind a TLS-terminating reverse proxy. Takes precedence overFLUXOMNI_PUBLIC_HOST+FLUXOMNI_FRONTEND_HTTP_PORT.FLUXOMNI_MEDIA_NODE_PUBLIC_HOST: public hostname/IP shown in generated RTMP, HLS, SRT, and WebRTC media URLs.FLUXOMNI_MEDIA_NODE_ID: stable media-node identifier shown in fleet views.FLUXOMNI_MEDIA_NODE_NAME: human-readable media-node name shown in the control-plane.FLUXOMNI_MEDIA_NODE_LABELS: optional comma-separated capability labels for routing and fleet filters.FLUXOMNI_MEDIA_NODE_ZONE: optional placement zone used to describe where the node runs.
FLUXOMNI_MEDIA_NODE_PUBLIC_HOST is especially important for standalone media-node installs.
Fluxomni Studio uses it in two places:
- It is shown in the RTMP, HLS, SRT, and WebRTC URLs that operators and publishers use.
- For standalone media-node installs, it is used to derive the default
FLUXOMNI_MEDIA_NODE_ENDPOINTashttp://<FLUXOMNI_MEDIA_NODE_PUBLIC_HOST>:50051. Single-host compose installs use Docker-internal networking (http://media-node:50051) instead.
If this value points to a private hostname, a Docker-only hostname, or the wrong server, the control-plane can register the node with an address that other systems cannot reach.
Example:
FLUXOMNI_CONTROL_PLANE_IMAGE=ghcr.io/fluxomnia-systems/fluxomni-control-plane
FLUXOMNI_FRONTEND_IMAGE=ghcr.io/fluxomnia-systems/fluxomni-frontend
FLUXOMNI_MEDIA_NODE_IMAGE=ghcr.io/fluxomnia-systems/fluxomni-media-node
FLUXOMNI_VERSION=latest
FLUXOMNI_PUBLIC_HOST=control.example.com
FLUXOMNI_MEDIA_NODE_PUBLIC_HOST=control.example.com
install.sh also writes FLUXOMNI_CONTROL_PLANE_INTERNAL_AUTH_TOKEN automatically. Keep the same token on both services; rotate it only if you are restarting the whole stack together.
Published self-host releases serve the operator UI from the frontend container, so FLUXOMNI_PUBLIC_HOST and FLUXOMNI_FRONTEND_HTTP_PORT determine the browser URL you share with operators.
If you deploy behind a domain or reverse proxy, set FLUXOMNI_PUBLIC_HOST, FLUXOMNI_MEDIA_NODE_PUBLIC_HOST, and FLUXOMNI_PUBLIC_URL (with the https:// scheme) so generated URLs use the correct hostnames and scheme. See Reverse Proxy & TLS for examples.
Release Channels
latest: newest stable release and the default in this repositoryvYY.Q.N: canonical public stable release tag, e.g.v26.2.4vX.Y.Z: core image tag, accepted for direct image pinning, e.g.v0.13.0edge: latest successful publish frommain
The installer maps canonical public pins to the matching core image tag when native date image tags are not published.
Optional Variables
FLUXOMNI_FRONTEND_HTTP_PORT: host HTTP port for the frontend UI and proxied API.FLUXOMNI_CONTROL_PLANE_RPC_PORT: host gRPC port for remote media-node registration and delivery. Defaults to localhost-only; expose it deliberately when attaching external media nodes.FLUXOMNI_MEDIA_NODE_RTMP_PORT: host RTMP ingest port.FLUXOMNI_MEDIA_NODE_HLS_PORT: host HLS TCP port.FLUXOMNI_MEDIA_NODE_WHIP_PORT: host WHIP signaling TCP port (default8003).FLUXOMNI_SRS_RTC_PORT: WebRTC media UDP listener and host port (default8000), independent of HLS.FLUXOMNI_SRS_CANDIDATE: reachable ICE candidate hostname/IP; defaults to the media-node public host when empty.FLUXOMNI_MEDIA_NODE_SRS_CALLBACK_PORT: host loopback port for the internal SRS callback listener.FLUXOMNI_MEDIA_NODE_SRT_PORT: host SRT UDP port.FLUXOMNI_MEDIA_NODE_GRPC_PORT: host gRPC port for a standalone media-node.FLUXOMNI_CONTROL_PLANE_DATA_DIR: control-plane app data directory on the host.FLUXOMNI_MEDIA_NODE_DATA_DIR: media-node app data directory on the host.FLUXOMNI_SHARED_VIDEO_DIR: host directory mounted read-only into the media-node video cache path.FLUXOMNI_OTLP_ENDPOINT: OpenTelemetry collector endpoint (e.g.http://collector:4318).
For single-host installs, keep both data-directory variables on ./data unless you intentionally want separate storage surfaces.
If you move FLUXOMNI_MEDIA_NODE_DATA_DIR elsewhere, keep FLUXOMNI_SHARED_VIDEO_DIR pointed at the control-plane video cache so downloaded or imported playlist files remain readable from the media-node.
Apply Changes
Apply changes through Capacity Ledger Upgrades. Disable and drain routes before recreating existing control-plane or media-node containers, then restore the recorded enabled routes after verification.
The operator UI is served from the frontend host:
http://<FLUXOMNI_PUBLIC_HOST>for the landing page/routesfor route management/fleetfor media-node monitoring
Attach an External Media Node
The full self-host install binds the control-plane RPC listener to localhost by default.
Before attaching another media server, expose 50052/tcp only to trusted node IPs, then run the installer on that server in explicit media-node mode.
FLUXOMNI_CONTROL_PLANE_RPC_ENDPOINT, FLUXOMNI_CONTROL_PLANE_INTERNAL_AUTH_TOKEN, and FLUXOMNI_MEDIA_NODE_PUBLIC_HOST are required for that mode:
FLUXOMNI_VERSION=edge \
FLUXOMNI_CONTROL_PLANE_RPC_ENDPOINT=http://control.example.com:50052 \
FLUXOMNI_CONTROL_PLANE_INTERNAL_AUTH_TOKEN=replace-with-shared-token \
FLUXOMNI_MEDIA_NODE_PUBLIC_HOST=media2.example.com \
  curl -fsSL https://install.fluxomni.io | bash -s -- media-node
That mode installs into ~/fluxomni-media-node by default, writes a media-node-only compose bundle, derives a host-specific node ID when one is not provided, and waits for a successful Registered media node with control plane log before printing success.
Set FLUXOMNI_MEDIA_NODE_PUBLIC_HOST to the hostname or IP that the control-plane, publishers, and viewers should use for that media server. In the example above, that is media2.example.com.
Set these only when you need to override the defaults:
FLUXOMNI_MEDIA_NODE_ENDPOINT: advertised media-node gRPC endpoint. Defaults tohttp://<FLUXOMNI_MEDIA_NODE_PUBLIC_HOST>:50051.FLUXOMNI_MEDIA_NODE_ID: stable node ID. Defaults tomedia-node-<hostname>.FLUXOMNI_MEDIA_NODE_NAME: display name shown in the control-plane. Defaults toMedia Node <hostname>.FLUXOMNI_MEDIA_NODE_LABELS: comma-separated labels for node capabilities or operator grouping. Defaults toselfhost.FLUXOMNI_MEDIA_NODE_ZONE: optional location or placement label. Defaults tolocal.
Update an Existing Installation
Follow the capacity upgrade guide. Installer reruns require initial, drained or standalone-node maintenance mode; keep automatic updates stopped.
Offline Preparation Resource Limits
Each media node can have its own shared budget for playlist normalization. Live FFmpeg and SRS remain outside that preparation group. The Fleet node’s Diagnostics page shows the configured budget, current usage, throttling and active/waiting preparation jobs.
This option requires a media-node build that supports preparation cgroups,
Linux with cgroup v2, a local rootful Docker daemon without user namespace
remapping, systemd, Python 3 at /usr/bin/python3, and root/sudo access. The host must already enable
cpu, memory and pids in /sys/fs/cgroup/cgroup.subtree_control; the installer
does not change the host-wide controller policy. Docker Desktop, remote Docker
contexts and rootless Docker are not supported by this option.
Choose budgets for your machine; the following values are examples:
curl -fsSL https://install.fluxomni.io -o install.sh
FLUXOMNI_PREPARATION_CGROUP_ENABLED=1 \
FLUXOMNI_PREPARATION_CPU_MILLICORES=500 \
FLUXOMNI_PREPARATION_MEMORY_MIB=1024 \
FLUXOMNI_PREPARATION_TASKS=64 \
  bash install.sh full
Use media-node instead of full on a standalone node, alongside its usual
control-plane connection settings. Repeat on other node hosts with different
budgets. 500 millicores means half of one CPU core; memory is MiB and includes
charged page cache; tasks count threads, not just processes. Swap is disabled
for preparation. These limits do not predict how many additional live routes
or outputs will fit.
The installer saves the values in .env, downloads the common
docker-compose.preparation-cgroup.yml overlay and includes it in the installed
Compose bundle. Each installation directory gets a distinct hash-named group,
root-owned helper and boot unit. Keep installation directories stable. The unit
recreates the group before Docker starts after reboot, including socket
activation. No privileged media-node container or full writable cgroup mount
is added.
Installer reruns preserve budgets; an explicit environment value overrides its
saved value. To change just CPU, rerun with
FLUXOMNI_PREPARATION_CPU_MILLICORES=750. Changing an existing node requires the
drained maintenance procedure.
The installer requires the current media-node startup to confirm enforcement,
so older images cannot pass using limits left by a previous version.
Check that Fleet reports enforced after recreation. CPU throttling slows
preparation; memory/task-limit events fail the preparation request. Shared
storage, memory bandwidth and GPU contention still need workload testing.
To disable, rerun the installer with
FLUXOMNI_PREPARATION_CGROUP_ENABLED=0. This removes the active overlay, disables
the boot unit and saves budgets as comments for a later explicit re-enable.
Changing the flag alone followed by docker compose up does not rebuild the
include: use the installer for enable/disable. Disabling never kills or deletes
the old cgroup. After a killed node, re-enabling lets the runtime recover its
owned attempts; live/runtime Docker limits cover a separate budget.
For manual deployments, provision a dedicated subtree, set
FLUXOMNI_PREPARATION_HOST_ROOT and all three budgets, then combine either base
Compose template with docker-compose.preparation-cgroup.yml. Do not share a
preparation root between nodes. Provide boot-time provisioning before Docker
restores the container. Installer-managed roots can be drained after stopping
the node with the root-owned helper’s cleanup <installation-hash> command;
cleanup disables that installation’s boot unit and refuses a live owner.
Reverse Proxy & TLS
Most production deployments place Fluxomni Studio behind a reverse proxy to terminate TLS, serve the UI on port 443, and optionally restrict access.
Overview
Fluxomni Studio exposes an HTTP surface (UI + API) and several media-plane ports. A reverse proxy sits in front of the HTTP surface while media ports (RTMP, SRT, HLS, WHIP signaling, and RTC media) are typically passed through directly.
Internet
  |
  +---> :443 (TLS) ---> reverse proxy ---> frontend :80  (HTTP)
  +---> :1935 -----------------------------------------> media-node   (RTMP)
  +---> :10080/udp ------------------------------------> media-node   (SRT)
  +---> :8000/tcp -------------------------------------> media-node   (HLS)
  +---> :8003/tcp -------------------------------------> media-node   (WHIP signaling)
  +---> :8000/udp -------------------------------------> media-node   (RTC media)
Caddy (recommended)
Caddy handles TLS certificates automatically via Let’s Encrypt.
Install Caddy on the same host or a gateway host, then create
/etc/caddy/Caddyfile:
stream.example.com {
    reverse_proxy localhost:80
}
Reload Caddy:
sudo systemctl reload caddy
Caddy provisions a certificate automatically. Set your .env values to
match:
FLUXOMNI_PUBLIC_HOST=stream.example.com
FLUXOMNI_MEDIA_NODE_PUBLIC_HOST=stream.example.com
FLUXOMNI_PUBLIC_URL=https://stream.example.com
FLUXOMNI_PUBLIC_URL tells the control plane the full public URL including
scheme. Without it, artifact fetch URLs default to http:// which causes TLS
handshake failures when media nodes download files through the HTTPS proxy.
Apply changes through Capacity Ledger Upgrades. Disable and drain routes before recreating existing control-plane or media-node containers, then restore the recorded enabled routes after verification.
WebSocket support
The Control Surface uses WebSocket connections for real-time updates. Caddy proxies WebSocket by default with no extra configuration.
nginx
Install nginx and create /etc/nginx/sites-available/fluxomni:
server {
    listen 443 ssl http2;
    server_name stream.example.com;

    ssl_certificate     /etc/letsencrypt/live/stream.example.com/fullchain.pem;
    ssl_certificate_key /etc/letsencrypt/live/stream.example.com/privkey.pem;

    location / {
        proxy_pass http://127.0.0.1:80;
        proxy_set_header Host $host;
        proxy_set_header X-Real-IP $remote_addr;
        proxy_set_header X-Forwarded-For $proxy_add_x_forwarded_for;
        proxy_set_header X-Forwarded-Proto $scheme;

        # WebSocket support
        proxy_http_version 1.1;
        proxy_set_header Upgrade $http_upgrade;
        proxy_set_header Connection "upgrade";
    }
}

server {
    listen 80;
    server_name stream.example.com;
    return 301 https://$host$request_uri;
}
Enable the site and reload:
sudo ln -s /etc/nginx/sites-available/fluxomni /etc/nginx/sites-enabled/
sudo nginx -t && sudo systemctl reload nginx
Obtain a certificate with Certbot:
sudo certbot --nginx -d stream.example.com
Media ports
RTMP (TCP 1935), SRT (UDP 10080), and RTC media (UDP 8000) must have reachable transport paths. HLS uses TCP 8000; WHIP signaling uses TCP 8003. Keep these ports published directly unless you deliberately proxy HLS or WHIP over HTTP. Proxying WHIP signaling does not proxy RTC UDP media. For custom ports, use the values from .env.
If you need TLS on RTMP, some CDN endpoints accept RTMPS. Fluxomni Studio
outputs support rtmps:// destination URLs natively.
Firewall considerations
When using a reverse proxy, you can restrict the frontend HTTP port to localhost so it is only reachable through the proxy:
# In .env
FLUXOMNI_FRONTEND_HTTP_PORT=127.0.0.1:80
This binds port 80 to the loopback interface only. The reverse proxy on the same host can still reach it, but external clients cannot bypass TLS.
Media ports must remain publicly accessible for publishers and viewers.
Private Access & Tunnels
Run Fluxomni Studio on a private overlay network when the Control Surface and media ports should be reachable only from your own devices or servers.
This page shows Tailscale first because it is the easiest private-network option for most self-host deployments. The same Fluxomni Studio rule applies to every option: set the advertised hosts to the address that your publishers, viewers, and extra media nodes can actually reach.
When to Use This
Use private access when you want a home lab, creator workstation, staging server, or internal fleet that is not exposed directly to the public internet.
Private overlays are a good fit for:
- operator access to
/routes,/fleet, and settings - private RTMP/SRT publish tests from your own machines
- remote media nodes that register over a private control path
- staging deployments before opening public media ports
They are not a replacement for a public ingest or viewer edge. If guests, customers, or platforms outside your private network need to publish or watch, use public DNS and firewall rules for those media ports.
Tailscale Single-Host Install
Add the server as a new device in Tailscale, join your tailnet, then install Fluxomni Studio with the server’s Tailscale IP as the advertised host.
- Open Tailscale’s Add device page.
- Choose the server OS and copy the setup command Tailscale gives you.
- Run that command on the server, then bring the device online with
sudo tailscale up --sshif the setup command did not already do that.
After the device appears in your tailnet, run:
#!/usr/bin/env bash
set -euo pipefail

sudo tailscale up --ssh

TS_IP="$(tailscale ip -4 | head -n1)"
if [ -z "$TS_IP" ]; then
  echo "Could not detect a Tailscale IPv4 address" >&2
  exit 1
fi

# Install Fluxomni Studio so generated UI, RTMP, HLS, and SRT URLs use the tailnet IP.
curl -fsSL https://install.fluxomni.io | \
  FLUXOMNI_PUBLIC_HOST="$TS_IP" \
  FLUXOMNI_MEDIA_NODE_PUBLIC_HOST="$TS_IP" \
  bash

printf '\nFluxomni Studio Control Surface: http://%s\n' "$TS_IP"
printf 'RTMP/SRT/HLS media ports are reachable from tailnet devices on the same host.\n'
From a device in the same tailnet, open:
http://100.x.y.z/routes
The default media addresses shown in the route workspace will use the same Tailscale IP:
rtmp://100.x.y.z:1935/live/<publish-key>
srt://100.x.y.z:10080?streamid=...
http://100.x.y.z:8000/...
Tailscale MagicDNS Names
If MagicDNS is enabled in the Tailscale admin console, you can advertise the node name instead of the 100.x.y.z IP.
TS_DNS="fluxomni-box.your-tailnet.ts.net"

curl -fsSL https://install.fluxomni.io | \
  FLUXOMNI_PUBLIC_HOST="$TS_DNS" \
  FLUXOMNI_MEDIA_NODE_PUBLIC_HOST="$TS_DNS" \
  bash
Use the IP form if Docker containers on the host cannot resolve your MagicDNS name. Generated artifact URLs and media-node callbacks must be reachable from the containers, not only from your laptop.
Optional Tailscale Serve
Tailscale already encrypts traffic between tailnet devices. Use Tailscale Serve when you want a private https://...ts.net URL for the web UI, or when Docker-published ports time out over Tailscale even though Tailscale SSH and tailscale ping work.
#!/usr/bin/env bash
set -euo pipefail

: "${TS_DNS:?Set TS_DNS to your MagicDNS name, for example fluxomni-box.your-tailnet.ts.net}"

# First add this host from https://login.tailscale.com/admin/machines/new,
# then make sure it is online in your tailnet.
sudo tailscale up --ssh

# Bind the Fluxomni Studio HTTP container port to localhost, then let Tailscale Serve
# publish it privately on https://$TS_DNS.
curl -fsSL https://install.fluxomni.io | \
  FLUXOMNI_FRONTEND_HTTP_PORT=127.0.0.1:8080 \
  FLUXOMNI_PUBLIC_HOST="$TS_DNS" \
  FLUXOMNI_PUBLIC_URL="https://$TS_DNS" \
  FLUXOMNI_MEDIA_NODE_PUBLIC_HOST="$(tailscale ip -4 | head -n1)" \
  bash

sudo tailscale serve --bg --https=443 http://127.0.0.1:8080

printf '\nFluxomni Studio Control Surface: https://%s\n' "$TS_DNS"
Tailscale Serve can also forward the plain HTTP UI and TCP media ports when direct Docker-published ports are not reachable over the tailnet:
# UI over plain HTTP, useful when http://<tailnet-name>/routes times out.
sudo tailscale serve --bg --http=80 http://127.0.0.1:80

# RTMP and HLS and WHIP signaling TCP over the tailnet.
sudo tailscale serve --bg --tcp=1935 tcp://127.0.0.1:1935
sudo tailscale serve --bg --tcp=8000 tcp://127.0.0.1:8000
sudo tailscale serve --bg --tcp=8003 tcp://127.0.0.1:8003

# Control-plane gRPC for standalone media-node registration.
sudo tailscale serve --bg --tcp=50052 tcp://127.0.0.1:50052

# Inspect or reset the current Serve config.
tailscale serve status
# sudo tailscale serve reset
This is a Tailscale/Docker forwarding workaround, not a Fluxomni Studio setting. Tailscale Serve does not forward SRT UDP (10080/udp) or RTC media UDP (8000/udp), so use RTMP for private tailnet ingest/testing when you rely on Serve forwarding.
If you use a Tailscale Service, pass its TailVIP to --service so the stable service name, not the physical node name, owns the forwarded ports:
SERVICE_TAILVIP=100.x.y.z # from Tailscale service settings

sudo tailscale serve --bg --service="$SERVICE_TAILVIP" --http=80 http://127.0.0.1:80
sudo tailscale serve --bg --service="$SERVICE_TAILVIP" --tcp=1935 tcp://127.0.0.1:1935
sudo tailscale serve --bg --service="$SERVICE_TAILVIP" --tcp=8000 tcp://127.0.0.1:8000
sudo tailscale serve --bg --service="$SERVICE_TAILVIP" --tcp=8003 tcp://127.0.0.1:8003
sudo tailscale serve --bg --service="$SERVICE_TAILVIP" --tcp=50052 tcp://127.0.0.1:50052
Tailscale ACL Example
Use Tailscale ACLs to restrict who can reach the Fluxomni Studio host. This example allows only members of group:operators to reach the UI and media ports.
{
  "groups": {
    "group:operators": ["[email protected]", "[email protected]"]
  },
  "acls": [
    {
      "action": "accept",
      "src": ["group:operators"],
      "dst": [
        "tag:fluxomni:80",
        "tag:fluxomni:443",
        "tag:fluxomni:1935",
        "tag:fluxomni:8000",
        "tag:fluxomni:8003",
        "tag:fluxomni:10080"
      ]
    }
  ],
  "tagOwners": {
    "tag:fluxomni": ["group:operators"]
  }
}
Then authenticate the server with the tag:
sudo tailscale up --ssh --advertise-tags=tag:fluxomni
If Tailscale SSH works but http://<tailscale-host>/routes times out, check the ACLs first. SSH can be allowed while HTTP, RTMP, HLS, and SRT are still blocked; permit at least ports 80, 1935, 8000, 8003, and 10080 to the Fluxomni Studio host or tag. If grants already allow the traffic and the ports still time out, use the Tailscale Serve commands above to forward UI, RTMP, and HLS and WHIP signaling TCP from localhost.
Remote Media Node over Tailscale
A standalone media node can register to the control plane over the tailnet. Add the media-node host from Tailscale’s Add device page, join the same tailnet, then run this on the media-node host.
#!/usr/bin/env bash
set -euo pipefail

: "${CONTROL_TS_HOST:?Set CONTROL_TS_HOST to the control-plane Tailscale IP or MagicDNS name}"
: "${FLUXOMNI_CONTROL_PLANE_INTERNAL_AUTH_TOKEN:?Set the same token used by the control plane}"

sudo tailscale up --ssh

MEDIA_TS_IP="$(tailscale ip -4 | head -n1)"

curl -fsSL https://install.fluxomni.io | \
  FLUXOMNI_CONTROL_PLANE_RPC_ENDPOINT="http://${CONTROL_TS_HOST}:50052" \
  FLUXOMNI_CONTROL_PLANE_INTERNAL_AUTH_TOKEN="$FLUXOMNI_CONTROL_PLANE_INTERNAL_AUTH_TOKEN" \
  FLUXOMNI_MEDIA_NODE_PUBLIC_HOST="$MEDIA_TS_IP" \
  FLUXOMNI_MEDIA_NODE_ENDPOINT="http://${MEDIA_TS_IP}:50051" \
  FLUXOMNI_MEDIA_NODE_LABELS="selfhost,tailnet" \
  FLUXOMNI_MEDIA_NODE_ZONE="tailnet" \
  bash -s -- media-node
Use the same internal auth token as the control plane. The control-plane RPC port (50052/tcp) and media-node gRPC port (50051/tcp) only need to be reachable inside the tailnet unless you intentionally run a public distributed fleet.
50052/tcp and 50051/tcp are different directions:
50052/tcpis the control-plane RPC endpoint that media nodes call for registration, heartbeat, and feedback.50051/tcpis the media-node gRPC endpoint that the control plane calls for media-node operations.
If direct Docker-published ports also time out on the standalone media-node host, run Tailscale Serve there too and advertise the forwarded endpoint:
# On the standalone media-node host.
sudo tailscale serve --bg --tcp=50051 tcp://127.0.0.1:50051

MEDIA_TS_HOST=media-node.tail380321.ts.net
curl -fsSL https://install.fluxomni.io | \
  FLUXOMNI_CONTROL_PLANE_RPC_ENDPOINT="http://${CONTROL_TS_HOST}:50052" \
  FLUXOMNI_CONTROL_PLANE_INTERNAL_AUTH_TOKEN="$FLUXOMNI_CONTROL_PLANE_INTERNAL_AUTH_TOKEN" \
  FLUXOMNI_MEDIA_NODE_PUBLIC_HOST="$MEDIA_TS_HOST" \
  FLUXOMNI_MEDIA_NODE_ENDPOINT="http://${MEDIA_TS_HOST}:50051" \
  FLUXOMNI_MEDIA_NODE_LABELS="selfhost,tailnet" \
  FLUXOMNI_MEDIA_NODE_ZONE="tailnet" \
  bash -s -- media-node
For distributed Fluxomni Studio over Tailscale, keep these TCP paths reachable:
| Host | Port | Purpose |
|---|---|---|
| Frontend host | 80/tcp | Control Surface UI/API |
| Control-plane host | 50052/tcp | Control-plane gRPC for media-node registration |
| Control-plane host with local media node | 1935/tcp | RTMP ingest |
| Control-plane host with local media node | 8000/tcp | HLS playback |
| Control-plane host with local media node | 8003/tcp | WHIP signaling |
| Standalone media-node host | 50051/tcp | Media-node gRPC called by the control plane |
| Standalone media-node host | 1935/tcp | RTMP ingest |
| Standalone media-node host | 8000/tcp | HLS playback |
| Standalone media-node host | 8003/tcp | WHIP signaling |
Tailscale Serve forwards TCP only. It does not cover SRT UDP (10080/udp) or RTC media UDP (8000/udp). WHIP signaling forwarding requires TCP 8003, but WebRTC also needs direct UDP reachability to the advertised ICE candidate.
Cloudflare Tunnel
Cloudflare Tunnel is useful for exposing the Control Surface over HTTPS without opening inbound HTTP ports. It is not a full private L3 network and does not carry RTMP or SRT media ports directly.
Quick UI-only test:
#!/usr/bin/env bash
set -euo pipefail

curl -fsSL https://install.fluxomni.io | \
  FLUXOMNI_FRONTEND_HTTP_PORT=127.0.0.1:8080 \
  FLUXOMNI_PUBLIC_HOST=fluxomni.example.com \
  FLUXOMNI_PUBLIC_URL=https://fluxomni.example.com \
  FLUXOMNI_MEDIA_NODE_PUBLIC_HOST="$(hostname -I | awk '{print $1}')" \
  bash

# For a temporary test tunnel. For production, create a named tunnel and route
# fluxomni.example.com to it in Cloudflare Zero Trust.
cloudflared tunnel --url http://127.0.0.1:8080
Use Cloudflare Access if you want identity-based protection for the UI. Keep media ports on Tailscale or public firewall rules depending on who must publish and view.
Choosing an Option
Pick the private-access layer based on which surface needs to be private.
| Option | Best for | Trade-offs |
|---|---|---|
| Tailscale | Private admin, media testing, and remote media nodes | Requires every publisher, viewer, or node to join the tailnet |
| Cloudflare Tunnel | HTTPS UI access without inbound HTTP ports | UI-focused; RTMP/SRT still need Tailscale or public firewall rules |
For most self-host users, start with Tailscale and the single-host install script above. Add Cloudflare Tunnel when you only need browser access to the Control Surface over HTTPS.
Capacity Ledger Upgrades
Use a maintenance window when moving to builds with durable route/output admission or restarting their media nodes.
These builds preserve capacity until the previous execution has proved it stopped. A container restart or a new heartbeat does not clear old ownership. Fleet Drain node prevents new placement but keeps existing execution; it does not release reservations.
The latest stable v26.3.2 predates this contract. Select a tested build containing core PR #344, such as immutable main-233a5d5, and use the same tested build for the control plane, frontend and nodes. The installer rejects older candidates that cannot provide the admission API and initialization proof. Keep backups and record the enabled route IDs before maintenance.
First Capacity Upgrade
Stop every external execution container before initializing the control-plane ledger.
-
On every standalone node host, stop its updater and node, and verify they have stopped:
cd ~/fluxomni-media-node
docker compose stop --timeout 30 watchtower media-node
docker compose ps --all
Include custom execution containers and other installations on those hosts. Pause deployment automation. Keep them stopped until the upgraded control plane has passed verification.
-
On the full-stack host, download the current installer and select the tested build:
curl -fsSL https://install.fluxomni.io -o install.sh FLUXOMNI_VERSION=main-233a5d5 \ bash install.sh full --capacity-upgrade initial --confirm-execution-stopped--confirm-execution-stoppedasserts that every external predecessor execution container and updater is stopped. The installer controls its local node; it cannot inspect other hosts. For a custom directory, also provideFLUXOMNI_DIR. -
The installer stops the local updater before downloading deployment assets or pulling images. It then stops local execution and controllers, starts the upgraded control plane alone with a temporary acknowledgement, verifies its authenticated admission API, stops it and verifies persisted ledger initialization. It recreates the control plane without that acknowledgement and verifies again before starting local media and the frontend. Watchtower stays stopped.
-
Update each already stopped standalone node only after the full-stack step succeeds:
FLUXOMNI_VERSION=main-233a5d5 \
  bash install.sh media-node --capacity-upgrade node --confirm-control-plane-ready
Here
--confirm-control-plane-readyasserts that the global initial shutdown boundary and control-plane verification succeeded. New starting reservations are expected; they have no predecessor execution. Check Fleet registration, source/playback health and Preparation enforced when isolation is configured.
Never place FLUXOMNI_CAPACITY_UPGRADE_STOPPED in .env or pass it as an installer environment variable. The installer owns its temporary Compose-only use. Initial mode refuses a ledger that is already initialized, even if empty.
Later Planned Upgrades
Release existing reservations while the old reporters are still alive.
-
Record enabled route IDs. Disable affected routes in the route workspace. For a full-stack upgrade, disable all routes in the cluster.
-
Wait for every affected node’s Fleet capacity counts to reach zero: committed, starting and retiring routes and outputs. Keep old nodes and the control plane running until shutdown proofs arrive. An offline node or pending retiring count is not a completed drain.
-
Upgrade the full-stack installation:
FLUXOMNI_VERSION=main-233a5d5 \
  bash install.sh full --capacity-upgrade drained
The installer checks the persisted ledger, stops writers, checks disabled routes and zero reservations again, then stops execution. It uses no initialization acknowledgement. If demand appears before writers stop, it refuses to stop media and restarts only the old control plane so draining can continue.
-
Update standalone nodes using
--capacity-upgrade node --confirm-control-plane-ready. For this path, the assertion means the remote control plane is ready and the affected node drained to zero reservations before it stopped. -
Restore the recorded enabled routes and verify playback, outputs, Fleet counts and preparation enforcement. The installer does not automatically disable or restore routes.
Established installations require an explicit maintenance mode on installer reruns, including budget/configuration changes that recreate nodes. Fresh installs retain bash install.sh full or media-node.
Incomplete First Installation
A failed first image pull or startup attempt before resource creation can be retried with the ordinary fresh command.
The installer retains a version/target-bound .install-pending marker until complete readiness. Retry requires local default Compose, no project containers and absent or empty rendered runtime databases without WAL/SHM sidecars. The helper preserves every file. The marker alone never authorizes an ownership reset.
If any container was created or runtime data exists, use explicit maintenance where the ledger is available, or a separately reviewed manual recovery for a startup failure before ledger creation. Never erase data or remove containers to force classification as fresh. Successful explicit maintenance also clears the marker.
Failure and Retry
Keep runtime data and diagnose the candidate before restarting execution.
Before initialization is verified, failure leaves media and automatic updates stopped and stops the temporary acknowledged control plane. If Docker cannot confirm that stop, stop it manually before retry. The installer retains the selected configuration and database; it does not restore predecessor state after a candidate may have written SQLite. Read candidate logs locally and correct image/configuration problems.
If the persisted ledger is still uninitialized, repeat initial mode after verifying external containers remain stopped. If initialization completed, use the initialized procedure instead: recreate only the selected control plane without the acknowledgement, keeping media and automatic updates stopped:
cd ~/fluxomni
docker compose up -d --no-deps --force-recreate control-plane
Verify its admission API, disable routes and wait for reservations to clear. Never erase the ledger or reuse the acknowledgement to release exposed ownership. Missing shutdown proof can retain reservations indefinitely and needs separate recovery work.
Failure during the final node/readiness checks may leave verified candidate services running. Inspect them and continue the drain/diagnostic procedure; do not automatically roll back their database or start predecessor images.
Supported Storage and Automation
The automated full-stack flow requires local Docker, Python 3, one identifiable local SQLite bind, and the default Compose bundle with optional docker-compose.override.yml customization.
The helper reads SQLite with WAL participation and checks rendered storage against the actual control-plane container. Changed storage roots, custom commands/entrypoints, overlapping mounts, named volumes, symlink paths, remote Docker and active Compose profiles require a separately reviewed manual procedure. The helper never modifies SQLite directly.
Keep the auto-update profile disabled for capacity-ledger builds. Uncoordinated Watchtower updates cannot perform the required drain and cluster shutdown sequence. Manual/custom rollouts must implement the same boundaries and verify the active control plane has no acknowledgement before starting nodes.
Upgrade to 26.3.2
Upgrade the frontend, control plane, and every media node to the same release. Custom GraphQL clients must adopt library pagination and scoped file subscriptions. Plan a maintenance window for active media workloads.
Before upgrading
- Record the current image tags or digests on every host and save the Compose files, overrides, and
.envfiles needed to restore them. - Take a consistent backup of state and media that you need to retain. Stop the stack for a filesystem backup, or use SQLite’s backup API; copying only a live
state.dbis insufficient. - Update custom API consumers as described below. Pin
@fluxomni/[email protected]and validate your own operations against the released GraphQL schema. - Review your RTMP, SRT, and WebRTC smoke checks. This release bundles pinned SRS 7.0.165, an upstream alpha build containing the admission-race fix.
Upgrade an installer-managed stack
Run on the control-plane host, using your existing installation directory:
curl -fsSL https://install.fluxomni.io -o /tmp/fluxomni-install.sh
FLUXOMNI_DIR="$HOME/fluxomni" FLUXOMNI_VERSION=v26.3.2 \
  bash /tmp/fluxomni-install.sh
For each standalone media-node host, use its existing directory and installation mode:
curl -fsSL https://install.fluxomni.io -o /tmp/fluxomni-install.sh
FLUXOMNI_DIR="$HOME/fluxomni-media-node" FLUXOMNI_VERSION=v26.3.2 \
  bash /tmp/fluxomni-install.sh media-node
Keep the existing control-plane endpoint, internal authentication token, node identity, and public host settings. Review custom Compose overrides before restarting. The installer preserves data and updates its managed files; it is not a zero-downtime rolling-upgrade guarantee. Manual deployments should update all three image tags to v26.3.2, pull them, and recreate the services using their existing configuration.
The latest installer fixes missing SRS file limits in v26.3.2 assets; updating images alone does not. For manual installs, see troubleshooting.
API changes
artifacts.libraryFiles now returns nodes, totalCount, hasNextPage, and endCursor. The default page contains up to 50 files; first accepts 1–200. Filters and sorting apply across the catalog, not only the current page.
query LibraryPage($after: String) {
  artifacts {
    libraryFiles(first: 50, after: $after, sort: NAME) {
      nodes { id name }
      totalCount
      hasNextPage
      endCursor
    }
  }
}
Start with after: null. Process nodes; while hasNextPage is true, send the returned endCursor as after. Reset the cursor when filters or sorting change. Do not treat the first page as the whole library or assume pagination is a snapshot of a concurrently changing catalog.
Replace the removed artifacts subscription with the scope your consumer needs:
fileTransfers: active and failed transfers; completed library files are excluded.routeFiles(routeId: ...): files referenced by one visible route’s playlist and file sources.file(fileId: ...): changes to one file, with a nullable result.
Use paginated queries for library listings. Unsubscribe when a consumer leaves a route or stops watching a file, and stop the client at shutdown. See subscriptions for examples. A package upgrade alone does not rewrite custom GraphQL strings.
Verify the upgrade
- Confirm the running image versions on every host with
docker compose imagesand check service health withdocker compose ps. - Open Fleet and confirm that the expected nodes reconnect, report compatible versions, and receive their route assignments.
- Publish a representative stream, verify preview and each destination receiver, then test a source reconnect. An output’s LIVE state now requires FFmpeg progress; receiver playback remains the end-to-end check.
- Open Artifacts, move beyond the first page, and exercise your custom API queries and subscriptions. Check logs for schema errors, startup failures, and stale heartbeats.
- Compare CPU, memory, and network use under your actual workload with the sizing guidance. Empty-route measurements do not predict active-stream capacity.
If verification fails, stop the changed stack, restore the saved configuration and a consistent pre-upgrade data backup, and recreate the previous pinned images on all hosts. Retain diagnostic logs first. Do not assume a previous binary can safely run against state already changed by a newer release.
Server Sizing
Size media nodes by active inputs, outputs, bitrate, and processing mode. A stored route, a live route without destinations, and a route sending twelve outputs have different costs. Current measurements qualify specific workloads, not a universal server maximum.
Where to run each service
A single host is convenient for a pilot. Budget for the OS, Docker, frontend, control plane, media node, and storage together. The control plane owns API requests, subscriptions, state persistence, and fleet coordination; media nodes run SRS, FFmpeg, ingest, and output delivery.
For production capacity qualification, separate the control plane from media hosts so media pressure does not compete with API and database work. Place test publishers and receivers on other hosts. This is an isolation recommendation, not evidence for a particular control-plane server size or linear scaling across nodes.
Use a stable CPU allocation, sufficient RAM and usable network bandwidth, and persistent storage appropriate to your artifact, playlist, and recording workload. Advertised vCPU count alone is insufficient: record CPU model, cgroup limits, swap, and other tenants. No automatic hardware-derived route or output limit is enforced by this release.
Measured relay workload: 48 outputs for one hour
On September 27, a pre-release ARM64 Linux development VM sustained four routes with twelve RTMP outputs each, using a looping 720p30 H.264/AAC fixture in copy mode and two GraphQL subscribers. The media container alone had a one-CPU, 2048-MiB limit without swap. The VM exposed ten CPUs and about 8 GiB RAM; the control plane, test helpers, and unrelated containers shared it.
- CPU: media-container p95 was 57.27% of one core; p99 was 70.40%.
- Memory: the lifetime cgroup peak, including startup, was 1073.9 MiB. Median charged memory across successive 15-minute windows was 997.7, 996.3, 998.5, and 998.7 MiB.
- Delivery: all 48 receivers kept their publisher identities and advanced audio/video counters. There were 719 post-baseline receiver observations across the hour, with a largest sampling gap of 5.60 seconds.
- Responsiveness: 720 successful samples each for reads, snapshots, and HLS, with no errors or timeouts. Read/snapshot p95 was 12.30/12.76 ms.
- Stability: no media-container restart or cgroup OOM event/kill. The CPU quota still recorded 4539 throttled periods out of 35823 lifetime periods.
The downloadable evidence summary includes source revision, Docker image IDs, exact counters, and workload settings. The tested source was 232e1bb2bd7b6513d6e7744b3e77f83ba684a596; its media runtime changes are included in 26.3.2. These were pre-release images, not a measurement of the published release image digests. This report preserves that distinction.
Each receiver averaged about 2.646 Mbit/s, or approximately 127 Mbit/s of aggregate media payload before additional transport overhead. All media stayed inside Docker networking. This does not measure a physical NIC, provider egress, or Internet delivery. Receiver counters establish progress, not decoded playback quality.
A one-CPU/2-GiB media-container ceiling is not a one-CPU/2-GiB whole-server recommendation. Nor is 48 a maximum or an automatically enforced allowance. Recovery bursts, long-term growth, transcoding, audio mixing, DVR, and alternate route/fan-out shapes need their own qualification.
What an empty route consumes
An empty route in these experiments means a configured push source with no publisher, no external outputs, and no preview viewer. Both disabled routes and enabled routes waiting for a publisher started zero FFmpeg workers. The running control plane, media agent, SRS, heartbeats, and telemetry still have a fixed baseline cost.
A separate two-round x86 experiment measured 1, 2, and 10 waiting routes with fresh stacks, 15-second settling, and approximately 30-second sampling windows. Services shared a two-CPU GitHub runner with about 7.75 GiB RAM; the media container was capped at one CPU/2048 MiB. These measurements preceded the later idle-scan optimizations in 26.3.2.
Subtracting each round’s mean of its starting and ending zero-route baselines gave these round 1 / round 2 increments, not confidence intervals:
- 1 waiting route: control-plane memory +0.22/+0.14 MiB; media memory −1.34/+0.23 MiB. CPU changed by +0.052/+0.064 percentage points in the control plane and −0.023/−0.017 in the media container.
- 2 waiting routes: control-plane memory +0.86/+0.64 MiB; media memory −1.08/+0.08 MiB. CPU changed by +0.055/+0.045 and −0.015/−0.066 points, respectively.
- 10 waiting routes: control-plane memory +2.87/+2.74 MiB; media memory −0.04/+1.68 MiB. CPU changed by +0.106/+0.091 and +0.023/−0.010 points, respectively.
CPU percentages refer to one core. Memory is charged cgroup memory, including cache; it is not whole-host RAM. Negative increments are measurement variation. The media CPU deltas are too small to infer a dependable CPU-per-empty-route coefficient. Ten waiting routes added a few MiB of control-plane state rather than ten media pipelines.
By contrast, one live RTMP pull route with no external outputs added 55.32/56.74 MiB and 3.491/3.483 CPU percentage points to the media baseline, with two copy-mode FFmpeg workers. Two live pull routes added 111.22/115.02 MiB and 7.336/7.102 points; ten added 550.76/566.02 MiB and 37.084/37.919 points. Ingest and switching are real media work even before a destination is added.
Source revision: 59a926eacbde786edd0a5a6e36302cfa306c1299; GitHub run 36306312061, attempt 1. These short observations do not establish a maximum route count, long-term memory behavior, or active push/transcoding costs.
Why idle CPU is not zero
Profiling a separate ARM64 workload with 200 waiting routes identified repeated source-authority lookups, manifest copies, and unchanged source scans. The release removes that repeated work while preserving media readiness, source authority, retries, and heartbeat behavior.
In the final local comparison, two quiet 45-second windows measured mean Rust media-agent CPU changing from 0.633% to 0.511% of one core at 200 routes. Total media-container CPU changed from 1.352% to 1.254%. Its zero-route agent baseline after the change was 0.333%. These are short diagnostic point estimates, not confidence bounds or a release-to-release benchmark.
SRS protocol polling and timers, health checks, heartbeats, and state coordination remain active. Full-catalog polling also adds observer cost. An unpublished route should start no media pipeline; a running service still needs background CPU. Do not disable public protocols merely to make an idle graph smaller.
Qualify your deployment
- Fix the CPU model, service placement, container limits, image digests, and workload. Count live inputs separately from outputs and record codecs, bitrate, protocols, copy/transcode mode, subscriptions, recording, and playlist activity.
- Start with a workload below the observed pressure points. Track cgroup CPU, throttling, memory, OOM counters, API latency/errors, heartbeat age, and receiver continuity throughout startup and steady delivery.
- Estimate network payload as the sum of output bitrates, then include input traffic, transport overhead, preview traffic, and operating reserve. Verify sustained physical egress and provider transfer allowances independently.
- Soak on your target hardware and exercise simultaneous reconnects, node loss, restart, and failover. Preserve headroom for those events before choosing an operating budget.
- Increase one workload dimension at a time. Adding media nodes distributes work, but does not establish linear capacity scaling or remove shared control-plane and network constraints.
The exploratory relay experiments used p95 CPU at most 75% of the one-core ceiling and peak RAM at most 75% of the 2-GiB ceiling as candidate headroom checks. These are laboratory selection criteria, not production SLOs or scheduler limits. See Monitoring and Architecture for operational context.
Monitoring
Fluxomni Studio provides built-in system metrics in the Control Surface sidebar and supports exporting traces via OpenTelemetry (OTLP).
Built-in metrics
The bottom of the Control Surface sidebar shows real-time gauges for the control-plane host:
- CPU — current processor utilization percentage.
- MEM — current memory utilization percentage.
- NET — current network throughput.
These values update in real time and give operators a quick health check without leaving the UI.
Fleet telemetry
The Fleet page shows per-node telemetry:
- Heartbeat — time since the last heartbeat from each media node.
A stale heartbeat (configurable via
FLUXOMNI_MEDIA_NODE_STALE_HEARTBEAT_SECS) indicates the node may be unreachable. - Worker — active worker process count.
- Assignments — number of routes placed on the node.
- Cache — number of cached playlist files.
- Reachability — whether the node is publicly reachable.
- Scheduling — whether the node accepts new work.
Attention feed
The Attention page (/attention) aggregates alerts across all routes
and fleet nodes. Alert severity levels:
- CRITICAL (HIGH) — route probe errors, offline nodes, or failures that prevent playback.
- ATTENTION (MEDIUM) — parameter mismatches or degraded conditions that may affect quality.
OpenTelemetry (OTLP)
Fluxomni Studio can export traces to an OpenTelemetry collector. Set the
endpoint in .env:
FLUXOMNI_OTLP_ENDPOINT=http://collector.example.com:4318
Apply changes through Capacity Ledger Upgrades. Disable and drain routes before recreating existing control-plane or media-node containers, then restore the recorded enabled routes after verification.
This sends traces over HTTP (OTLP/HTTP) to the specified collector. From there, you can forward data to backends like Jaeger, Grafana Tempo, or Datadog.
Example: Grafana + Tempo
A minimal collector setup using Grafana Alloy or the OpenTelemetry Collector:
# otel-collector-config.yaml
receivers:
  otlp:
    protocols:
      http:
        endpoint: "0.0.0.0:4318"

exporters:
  otlp:
    endpoint: "tempo:4317"
    tls:
      insecure: true

service:
  pipelines:
    traces:
      receivers: [otlp]
      exporters: [otlp]
Point FLUXOMNI_OTLP_ENDPOINT at the collector’s HTTP receiver.
Log management
By default, Fluxomni Studio logs to stdout which Docker captures. View logs with:
docker compose logs -f frontend control-plane media-node
To write logs to files on the host, set:
FLUXOMNI_WRITE_LOGS_TO_FILE=true
Log files are written to the data directory. Use FLUXOMNI_LOG_FORMAT
to switch between pretty (human-readable) and json (structured)
output.
Health checks
The control-plane and media-node containers include Docker health checks. Check container health with:
docker compose ps
A healthy stack shows all services as Up (healthy).
Backup & Restore
Back up runtime data and configuration, and preserve capacity ownership when stopping or moving an installation.
What to back up
Keep data/state.db, .env and cached playlist files in data/videos/. Include configured external data binds. SQLite may also create state.db-wal and state.db-shm; retain them beside the database for live filesystem snapshots.
DVR recordings in data/dvr/ are optional backup data. Generated data/srs-http/ media can be recreated.
Create a backup
For capacity-ledger builds, record enabled route IDs, disable all routes and wait for every node’s committed, starting and retiring counts to reach zero while old reporters are alive. Follow Capacity Ledger Upgrades before stopping execution.
Then stop the full-stack installation, retaining its containers for storage verification:
cd ~/fluxomni
docker compose --profile auto-update stop --timeout 30
tar czf ~/fluxomni-backup-$(date +%Y%m%d).tar.gz data/ .env
Restart the same tested build with the drained installer mode from the upgrade guide. Verify Fleet and playback, then restore the recorded enabled routes. Keep automatic updates stopped.
For a live SQLite backup, use SQLite’s backup command instead of copying only state.db:
cd ~/fluxomni
sqlite3 data/state.db ".backup '$HOME/fluxomni-state-backup.db'"
cp .env ~/fluxomni-env-backup
A live backup can contain exposed reservations. It is evidence and backup data; restoring it does not release ownership or prove predecessor execution stopped.
Restore from backup
Restore matching database, files, configuration and images through a separately reviewed recovery procedure. Stop all predecessor execution and deployment automation before restoring. Preserve the original backup and current runtime data until recovery is verified.
Do not delete the capacity ledger, reset initialized state, or use the initial acknowledgement to discard reservations from a restored initialized database. Missing shutdown proof can keep ownership reserved and requires separate recovery work. The installer does not automate data rollback.
Migrate between hosts
Drain the source cluster while reporters are alive, take a stopped backup, and keep source execution stopped throughout migration. Transfer the matching data and configuration, preserve node identities deliberately, and update public hostnames and shared video paths before startup.
Changed storage roots or a different host require a separately reviewed manual procedure. Verify the initialized ledger, acknowledgement absence and Fleet registration before enabling the recorded routes. Never run source and destination against copied ownership concurrently.
Rotate the auth token
Drain all routes with the old credentials still valid, following Capacity Ledger Upgrades. Stop execution and automatic updates on every host, then stop the control plane.
Generate a new token with openssl rand -hex 24 and update FLUXOMNI_CONTROL_PLANE_INTERNAL_AUTH_TOKEN in .env on the full-stack and every standalone-node host. Restart the full stack with drained mode, then update standalone nodes with --capacity-upgrade node --confirm-control-plane-ready. Verify registration before restoring enabled routes.
All services must use the same token. A mismatch prevents node registration and shutdown reporting.
Troubleshooting
Installation Health Check (Doctor)
If you encounter issues during or after installation, run the diagnostic script from your install directory:
# From your install directory (default ~/fluxomni)
./doctor.sh
The script verifies:
- Docker and Docker Compose installation
- Environment configuration (
.env) - Port availability (checks for conflicts with other services)
- Container running status
- Disk space and data directory integrity
Container Does Not Start
Navigate to your Fluxomni Studio install directory and check the logs:
# Default: ~/fluxomni
cd ~/fluxomni
docker compose logs -f frontend control-plane media-node
For standalone remote media-node installs:
# Default: ~/fluxomni-media-node
cd ~/fluxomni-media-node
docker compose logs -f media-node
Common causes:
- Docker daemon is not running.
- The selected image tag does not exist.
FLUXOMNI_CONTROL_PLANE_INTERNAL_AUTH_TOKENis missing from.envafter a manual install.- The configured frontend HTTP port, 1935, 8000/tcp, 8003/tcp, 8000/udp, 8081/tcp (loopback), 10080/udp, 50051/tcp, or 50052/tcp is already in use.
- For standalone media-node installs, the control-plane RPC endpoint in
.envis unreachable from the media server. - For standalone media-node installs, the advertised
FLUXOMNI_MEDIA_NODE_ENDPOINTdoes not point back to the media server.
Media Node Does Not Appear in Fleet
If the control surface loads but a standalone node never shows up under /fleet, check the media-node logs:
cd ~/fluxomni-media-node
docker compose logs -f media-node
Look for a successful Registered media node with control plane message.
If it never appears, verify:
FLUXOMNI_CONTROL_PLANE_RPC_ENDPOINTis reachable from the media-node host.FLUXOMNI_CONTROL_PLANE_INTERNAL_AUTH_TOKENmatches the control-plane value exactly.FLUXOMNI_MEDIA_NODE_PUBLIC_HOSTandFLUXOMNI_MEDIA_NODE_ENDPOINTpoint back to the actual media-node host and published gRPC port.- Any firewall between hosts allows TCP
50052to the control-plane and the published media-node gRPC port back to the node when remote operators or services need it.
SRS Reports Too Few Open Files
1128 exceed max open files=1024 means the container’s file limit is below SRS’s startup requirement.
Rerun the latest installer with your existing directory and explicit capacity maintenance mode. It supplies limits of 65,536, including for v26.3.2 assets. Container recreation interrupts active streams but retains mounted data.
For manual installs, add this under media-node and check for conflicting overrides:
    ulimits:
      nofile:
        soft: 65536
        hard: 65536
Apply the change through Capacity Ledger Upgrades, then verify:
docker compose exec media-node sh -c 'ulimit -Sn; ulimit -Hn'
Both values should be 65536. Applying the change requires container recreation, not a restart.
Generated URLs Use the Wrong Hostname or IP
If the UI shows RTMP, HLS, SRT, or WebRTC URLs with a private IP, Docker hostname, or old domain, update these values in .env and restart the stack:
FLUXOMNI_PUBLIC_HOSTfor control-plane linksFLUXOMNI_MEDIA_NODE_PUBLIC_HOSTfor media ingest and playback links
On current releases, /routes is the main operator surface and /fleet shows attached media nodes. Those pages use the configured public hosts when they render copyable endpoints.
Check Running State
From your install directory:
docker compose ps
Clean Restart
Use Capacity Ledger Upgrades for a planned restart. Disable and drain routes while the old reporters are alive; restarting containers does not clear old reservations.
Playlist File Errors
Files in a route playlist show a signal integrity badge:
- REF — the file matches the reference stream parameters. No issues.
- DIFF — the file has different codec, resolution, or frame rate than the reference. This may cause brief glitches or quality changes during playback transitions.
- ERROR — the file could not be probed. It may be corrupt, still downloading, or in an unsupported format.
To fix DIFF warnings, re-encode files to match the reference parameters shown in the playlist status bar (codec, resolution, frame rate, audio channels).
Disk Space
If the control-plane or media-node containers exit unexpectedly, check available disk space:
df -h ~/fluxomni/data
Playlist file downloads and DVR recordings can fill the disk. Free space by:
- Clearing unused playlist files from route playlists.
- Removing old DVR segments from
data/dvr/. - Moving the data directory to a larger volume and updating
FLUXOMNI_CONTROL_PLANE_DATA_DIRandFLUXOMNI_MEDIA_NODE_DATA_DIRin.env.
Port Already in Use
If Docker fails with an error like:
failed to bind port 0.0.0.0:80/tcp: Error starting userland proxy: listen tcp4 0.0.0.0:80: bind: address already in use
Another service on the host is already listening on that port. This is common on NAS devices (Synology, QNAP, Unraid) where the built-in web UI occupies port 80. Port 8000 (HLS TCP / RTC UDP) is another frequent conflict — Synology DSM uses it as an alternative HTTP port, and media apps like Plex or Jellyfin may also bind to it.
Fix: override the conflicting host ports in .env without editing docker-compose.yml:
# Change the Control Surface port from 80 to 8080
echo 'FLUXOMNI_FRONTEND_HTTP_PORT=8080' >> .env

# Change HLS TCP port from 8000 to 8800 (if 8000 is also taken)
echo 'FLUXOMNI_MEDIA_NODE_HLS_PORT=8800' >> .env

# Change WebRTC media UDP and WHIP signaling TCP independently
echo 'FLUXOMNI_SRS_RTC_PORT=8800' >> .env
echo 'FLUXOMNI_MEDIA_NODE_WHIP_PORT=8803' >> .env
Apply the changes using Capacity Ledger Upgrades. For an already running installation, drain routes before recreating containers.
Access the Control Surface at http://<HOST-IP>:8080. If you also set FLUXOMNI_PUBLIC_URL, make sure it includes the new port (e.g. http://nas.local:8080).
Multi-Subnet and NAT Environments
In environments with multiple networks (e.g. cloud VPCs, complex office LANs, or behind NAT), the Web UI might be unreachable if the public-facing address is misconfigured.
The Self-Host Doctor (./doctor.sh) will automatically detect your local IP addresses and warn you if FLUXOMNI_PUBLIC_HOST is set to a restricted loopback address.
Symptoms:
- Browser shows “Connection Timed Out” or “Connection Refused”.
- The doctor script warns that
FLUXOMNI_PUBLIC_HOSTdoes not match any local IP.
Resolution:
- Run the Doctor:
./doctor.shto see the recommended IPs for your host. - Set the correct Public Host: ensure
FLUXOMNI_PUBLIC_HOSTin.envis set to the IP or hostname that your browser uses to reach the server. - Bind to all interfaces: if you want the Control Plane to be reachable from any network connected to the server, ensure
FLUXOMNI_CONTROL_PLANE_HTTP_BINDis set to0.0.0.0:<port>(default in most setups). - Check NAT Reflection: if you are accessing the server via a public IP from inside the same LAN, ensure your router supports NAT reflection (Hairpin NAT).
If you are using a reverse proxy (Nginx, Traefik, Caddy), set FLUXOMNI_PUBLIC_URL to the full proxy URL:
FLUXOMNI_PUBLIC_URL=https://fluxomni.example.com
All port mappings in docker-compose.yml support the same pattern — override via the corresponding FLUXOMNI_* variable in .env:
| Variable | Default | Service |
|---|---|---|
FLUXOMNI_FRONTEND_HTTP_PORT | 80 | Control Surface (HTTP) |
FLUXOMNI_CONTROL_PLANE_RPC_PORT | 127.0.0.1:50052 | Control-plane gRPC |
FLUXOMNI_MEDIA_NODE_RTMP_PORT | 1935 | RTMP ingest |
FLUXOMNI_MEDIA_NODE_HLS_PORT | 8000 | HLS TCP |
FLUXOMNI_MEDIA_NODE_WHIP_PORT | 8003 | WHIP signaling TCP |
FLUXOMNI_SRS_RTC_PORT | 8000 | WebRTC media UDP |
FLUXOMNI_MEDIA_NODE_SRT_PORT | 10080 | SRT ingest |
Firewall and Port Issues
Fluxomni Studio uses both TCP and UDP ports. A common mistake is only opening TCP:
| Port | Protocol | Service |
|---|---|---|
| 80 | TCP | Control Surface (HTTP) |
| 1935 | TCP | RTMP ingest |
| 8000 | TCP | HLS playback |
| 8003 | TCP | WHIP signaling |
| 8000 | UDP | WebRTC media |
| 8081 | TCP (localhost) | SRS callback (internal) |
| 10080 | UDP | SRT ingest |
| 50051 | TCP | Media-node gRPC |
| 50052 | TCP | Control-plane gRPC (localhost by default) |
SRT (port 10080) is UDP only. If SRT publishers cannot connect, verify that UDP traffic is allowed through your firewall or cloud security group.
WHIP needs both signaling TCP and media UDP: by default TCP 8003 and UDP 8000. HLS uses TCP 8000 separately. If you override ports, open the matching firewall/cloud rules; changing the HLS port does not change the RTC UDP listener.
Stream Quality Issues
If the output stream has artifacts, stuttering, or audio sync problems:
- Check the Signal Integrity panel on the routes list for mismatch or fetch warnings.
- Open the route workspace and verify the input codec info matches what your encoder is sending.
- Ensure your encoder bitrate does not exceed the server’s upload bandwidth.
- For playlist playback, verify all files use the same codec, resolution, and frame rate as the primary source.
Cannot Sign In
If you are locked out of the Control Surface:
- Verify the username and password. Passwords are case-sensitive.
- If you forgot the admin password, current installs store user accounts in
data/state.db, notdata/state.json. Stop the stack first, back updata/, and usesqlite3 data/state.dbas a last-resort recovery path if you need to inspect or repair theuserstable before restarting. - If no user accounts exist, Fluxomni Studio falls back to the open admin shell. After emergency recovery, use Settings to create a new admin account before re-enabling named-user sign-in.
Rollback to a Previous Version
Retain the database and diagnose the candidate using Capacity Ledger Upgrades. A predecessor image may not understand migrated state or durable capacity ownership; changing the image tag and recreating containers is not a verified rollback.
Restoring an older database and matching images requires a separately reviewed recovery procedure, backups and proof that all predecessor execution is stopped. Never erase the ledger or reuse the initialization acknowledgement to release exposed ownership. Available image tags are listed on GitHub Releases.
Architecture
Fluxomni Studio uses a split runtime with the frontend, the control-plane, and one or more media nodes.
Components
Frontend
The frontend serves the operator UI (Control Surface). In Docker Compose, it is the public HTTP entrypoint and proxies API/file requests back to the control-plane over Docker-internal networking.
Control-plane
The control-plane is the brain of the system. It:
- Serves the GraphQL API and backend HTTP endpoints used by the frontend.
- Manages route definitions, playlist state, user accounts, and settings.
- Assigns routes to media nodes and monitors their health.
- Persists all state to an embedded SQLite database (
data/state.db).
A single control-plane instance manages the entire fleet. It runs as the
control-plane container in the Docker Compose stack.
Media node
A media node handles the actual media work:
- Receives ingest streams (RTMP push, RTMP pull, SRT push, WebRTC push).
- Relays streams to output destinations (RTMP, RTMPS, SRT, Icecast, file).
- Plays back playlist files through the pipeline.
- Reports health, telemetry, and heartbeat to the control-plane over gRPC.
- Caches playlist files locally for fast playback.
In a single-host install, one media node runs alongside the control-plane and communicates over Docker-internal networking. In distributed deployments, additional media nodes run on separate servers and connect back to the control-plane over its published gRPC port (TCP 50052).
SRS (Simple Realtime Server)
Each media node embeds an SRS instance that provides the low-level RTMP, HLS, SRT, and WebRTC protocol handling. Fluxomni Studio manages SRS configuration and lifecycle automatically. Operators do not interact with SRS directly.
Communication
┌──────────────┐    HTTP :80     ┌─────────────────┐    gRPC :50052    ┌─────────────────┐
│   Frontend   │◄──────────────► │  Control-plane  │◄────────────────► │   Media Node 1  │
│  - UI/API    │                 │  - API          │    gRPC :50051    │  - RTMP :1935   │
│  proxy       │                 │  - State mgmt   │◄────────────────► │  - SRT  :10080  │
└──────────────┘                 │  - Scheduling   │                   │  - HLS  :8000   │
                                 │                 │    gRPC :50051    └─────────────────┘
                                 │                 │◄──────────────┐
                                 └─────────────────┘               │    ┌─────────────────┐
                                                                   └──► │   Media Node 2  │
                                                                        │  (remote host)  │
                                                                        └─────────────────┘
- Frontend to control-plane: The frontend serves the Control Surface and proxies API/file requests to the control-plane over Docker-internal HTTP.
- Control-plane to media node: The control-plane pushes route manifests, playlist updates, and scheduling decisions to media nodes over gRPC.
- Media node to control-plane: Each media node sends periodic heartbeats, telemetry (CPU, memory, network), and execution state updates back to the control-plane.
- Auth token: Both services share
FLUXOMNI_CONTROL_PLANE_INTERNAL_AUTH_TOKEN. This token authenticates gRPC calls in both directions.
Route lifecycle
- An operator creates a route in the Control Surface.
- The control-plane assigns the route to a media node (auto-placement or pinned).
- The media node receives the route manifest and configures its SRS instance.
- The media node generates ingest endpoints (RTMP, SRT, or WebRTC URLs) and reports them back.
- When a publisher connects, the media node relays the stream to all enabled outputs.
- The control-plane monitors execution state and can reassign the route if the media node becomes unhealthy (failover).
Data storage
All persistent state lives in the data/ directory:
| Path | Contents |
|---|---|
data/state.db | Route definitions, settings, user accounts |
data/videos/ | Cached playlist files |
data/dvr/ | DVR / recording segments (when enabled) |
data/srs-http/ | SRS HTTP content directory |
Back up the data/ directory to preserve your entire configuration.
During runtime, SQLite may also create state.db-wal and state.db-shm beside state.db, so keep the full directory together.
See Backup & Restore for details.
Scaling
- Single host: One control-plane + one media node on the same server. Suitable for small to medium workloads.
- Distributed: One control-plane + multiple media nodes on separate servers. Each media node handles a subset of routes. The control-plane load-balances route assignments across available nodes.
- Media node capabilities: Nodes advertise capabilities like
PUBLIC_INGEST,PUBLIC_EGRESS,ARTIFACT_COMPUTE, andGPU_TRANSCODE. The scheduler can use these to make placement decisions.
Scenarios
End-to-end walkthroughs for the most common ways teams run Fluxomni Studio.
Each scenario explains who it’s for, what you’ll build, the exact setup steps, and rough cost and scale notes. Start from the scenario closest to your team, then branch into the User Guide for deeper topics.
- Multistream agency
- Linear channel (24/7 broadcast)
- Distributed fleet with regional failover
- Artifact library for playout assets
- Power creator beyond SaaS caps
Multistream agency
Who this is for
Agencies and teams operating multistreaming ops on behalf of clients — typically 10–50 concurrent routes across YouTube, Twitch, Facebook, and custom RTMP destinations. You want predictable per-month cost, clear per-client separation, and the ability to hand a client a stable publish address without exposing your internal infra.
What you’ll build
Single-host Fluxomni Studio on a modest cloud VM serving dozens of copy-through routes — one per client brand — with per-route labels and exported configs ready to migrate to a multi-node fleet when load grows.
1 OBS per client → Fluxomni Studio single-host → fan-out to { YouTube, Twitch, Custom RTMP }
Setup
- Provision a Linux or macOS host. See Deployment guides.
- Install with
curl -fsSL https://install.fluxomni.io | bash. - Open the control surface and create a route per client. Use the
labelfield for the client name. - Configure outputs per platform. Use per-route controls to start/stop by client.
- Export configs with the
Exportbutton — check them into your ops repo for disaster recovery.
Cost and scale notes
A Hetzner CPX31 (4 vCPU / 8 GB / ~€15 per month) comfortably carries ~70 copy-through routes. A CPX41 (8 vCPU / 16 GB / ~€29 per month) handles 100+. Scale further by adding media nodes — no need to migrate routes or change client publish addresses.
Next steps
Linear channel (24/7 broadcast)
Who this is for
Broadcast operators running a 24/7 channel from pre-recorded content: corporate TV, radio stations with simulcast video, church service archives, esports replay channels. You want scheduled playback without an on-site encoder, and automatic recovery if a file fails to play.
What you’ll build
Fluxomni Studio single-host (or a small fleet if you need regional reach), one route with a large playlist backed by Google Drive, file-backup as the safety net, and outputs to YouTube + custom CDN + Icecast audio.
Files (local + Google Drive) → Playlist → Fluxomni Studio → { YouTube, Custom CDN, Icecast audio }
                                              ↘︎ file-backup loop (safety net)
Setup
- Install Fluxomni Studio:
curl -fsSL https://install.fluxomni.io | bash. - Upload your files to Google Drive, organized by channel or day-part.
- Add a Google Drive API key in Settings → Artifacts → Google Drive, then make the files link-shareable. See Settings.
- Create a route and add the playlist files in schedule order.
- Attach a file-backup source as a safety net for the route.
- Configure outputs (RTMP/RTMPS, SRT, Icecast for the audio-only simulcast).
- Start the route. Verify the HLS preview before going live.
Cost and scale notes
Per-channel cost is the decoder/playback cost plus egress bandwidth. The playlist takes precedence; file-backup loops underneath if a file fails. Once distributed mode is enabled, the route survives single-node loss.
Next steps
Distributed fleet with regional failover
Who this is for
Broadcast-ops teams that need regional redundancy, higher aggregate capacity, or data-locality across regions (e.g. EU vs US). You want one control plane, several media nodes, and automatic ingress failover without operator intervention.
What you’ll build
One control plane and two or more media nodes across regions. Routes assigned via labels/zones. Automatic failover across primary, backup, file-backup, and playlist ingress sources.
Control plane (orchestration + UI)
        │ gRPC
        ├── media-node (zone=eu)
        └── media-node (zone=us)
Setup
- Install the control plane on the orchestration host:
curl -fsSL https://install.fluxomni.io | bash. - Install a media-node on each regional host. Point it at the control plane with
FLUXOMNI_CONTROL_PLANE_RPC_ENDPOINT. See Configuration. - Set each node’s
FLUXOMNI_MEDIA_NODE_LABELSandFLUXOMNI_MEDIA_NODE_ZONEwhen installing it, then confirm the advertised labels and zone in Fleet. - Set route placement in Advanced routing when a route must use a specific media node. See Routes.
- Configure ingress failover per route (primary → backup → file-backup → playlist).
Cost and scale notes
Linear scaling — each node carries its local routes; the control plane hosts only orchestration, not media pipelines. Add a node, label it, assign routes. No changes to publish addresses seen by clients.
Next steps
Artifact library for playout assets
Who this is for
Operators who reuse the same source files across playlists, fallback loops, client channels, or regional media nodes. You want one durable artifact catalog instead of hunting for copies on each route or node.
What you’ll build
A shared artifact library with browser uploads, folder uploads, Google Drive imports, tags, storage guardrails, and route playlist selection from the same catalog.
Local files / folders / Google Drive → Artifacts → playlists and file-backup sources
                                           ↘ storage usage and cache visibility
Setup
- Install Fluxomni Studio:
curl -fsSL https://install.fluxomni.io | bash. - Open Artifacts from the Control Surface sidebar.
- Use Add files to upload a file, upload a folder, or import from Google Drive.
- Tag reusable files by campaign, client, show, or day-part.
- Check the storage chip and expandable storage panel before large uploads.
- Open a route playlist and choose files from From library instead of importing the same file again.
- Use Fleet to confirm which media nodes have cached the required artifacts.
Cost and scale notes
Artifacts live in the control-plane relay backend by default, with admission limits based on configured storage headroom. Media nodes cache artifacts only when a route manifest needs them, so regional nodes do not need permanent full copies of the catalog.
Next steps
Power creator beyond SaaS caps
Who this is for
Individual creators and small teams streaming to 4+ platforms simultaneously who keep hitting SaaS tier walls ($80–$300+/mo). You want a fixed monthly cost, unlimited destinations, and full control of your data.
What you’ll build
Single-host Fluxomni Studio on a small cloud VM (Hetzner CPX21, €5–10/mo). OBS on your desk pushes RTMP to Fluxomni Studio, which fans out to YouTube, Twitch, Kick, Facebook, and any custom RTMP endpoint.
OBS → Fluxomni Studio (single VM) → { YouTube, Twitch, Kick, Facebook, Custom RTMP }
Setup
- Provision a small cloud VM. See Deployment guides.
- Install:
curl -fsSL https://install.fluxomni.io | bash. - Complete First Stream to create a protected operator account, route, and first output.
- Point OBS at the route’s publish URL — Fluxomni Studio fans it out to every platform.
Cost and scale notes
Fixed €5–15 per month of infra replaces $100+/mo of SaaS fees. Copy-through fan-out is nearly free on CPU, so a small VM handles all five destinations comfortably. For a custom domain and TLS, see Reverse proxy & TLS.
Next steps
API Automation
Fluxomni Studio exposes a public API preview for operators who want to automate route, playlist, artifact, settings, and Fleet workflows.
The supported automation surface is GraphQL over /api, subscriptions over /api/subscriptions, the generated SDL at /api/schema.graphql, the bundled release schema, automation recipes, LLM metadata, and the @fluxomni/api-client TypeScript package.
Use the API for control-plane automation:
- read route, source, output, playlist, artifact, settings, and Fleet state
- compute the desired state outside Fluxomni Studio
- apply mutations with explicit result payloads
- handle no-op, missing-target, validation, forbidden, and runtime-unavailable outcomes
- observe convergence through follow-up queries or subscriptions
The first stable automation release uses user sessions. Public automation should log in through /api/auth/login and reuse the returned fluxomni_session cookie. Loopback bearer tokens are internal-only and should not be used by external scripts.
Versioned Contract
For a running instance, authenticated operators can fetch the active schema:
curl -b "fluxomni_session=$SESSION" \
  http://<your-server>/api/schema.graphql
For release-pinned automation, use the schema, release manifest, and client from the same self-host docs release tag:
- Bundled GraphQL schema for this docs build
- Automation recipes JSON for this docs build
- LLM-readable API metadata for this docs build
- Release manifest for matching schema and client versions
https://github.com/fluxomnia-systems/fluxomni-selfhost/blob/vYY.Q.N/docs/src/api/schema.graphql
Supported Fields
Public guides document the compatibility-managed automation surface. Some authenticated GraphQL fields are diagnostic: useful for dashboards and troubleshooting, but not the durable desired-state contract.
Do not build public automation around:
- loopback
Authorization: Bearercredentials SystemSettingsMutation.setPassword- media-node lifecycle ownership or private runtime protocols
- legacy stream/restream route aliases
- diagnostic runtime rows as durable desired-state records
For durable artifact automation, prefer LibraryFile catalog rows. Runtime file-state rows are diagnostic.
For route automation, use the route, route source, output, playlist, artifact, settings, and Fleet names shown in the schema and examples.
API Authentication
API automation uses the same named-user sessions as the operator UI.
Log in with /api/auth/login, keep the returned fluxomni_session cookie, and send it with GraphQL HTTP and WebSocket subscription requests.
Login
curl -i \
  -H 'content-type: application/json' \
  -d '{"username":"admin","password":"your-password"}' \
  http://<your-server>/api/auth/login
The response sets a fluxomni_session cookie when the credentials are valid.
Use /api/auth/status to check the current session:
curl -b "fluxomni_session=$SESSION" \
  http://<your-server>/api/auth/status
Roles
Automation inherits the same role guards as the UI:
- Admin — full access to routes, artifacts, Fleet, settings, user management, export/import, and ownership assignment.
- Operator — can manage visible routes, sources, outputs, playlists, and artifacts, plus self-service settings.
- Viewer — read-only access to visible routes and system surfaces.
Session Expiry
Session lifetime is controlled by the server sessionTtlSeconds setting. A value of 0 or null disables expiry; otherwise the in-memory session expires after that many seconds from login.
Scripts should treat HTTP 401 or GraphQL extensions.code: "UNAUTHORIZED" as a signal to log in again.
Internal Credentials
Loopback bearer authentication is for internal control-plane and media-node traffic only. Do not use Authorization: Bearer as a public automation credential.
Raw GraphQL
Fluxomni Studio accepts GraphQL HTTP POST requests at /api.
Raw GraphQL is the most portable automation format because it maps directly to the release schema.
Query
curl \
  -b "fluxomni_session=$SESSION" \
  -H 'content-type: application/json' \
  -d '{"query":"query Routes { routes { allRoutes { id label enabled presentation { phase label } } } }"}' \
  http://<your-server>/api
Mutation
Mutation payloads expose machine-readable status values when no-op or missing-target outcomes are normal convergence states.
mutation DisableOutput($routeId: RouteId!, $outputId: OutputId!) {
  routes {
    disableOutput(routeId: $routeId, id: $outputId) {
      status
      routeId
      outputId
    }
  }
}
Common status values:
UPDATED— the operation changed or accepted the target state.UNCHANGED— the requested state was already in effect.NOT_FOUND— the target was missing and the mutation can express that as a normal result.
GraphQL errors are still used for malformed input, permission failures, persistence failures, runtime-unavailable cases, and rejected exceptional commands.
Schema
Fetch the running server schema:
curl -b "fluxomni_session=$SESSION" \
  http://<your-server>/api/schema.graphql
Use the release-tagged api/schema.graphql from GitHub when pinning automation to a specific Fluxomni Studio release.
Library Pagination
In 26.3.2, artifacts.libraryFiles returns a page object. Select its nodes and follow endCursor while hasNextPage is true. The default page size is 50, with a maximum of 200. See the upgrade guide’s executable query.
TypeScript Client
@fluxomni/api-client is a thin session-aware GraphQL transport. It does not hide the schema behind a separate domain SDK.
Install it in your automation project:
npm install @fluxomni/[email protected]
Login And Query
import { GraphQLClient } from '@fluxomni/api-client';

const { client } = await GraphQLClient.login({
  baseUrl: 'http://<your-server>',
  username: process.env.FLUXOMNI_USERNAME!,
  password: process.env.FLUXOMNI_PASSWORD!,
});

const data = await client.executeRaw<{
  routes: { allRoutes: Array<{ id: string; label?: string | null }> };
}>(`
  query Routes {
    routes {
      allRoutes {
        id
        label
      }
    }
  }
`);

console.log(data.routes.allRoutes);
client.stop();
Browser and same-origin callers can omit endpoint options and let the browser manage cookies.
Generated Operations
The package exports generated GraphQL documents and result types for callers that want compile-time operation typing.
import { GraphQLClient, ServerInfoDocument } from '@fluxomni/api-client';

const { client } = await GraphQLClient.login({ username, password });
const data = await client.query({ query: ServerInfoDocument });
client.stop();
Executable Examples
Release examples live in the main Fluxomni repository under api/examples/typescript.
They cover:
- session login plus raw query/subscription
- route desired-state convergence
- publish credential, source preference, failover, and output controls
- playlist, artifact tags, settings export/import, Fleet health, and guarded Fleet commands
In a Fluxomni source checkout, compile them with:
pnpm --filter @fluxomni/api-client run examples:check
GraphQL Subscriptions
Subscriptions use graphql-ws at /api/subscriptions.
They authenticate with the same session principal as GraphQL HTTP.
Server-Side Clients
Server-side scripts should pass the login cookie through the WebSocket connection_init payload.
GraphQLClient.login() handles this when you provide a WebSocket endpoint:
import { GraphQLClient, StateDocument } from '@fluxomni/api-client';

const { client } = await GraphQLClient.login({
  baseUrl: 'http://<your-server>',
  username: process.env.FLUXOMNI_USERNAME!,
  password: process.env.FLUXOMNI_PASSWORD!,
  wsEndpoint: 'ws://<your-server>/api/subscriptions',
});

const sub = client.subscribe({ query: StateDocument }).subscribe({
  next: (result) => console.log(result.data?.allRoutes.length),
  error: (error) => console.error(error),
});

setTimeout(() => {
  sub.unsubscribe();
  client.stop();
}, 5000);
Browser Clients
Browser callers normally rely on same-origin cookie handling. Keep browser-specific wiring in the webapp boundary and use the API client as transport, not as UI state.
Public Subscription Fields
Use subscriptions to observe the same workflow state documented by queries:
allRoutesrouteWithParentoutputfileTransfersrouteFiles(routeId: ...)file(fileId: ...)currentlyPlayingFileinfomediaNodes
Runtime or diagnostic subscriptions can help troubleshooting, but they are not the durable desired-state contract.
Scoped File Updates
In 26.3.2, the full-catalog artifacts subscription is removed. Use a paginated query for library browsing, fileTransfers for active or failed downloads, or a route/file subscription for a focused consumer.
subscription RouteFiles($routeId: RouteId!) {
  routeFiles(routeId: $routeId) { fileId state }
}
subscription FileState($fileId: FileId!) {
  file(fileId: $fileId) { fileId state }
}
A single-file result can be null. Route subscriptions require visibility of that route. Release subscriptions when leaving their scope; accumulated inactive consumers still cost server work. See the upgrade guide for pagination and migration details.
Error Handling
Automation should handle GraphQL failures by category. Do not branch on human-readable error messages.
GraphQL errors include extensions.code and may include extensions.status.
Categories
unauthenticated— no valid session is attached. Log in again and retry.forbidden— the session is valid, but the user role cannot access the resolver or object.validation— the input shape or value is not acceptable.not_found— the requested route, source, output, artifact, node, user, or settings target does not exist.conflict— the requested state conflicts with current durable state, ownership, or command preconditions.persistence_failure— a durable write failed.runtime_unavailable— runtime state needed by the resolver is not readable right now.operation_rejected— an exceptional operation, such as a Fleet command, was rejected or could not be safely applied.unknown— the client could not classify the server code.
Representative codes:
UNAUTHORIZEDmaps tounauthenticated.FORBIDDENmaps toforbidden.INVALID_USERNAME,INVALID_SPEC,EMPTY_PASSWORD, and status400map tovalidation.ROUTE_NOT_FOUND,FILE_NOT_FOUND,USER_NOT_FOUND, and status404map tonot_found.DUPLICATE_ROUTE_NAME,FIRST_USER_MUST_BE_ADMIN,LAST_ADMIN_REQUIRED, and status409map toconflict.FILE_PERSISTENCE_FAILED,FILE_TAG_PERSISTENCE_FAILED, andUSER_PERSISTENCE_FAILEDmap topersistence_failure.PLAYLIST_RUNTIME_STATE_UNAVAILABLEandOUTPUT_RUNTIME_STATE_UNAVAILABLEmap toruntime_unavailable.STALE_ASSIGNMENTand rejected Fleet command codes map tooperation_rejected.
TypeScript Classification
import { GraphQLError, classifyGraphQLError } from '@fluxomni/api-client';

try {
  await client.executeRaw('query Routes { routes { allRoutes { id } } }');
} catch (error) {
  if (error instanceof GraphQLError) {
    for (const serverError of error.errors) {
      switch (classifyGraphQLError(serverError)) {
        case 'unauthenticated':
          throw new Error('Session expired; log in again.');
        case 'forbidden':
          throw new Error('The current role cannot run this operation.');
        case 'not_found':
          console.warn('Target was already absent:', serverError.code);
          break;
        default:
          throw error;
      }
    }
  }
}
Mutation result payloads are not exceptions. Treat UPDATED, UNCHANGED, and NOT_FOUND as normal convergence outcomes when the schema returns a result payload.
Automation Workflows
Good automation follows a desired-state loop: read current state, compute a change, apply a public mutation, then re-read or subscribe until the expected state appears.
Route Desired State
Use routes.allRoutes to inspect current route topology and presentation. Use routes.setRoute to create or update route identity and route-source topology, then routes.setOutput for output destinations.
Key result payloads:
RouteMutationResult { status, routeId }RouteSourceMutationResult { status, routeId, sourceId }OutputMutationResult { status, routeId, outputId }
The executable ensure-route-desired-state.ts example in the Fluxomni source repo demonstrates this loop.
Route Controls
Public route-control workflows include:
- rotate or revoke a route-source publish credential
- prefer or clear a route source
- adjust source failover policy
- enable, disable, reorder, or remove outputs
The manage-route-controls.ts example covers these operations.
Playlists, Artifacts, And Settings
Public automation can:
- set playlist queue order
- enable sequential playback
- tag reusable library artifacts
- export settings
- import a controlled route spec
Use LibraryFile rows as durable artifact catalog records. Runtime file-state rows are for observation and troubleshooting.
The manage-playlist-artifacts-settings-fleet.ts example covers these flows.
Fleet Commands
Fleet command mutations are exceptional operator actions, not ordinary toggles.
Public commands:
fleet.drainMediaNode(nodeId)fleet.enterMediaNodeMaintenance(nodeId)fleet.exitMediaNodeMaintenance(nodeId)fleet.removeMediaNode(nodeId)
Always preflight fleet.mediaNodes before issuing a command. Check the target node, state, operatorStateOverride, acceptsNewWork, assignedRouteCount, and assigned route manifest delivery state.
After a command, re-read fleet.mediaNodes and confirm convergence:
- draining or maintenance nodes should stop accepting new work
- exiting maintenance should clear
operatorStateOverride - removing a node should remove it from
fleet.mediaNodes
Do not retry exceptional Fleet commands in a tight loop. Re-read Fleet state, compare it with your intended precondition, and retry only if the observed state still justifies the command.
Changelog
Operator-facing highlights from recent Fluxomni Studio releases.
The changelog is editorial release copy. Use release-manifest.json as the factual inventory for dates, module versions, images, and API client refs, but write the latest changelog entry by hand so it reads as operator-facing release notes instead of generated metadata.
Unreleased Installer Changes
Existing installations now require an explicit capacity maintenance mode. The first ledger upgrade verifies global execution shutdown, persists initialization and removes its temporary acknowledgement before starting media; later upgrades require disabled routes and zero reservations.
Automatic updates stop before maintenance inspection and stay stopped. Candidate failures preserve runtime data and stop the temporary control plane. Incomplete first bootstraps can retry while project containers are absent and runtime storage remains empty. Follow Capacity Ledger Upgrades and select a tested admission-capable build; v26.3.2 predates this runtime contract.
v26.3.2 - 27 September 2026
This release reduces repeated control-plane and idle media-node work, bounds artifact catalog requests, and makes output startup status reflect media progress. See the upgrade guide for deployment and API changes.
Control-Plane Responsiveness
SQLite persistence runs behind bounded work queues, and slow node delivery is isolated from other nodes. Route updates copy less unrelated state, while artifact metadata probes have concurrency and time limits. Delivery receipts remain attached to work already in flight so a newer update does not misreport an earlier operation’s result.
Quieter Idle Routes
Media nodes share immutable manifests and reuse unchanged source scans. A push route waiting for a publisher starts no FFmpeg worker. Background service activity remains, so an idle stack does not use zero CPU. The sizing guide explains the measured costs for 1, 2, and 10 empty routes and the follow-up CPU investigation.
Bounded Artifact Libraries
Library browsing now uses filtered, sorted pages, and file subscriptions target transfers, one route, or one file. Playlist metadata and route projections avoid repeated full-catalog work. API change: artifacts.libraryFiles returns a page object, and the full-catalog artifacts subscription is removed. Update custom queries and subscription consumers before upgrading.
Media Startup and Recovery
Outputs become LIVE after FFmpeg reports positive media progress; stalled startup is bounded by a deadline. SRS is pinned to 7.0.165 to include the upstream admission-race fix. This is an upstream SRS 7 alpha build; validate your RTMP, SRT, and WebRTC workflows when upgrading.
Workload-Specific Sizing Evidence
A pre-release, single-host ARM64 experiment sustained 48 RTMP copy outputs across four routes for one hour with a one-CPU/2-GiB media-container limit. This is a measured workload, not a whole-server specification or a maximum output count. See the method, results, and limitations.
v26.3.1 - 14 September 2026
Source-Session Contract Upgrade
Upgrade the control plane and media nodes together: source sessions now require canonical RouteSourceId, private node contract 4, and protobuf v2. Independent source sessions preserve verified publishers across manifest refreshes and agent recovery, reject obsolete feedback, and prevent stopped sessions from reviving.
Recoverable Live Connections
WebSocket connections keep retrying recoverable failures and report healthy only after active queries refresh. Unexpected subscription completion reconnects without discarding stale data; fatal closures remain visibly disconnected.
Program Playback and Relay Controls
Program supports low-latency WebRTC playback with automatic HLS fallback and a standalone player. Relay / Distribution workspaces expose safe playback and ingest endpoints, clearer viewer counts, grouped sessions, and per-session controls. Program playback enforces route ownership — named users cannot play another user’s private route.
Quarterly Release Versions
Packages, runtime images, releases, and public manifests share canonical vYY.Q.P versions. Historical releases remain discoverable through their original core versions.
Media-Node Compatibility and Crash Recovery
Fleet reports unknown, outdated, and ahead node contracts and blocks incompatible execution. Crash recovery reaps orphan processes, exposes exhausted restart budgets, restarts failed background tasks, and recovers overloaded feedback through heartbeats. Cache cleanup protects live artifacts and reports manifest health.
Safer Settings Import and Export
Exports include route-owner metadata without creating accounts on import. Preview validates owner references, supports explicit username remapping to local users, and provides clearer summaries and reliable copying on HTTP LAN deployments.
Clearer Operator Workspaces
Routes, Settings, and Fleet use compact layouts, consistent access rules, and clearer keyboard and touch controls. Recording actions stay accessible beside long URLs, while diagnostics show backend-reported startup, stopping, HLS preparation, and live or playlist source details.
Hardened API and Runtime Boundaries
Media-node RPCs now require the shared bearer token outside loopback. GraphQL operations require explicit authorization guards, internal errors return safe client messages, and CI detects unguarded resolvers.
Reliable State Persistence
Related state changes commit atomically before becoming visible in memory. Ordinary updates write only changed rows within one guarded operation, reducing contention and preventing detached writes.
Runtime Tracing and Metrics
OpenTelemetry traces follow requests from the control plane to media nodes. The OTLP pipeline also reports API latency, manifest sync, FFmpeg restarts, artifact jobs, heartbeats, and background-task health with bounded metric labels.
Reliable Live Takeover
Catalog synchronization preserves accepted live-stream statistics, preventing eligible publishers from falling back to files or stalling at baseline checks. Eligible preferred pulls retry while fallback keeps playing and regain selection only after verified readiness.
Public Automation Metadata
@fluxomni/[email protected] is the pinned API client for this release. The self-host docs carry the matching GraphQL schema hash, automation recipes, LLM metadata, and installer version aliases for v26.3.1.
v26.2.4 (0.13.0) - 29 May 2026
Per-Output Origin Audio
Each destination can now keep program audio, select a specific track or channel, or drop origin audio before mix-ins are applied. The output editor, GraphQL API, runtime manifest, and media-node FFmpeg planning now share one backend-owned selection contract.
Learnable Route Baselines
Route media profiles are configurable from Settings and can be learned from observed sources or probed files. Playlist insertion can teach a fresh route from the first valid file, while existing baselines protect routes from incompatible playlist or live-source media.
Durable Media Library Policy
Artifact storage, playlists, and route workspaces now share durable media-library policy for duplicate imports, private object fetches, derived artifacts, file-operation concurrency, and safe catalog cleanup after backend configuration changes.
More Compact Operations UI
Route workspace panels, playlist controls, diagnostics, route cards, and sidebar telemetry are tighter and less repetitive. Completed one-shot and sequential playlist items stay marked as played without blocking replay or playlist clearing.
Public Automation Metadata (v0.13.0)
@fluxomni/[email protected] is the pinned API client for this release. The self-host docs carry the matching GraphQL schema hash, automation recipes, LLM metadata, and installer version aliases for v26.2.4 and v0.13.0.
v26.2.3 (0.12.0) - 20 May 2026
Stable Automation Surface
Public GraphQL automation now uses Route and Artifacts vocabulary across the schema, generated operations, TypeScript client, webapp callers, Playwright helpers, and repo-owned operator tooling. Control planes expose the active SDL at /api/schema.graphql, so scripts and integrations can discover the live contract outside debug mode.
Recipes and Session-Aware Client
@fluxomni/[email protected] exposes generated documents, raw GraphQL execution, and session-aware transport helpers. The public docs now cover session login, desired-state route convergence, route-source controls, playlist and artifact settings, Fleet command safety, subscriptions, and error helpers.
API-Visible Route Telemetry
Automation and operators can read clearer source freshness, bitrate, viewer activity, and availability signals through the API and Control Surface. Playlist route workflows also expose baseline mismatch details through Attention and route workspace issue affordances, so automations can converge routes without scraping UI state.
Split Frontend Image
The web UI now has its own image alongside the control-plane and media-node images. This makes reverse-proxy and split-runtime deployments easier to reason about while preserving the embedded control-plane UI as a fallback.
Safer Playlist Automation
Playlist routes can teach or enforce media baselines, reject incompatible live or playlist sources earlier, and surface mismatch details through Attention and route workspace issue affordances. Automations can converge routes against these states without scraping UI-only signals.
v26.2.2 (0.11.0) - 6 May 2026
Shared Media Library
The new Artifacts page gives operators one place to upload files, import Drive assets, tag media by client or show, and reuse the same files across playlists, fallback loops, and route workflows.
Storage-Aware Uploads
Uploads and imports now surface usable capacity, configured headroom, top consumers, and recent storage rejections before operators start large transfers. Full-storage responses become upload toasts and Attention storage alerts so operators can free space before retrying.
Cleaner Asset Operations
Bulk tagging, filtered selection, protected deletes, route references, and route-baseline compatibility indicators make larger content libraries safer to manage during live channel operations.
Stable Release Pins
Public examples now use quarterly pins such as v26.2.2, while known core tags remain accepted for direct image pinning. This gives operators a readable stable version to copy into deployment notes and rollback plans.
v26.2.1 (0.10.2) - 26 April 2026
Clearer Live Route Status
Routes now use the media-node lifecycle as the source of truth. The Control Surface shows Pending, Converging, LIVE, Paused, and Error states so operators can distinguish startup, healthy playback, intentional pauses, and failures without relying on lossy aggregate booleans.
Cleaner Route Identity Model
Fluxomni Studio now completes the migration away from legacy RestreamKey, IngressKey, restream_key, and ingress_key fields. Current exports use route IDs, labels, publish_token, and internal_namespace; older imported specs are still upgraded automatically before state is materialized.
Upgrade note: external clients or automations that still read or submit the removed key fields must move to the current route ID and publish-token fields before upgrading.
Playlist and Output Stability
Playlist lifecycle callbacks now flow through the same runtime-event path as push ingresses, reducing false stopped-state flicker between files. Same-owner placement updates preserve route presentation continuity, and enabling outputs no longer flaps a healthy route through transient Pending states.
Quieter, Safer Media-Node Logs
Routine manifest reconciliation, file-download churn, and expected media lifecycle messages stay below operator warning level. Playlist probes no longer create noisy feedback loops, and media-node artifact download logs redact userinfo, query strings, and fragments from fetch URLs.
No Telemetry Unless Enabled
Self-hosted webapp builds no longer initialize PostHog by default. Analytics only run when both VITE_POSTHOG_ENABLED=true and a non-empty VITE_POSTHOG_KEY are provided at build time, preserving the no-telemetry promise for standard self-host installs.
v26.2.0 (0.10.1) - 19 April 2026
Stable Push Token Rotation
Publish credentials now live inside the route spec. Each RTMP, SRT, and WebRTC push ingress gets stable publish_token and internal_namespace values at creation, and older routes are backfilled automatically. Operators can rotate a token without recreating the route, and import/export preserves the new fields.
Simplified Fleet Onboarding
The Add Node flow now focuses on the three required environment variables and hides optional settings behind advanced controls. FLUXOMNI_PUBLIC_URL can carry the full external scheme, host, and port for proxy deployments. Media nodes unregister cleanly on shutdown so stale nodes disappear immediately. Operators can permanently remove an offline node from Fleet with the new removeMediaNode action.
Immutable Main Build Tags
Successful main builds now publish immutable main-<shortsha> image tags alongside edge. Pin a known main build without rebuilding.
Smarter Cold-Start Probes
File-ingress ffprobe now uses a 3000 ms per-attempt timeout over 3 attempts with exponential backoff. Cold-start timeouts no longer paint false errors on a healthy publisher in the operator UI.
v26.1.0 (0.10.0 / 0.9.0) - 14 April 2026
This combined public release identity covers the first modern Fluxomni Studio milestones from March and April 2026. The installer resolves v26.1.0 to the newer v0.10.0 runtime, while v0.9.0 remains available as a direct rollback tag.
Core 0.10.0 - 14 April 2026
Multi-User Authentication
Named user accounts with per-user passwords, role-based access control (admin and operator roles), configurable session expiry, and self-service password management. WebSocket subscriptions now require authentication too.
Secure Publish Credentials
Each route gets rotatable pk_ publish tokens scoped to a specific ingress. Raw stream keys are no longer exposed — operators can rotate or revoke tokens from the route workspace without reconfiguring the route itself.
Route Ownership
Routes belong to the user who created them. Non-admin operators only see and edit their own routes. Admins can reassign ownership or mark routes as shared from the route modal or the Settings → Users panel.
Attention Feed
A dedicated alert surface aggregates route-health and fleet-node issues in one place. Operators can dismiss known issues, drill into the affected route or node, and see an all-clear state when everything is healthy.
Redesigned Operator UI
Compact route cards with structured signal tiles, inline search, density controls, dark/light theme sync, and a unified header across all surfaces. The sidebar is regrouped into Operate, Fleet, and Control sections. Settings moved to dedicated routed pages at /settings.
Low-Latency HLS Preview
Near-real-time in-browser preview with 1-second HLS segments and tighter live-edge sync. Works on Chrome 146+ and all modern browsers. Preview streams are relayed through the control plane so they work behind HTTPS reverse proxies.
Node Pinning
Routes can be hard-pinned to a specific media node from the route modal. Pinned routes stay unassigned instead of falling back when the selected node is unavailable.
Graceful Shutdown
The control plane handles SIGINT and SIGTERM cleanly — HTTP connections drain and gRPC calls complete before the process exits. Active streams are not dropped during planned restarts.
Core 0.9.0 - 13 March 2026
Distributed Media-Node Orchestration
Standalone media nodes register with the control plane, receive typed execution manifests, and report runtime status back over gRPC. Scale by adding nodes across regions.
Fleet Monitoring
The /fleet surface shows media-node health, route assignments, cached artifacts, and system telemetry (CPU, memory, network). Guided “Add Node” onboarding walks operators through the install command.
Routes & Fleet Terminology
The operator UI is standardized around Routes (/routes) and Fleet (/fleet). Legacy dashboard, stream, and client URLs redirect to the canonical pages.
Durable Assignment Tracking
Route-to-node assignments persist across control-plane restarts with per-resource epochs. Stale ownership updates from disconnected nodes cannot override newer placement decisions.
Ephyr Restreamer predecessor — 2021-2024
Fluxomni Studio continues the Ephyr Restreamer line. The predecessor releases established the single-host restreaming model, GraphQL control API, dashboard operations, deployment scripts, and media-server integrations that later evolved into Fluxomni routes, fleet nodes, artifacts, and operator automation.
Restreamer 0.8.0 — November 4, 2024
The final released Ephyr Restreamer line expanded playlist-oriented workflows, made playlists optional per restream, added playback encoding work, and introduced drag-and-drop ordering for inputs and outputs. It also improved memory and network statistics, moved images to GitHub Container Registry, updated FFmpeg to 6.0, updated SRS to v5-r3, switched GraphQL subscriptions to graphql-ws, and extracted shared GraphQL and SRS client code into reusable crates.
Restreamer 0.7.0 — April 17, 2023
Restreamer 0.7.0 added dashboard-wide Start All and Stop All controls, last command and error visibility, password-state indicators, input-stream information, file-backup playback metadata, Google Drive link normalization, input endpoint reordering, and server CPU-core visibility. Deployment gained default port opening, OpenTelemetry collector configuration, allowed-IP controls, and optional state clearing on restart. Runtime work moved logging to tracing, added OpenTelemetry trace support, updated SRS to v4.0-r4, and routed SRS and FFmpeg logs through the same tracing pipeline.
Restreamer 0.6.0 — October 2, 2022
Restreamer 0.6.0 expanded audio mixing and backup workflows. Outputs could use up to three TeamSpeak mixers, specify TeamSpeak identity, apply sidechain behavior, and change delay smoothly. Inputs gained multiple backups per input, clearer primary and playback naming, keyboard-friendly label editing, and more visible endpoint labels. The release also introduced graceful FFmpeg shutdown, FIFO-based mixer feeding, FFmpeg 5.1, SRS v4.0-r1, Ubuntu 20.04 images, Rust 1.64, Tokio v1, Actix v4, and broader frontend tooling updates.
Restreamer 0.5.0 — April 20, 2022
Restreamer 0.5.0 focused on dashboard operations and deployment portability. Operators gained CPU, memory, and network statistics, dashboard filters, export and import, title-bar connection-loss indication, search by label, and clearer input-number status markers. Deployments could be sourced from a custom Docker registry, and the embedded SRS server moved to v4.
Restreamer 0.4.0 — November 27, 2021
Restreamer 0.4.0 introduced the dashboard application, Docker-based deployment, VScale support, custom input labels, multiple-JSON input mode, preview links for broadcasts, public mixer output pages, YouTube preview embeds, copy buttons for input and output URLs, unstable status reporting, and a broader GraphQL schema with settings, IDs, and longer input keys. It also fixed several early operator-facing UI issues, including lingering errors, stale active inputs after deletion, wrong output indication, long-label trimming, and volume resets during output edits.
Restreamer 0.3.0 — May 11, 2021
Restreamer 0.3.0 added operator settings for server title and deletion confirmation, dashboard-level Start All and Stop All controls, input and output counts, bounded copyable error messages, and matching GraphQL settings mutations and subscriptions.
Restreamer 0.2.0 — March 18, 2021
Restreamer 0.2.0 reworked the original API around unified restream objects, import and export specs, backup endpoints, HLS endpoints and HLS pulling, output editing, DVR file management, and richer output destinations including TeamSpeak, MP3, Icecast, SRT, and local FLV recording. Deployment automation added Ubuntu 20.04 provisioning, optional firewalld setup, mounted-volume detection for DigitalOcean and Hetzner Cloud, and Oracle Cloud Infrastructure documentation.
Restreamer 0.1.2 — February 13, 2021
Restreamer 0.1.2 fixed incorrect default registry selection in the Ubuntu 20.04 provisioning script.
Restreamer 0.1.1 — February 5, 2021
Restreamer 0.1.1 fixed the broken GraphQL Playground in debug mode.
Restreamer 0.1.0 — January 26, 2021
The initial Ephyr Restreamer release shipped the core web UI, GraphQL API, Docker image, Ubuntu provisioning script, DigitalOcean and Hetzner deployment guides, RTMP push and pull inputs, output fan-out, online and offline status indicators, enable and disable actions, and optional Basic HTTP authentication.
Roadmap
Fluxomni Studio self-host is built for teams that need dependable live operations under their own control. This roadmap focuses on operator and client outcomes, not internal platform work.
Timelines are intentionally absent because priorities shift with customer deployments, Design Partner feedback, and active production incidents. For the current active backlog, follow the fluxomni-selfhost issue tracker.
Available now
The current self-host release covers the production workflows most teams need before building deeper integrations.
- One source to every destination. Ingest over RTMP, SRT, or WebRTC, then send the same program to RTMP, SRT, and Icecast destinations without per-output software caps.
- Per-destination audio control. Keep program audio, select a source track or channel, mute origin audio, or apply mix-ins per output while keeping one backend-owned output contract.
- Always-on channel playout. Run 24/7 channels from local files, Google Drive assets, playlists, or fallback loops so a live route can recover without a manual scramble.
- Scheduled playlist starts. Arm one-shot sequential starts, replay completed queue rows, and keep played state visible without blocking playlist clearing or replay.
- Reusable media library. Upload, import, tag, bulk tag, bulk delete, filter, and reuse artifacts across playlists, fallback loops, and route workflows from the operator UI.
- Storage-aware operations. See usable capacity, configured headroom, top consumers, recent storage rejections, durable object rows, private fetch URLs, and derived-artifact policy before large uploads or imports fail.
- Learned media baselines. Teach route media profiles from real files or observed live sources, save custom profiles, and reject incompatible playlist or live-source media before it reaches the media node.
- Public automation surface. Use the stable GraphQL schema, session-aware TypeScript client, generated operations, subscription examples, mutation result payloads, and AI-readable automation recipes for route, playlist, artifact, settings, and Fleet workflows.
- Fleet and failover visibility. Add regional media nodes, pin routes when needed, and see route, node, and failover health in the Control Surface and Attention feed.
- Recording catalog safety. Recording rows participate in catalog-backed modals and runtime checks, while non-durable DVR files stay cache-like and object-storage rows reject unsafe overwrites.
- Controlled self-host access. Run behind public DNS, a reverse proxy, Tailscale, WireGuard, NetBird, or Cloudflare Tunnel, with named operators and role-based access.
- Pinned, recoverable installs. Use canonical public release pins such as
v26.2.4, plan recovery with matching state and images, or trackedgeonly when you intentionally want main-branch builds.
In focus
These are the next product areas being shaped with active users and Design Partners.
- Event-driven automation. Trigger route changes, output toggles, playlist boundaries, fallback behavior, and notifications from real stream events instead of one-off scripts.
- Client-ready media workspaces. Build clearer client, show, campaign, and channel organization on top of the shipped artifact tags, bulk operations, route usage checks, and baseline compatibility signals.
- Recording-to-reuse flow. Promote live recordings into managed artifacts that can be reviewed, tagged, replayed, or used as fallback content without leaving the platform.
- Operator handoff polish. Improve guided setup, copyable endpoint instructions, and status explanations so non-developer operators can run daily workflows confidently.
On the roadmap
Further out items are larger workflow expansions. Scope and sequencing are still being shaped by deployments.
- Deeper integrations. Webhooks, Slack or Teams alerts, richer storage-provider controls, and handoffs into client delivery systems.
- Distributed media jobs. Fleet-backed transcode, proxy generation, clip export, and packaging jobs for teams with larger media libraries.
- Automated highlight generation. Produce reviewable short clips from long-form source material and route them back into the artifact library.
- Client workspaces. Separate operational views, assets, and route templates for agencies or teams serving multiple brands.
Become a Design Partner
Teams serious about the In Focus and Roadmap areas can join the Platform Early Access program. Apply via email with a short description of your use case: current deployment, channels or clients served, the workflows you want automated, and what would unblock your operators.